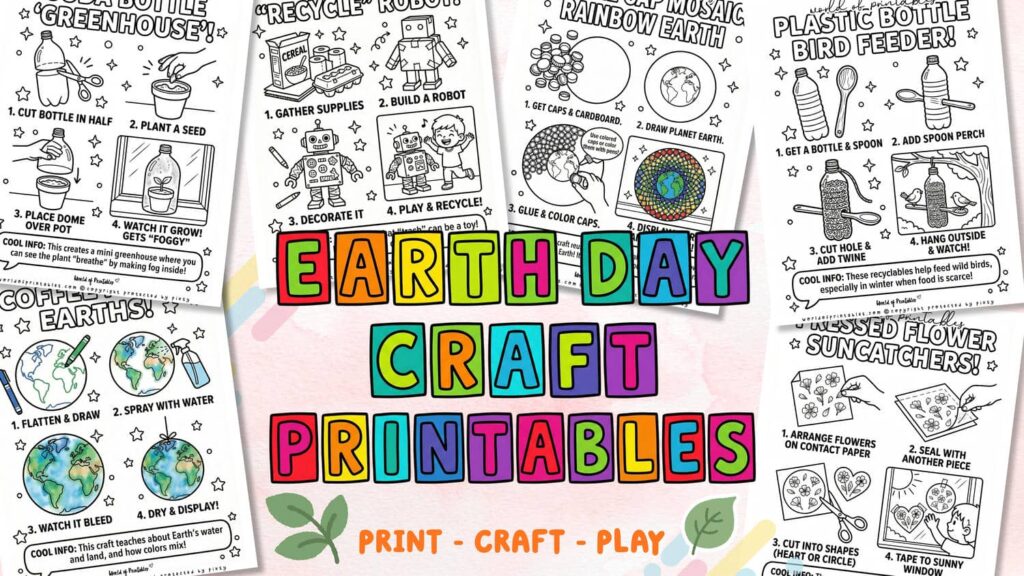
Earth Day is just around the corner, and there is no better way to celebrate our beautiful planet than by getting hands-on with some eco-friendly crafting! As a parent (or teacher), finding ways to explain sustainability to kids can feel a bit heavy.
That’s why I’m a huge fan of “Upcycled Art.” By using materials we already have in our recycling bins – like bottle caps, cardboard, and old newspapers – we show kids that “waste” is just a resource waiting for a little imagination (and we save money on craft items)!
In this post, I’m sharing 10 unique Earth Day crafts complete with free printable instructions for every single one! Whether you are looking for a classroom project or a rainy-day activity at home, these crafts are designed to be simple, colorful, and meaningful.
What You’ll Find in This Post:
- Visual Step-by-Step Printables: Perfect for kids to follow along.
- Low-Cost Materials: Most items are already in your recycling bin!
- Teachable Moments: Tips on how to talk about recycling while you craft.
Scroll down to find your favorite project, click any Little Maker’s Visual Guide image to open the printable PDF, and let’s start saving the planet, one craft at a time!
💡 Teacher/Parent Tip: Print out The Little Maker’s Visual Guide and set it on the table. It’s designed so kids can follow the pictures and lead the craft themselves – giving them a huge boost of “I did it!” confidence!
Bottle Cap Mosaic: Rainbow Earth

This craft is a brilliant way to reuse those plastic bottle caps that often can’t be recycled curbside. By arranging them in a vibrant rainbow around a hand-colored Earth, kids create a 3D masterpiece that pops off the page. It’s a fantastic lesson in color sorting and fine motor skills!
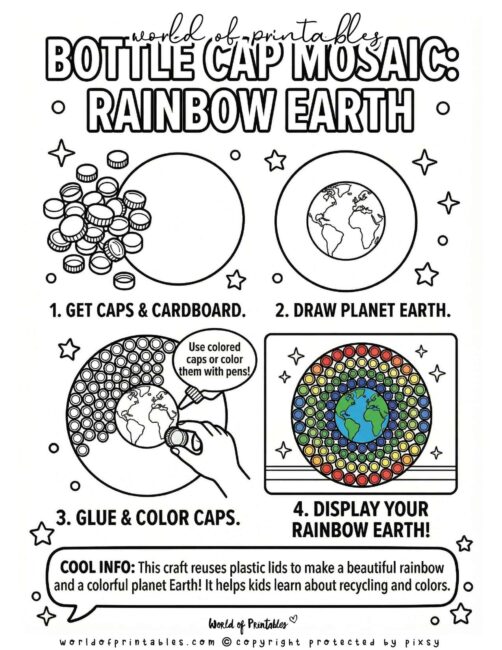
How to Build Your Mosaic (Using The Little Maker’s Visual Guide)
Materials Needed:
- Cardboard base (an old shipping box or cereal box works great)
- Assorted plastic bottle caps (various colors and sizes)
- Markers or pens (Blue, green, and a black permanent marker)
- School glue (white liquid glue works best for caps)
- Scissors
To get the best results, we recommend printing out our The Little Maker’s Visual Guide to keep on the table during the craft.
- Follow the Blueprint: Use Step 1 on the guide to gather your supplies. Having the visual checklist helps kids ensure they have enough caps before they start gluing!
- Trace the Guide: Use the circles on the The Little Maker’s Visual Guide as a reference for how large to draw your cardboard base.
- Color Reference: Use the Step 3 illustration to help kids visualize the “Rainbow Ring” pattern. It shows exactly where the glue goes so they don’t over-saturate the cardboard.
- The Final Check: Once you reach Step 4 on the guide, your project is ready for the “Dry Test” before the final glue-down!
Nature Art: Easy Leaf Rubbings
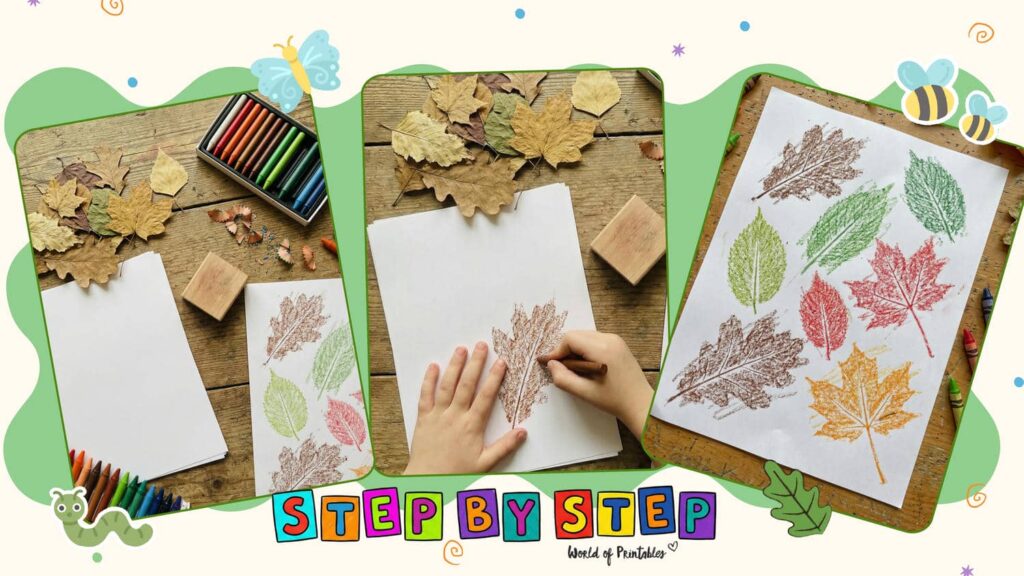
Celebrate Earth Day by exploring the beauty of nature firsthand! This classic “low-prep” craft turns a backyard walk into an art adventure, teaching kids to notice the unique textures and shapes found in local plants.
This activity is a great introduction to biology, showing how a leaf’s veins carry water and food – just like the veins in our own bodies!
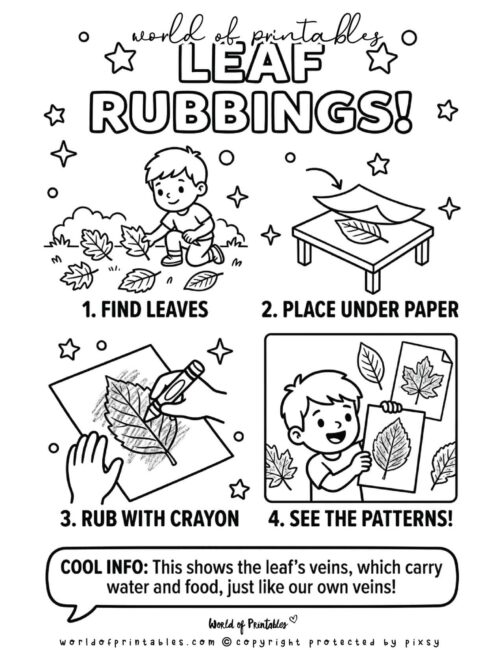
How to Create Your Leaf Rubbings (Using The Little Maker’s Visual Guide)
Materials Needed:
- Fresh leaves (various shapes and sizes)
- Thin white paper
- Crayons (peel the paper off for better rubbing)
- A flat surface
To get the best results, we recommend printing out our The Little Maker’s Visual Guide to keep on the table during the craft.
- Find Your Leaves: Head outside to collect leaves with different shapes and textures.
- Setup: Place your leaf under a sheet of paper on a flat surface.
- Rub and Reveal: Use a crayon to rub over the paper until the leaf’s pattern appears.
- See the Patterns: Look closely at the veins you’ve revealed to see how the leaf grew!
Wearable Art: Nature Bracelets
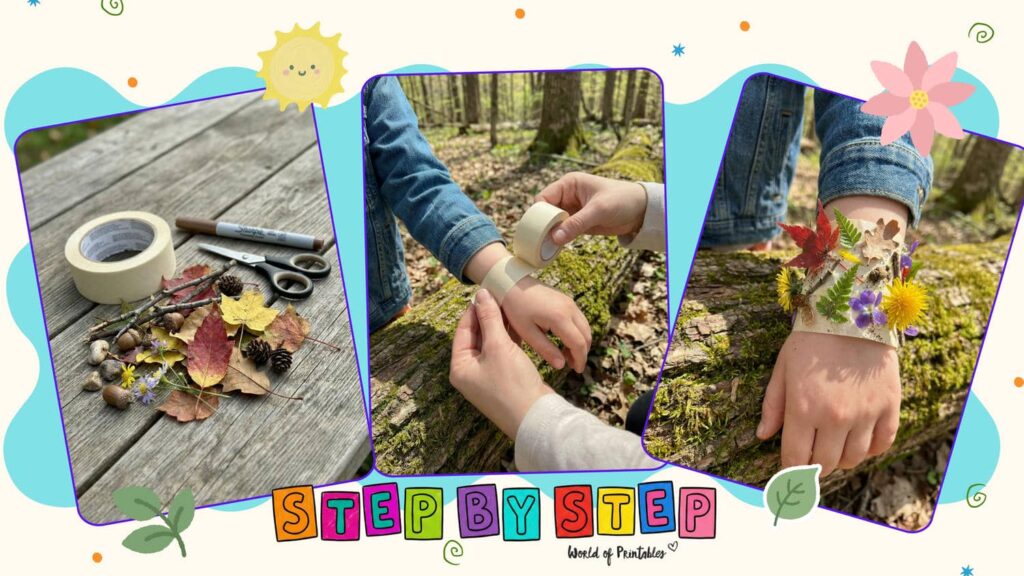
Turn a simple walk into a sensory scavenger hunt with these fun Nature Bracelets! This is a fantastic “zero-prep” craft that encourages kids to discover different textures and colors in the world around them while creating their own wearable art.
These bracelets are a wonderful way for little ones to explore nature up close, allowing them to collect “treasures” like fallen petals, tiny leaves, and interesting twigs.

How to Create Your Nature Bracelet (Using The Little Maker’s Visual Guide)
Materials Needed:
- Masking tape
- A pair of curious hands!
- Natural items (leaves, small flowers, grass, etc.)
To get the best results, we recommend printing out our The Little Maker’s Visual Guide to keep on the table during the craft.
- Prepare the Base: Follow Step 1 on your guide by wrapping a piece of masking tape around your child’s wrist with the sticky side facing out.
- Go for a Walk: Head outside to find small, fallen items from nature.
- Stick and Decorate: Press your nature finds directly onto the tape to decorate your bracelet.
- Wear and Explore: Once the tape is full, wear your creation with pride and continue exploring!
Backyard Habitat: Plastic Bottle Bird Feeder
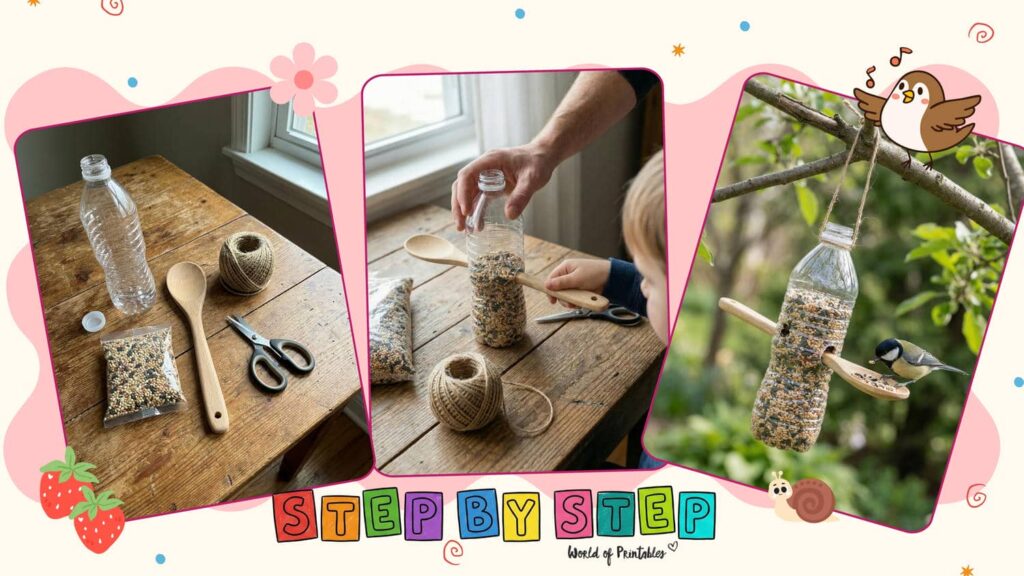
Help your local wildlife by turning a single-use plastic bottle into a handy bird feeder! This project is a great way to recycle while helping to feed wild birds, especially during the winter months when their natural food sources are scarce.
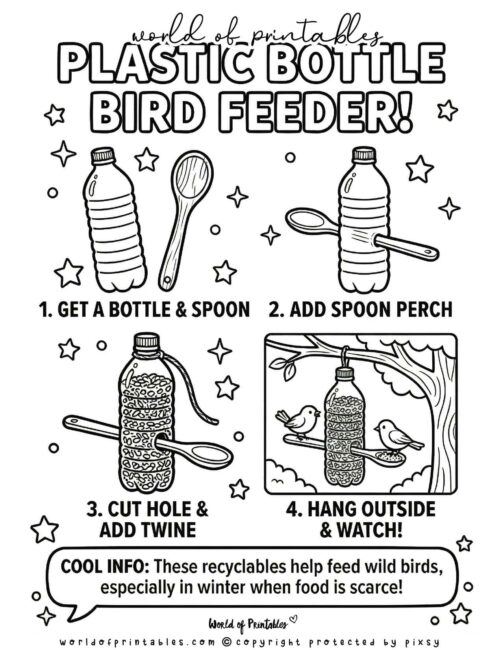
How to Build Your Bird Feeder (Using The Little Maker’s Visual Guide)
Materials Needed:
- Empty plastic bottle
- Wooden spoon (to act as a perch)
- Twine or string
- Birdseed
- Scissors or a craft knife (Adult supervision required!)
To get the best results, we recommend printing out our The Little Maker’s Visual Guide to keep on the table during the craft.
- Prepare Your Parts: Grab an empty bottle and a wooden spoon.
- Add the Perch: Carefully create holes in the sides of the bottle to slide your spoon through. This gives the birds a place to sit while they eat!
- Fill and Prep: Cut a small hole just above the spoon so the seed can spill out, then tie twine around the neck of the bottle.
- Hang and Watch: Hang your feeder from a sturdy tree branch outside and see which feathered friends come to visit!
Eco-Friendly Gardening: Egg Carton Gardens
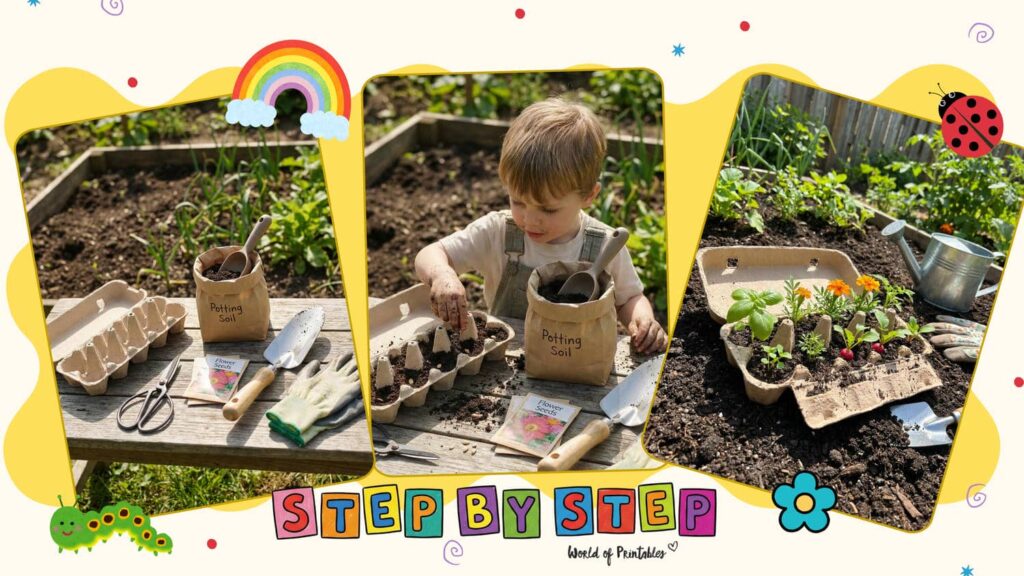
Start your own mini garden while recycling at the same time! These cardboard cartons are perfect for seedlings because they can eventually be planted straight into the ground, where they break down naturally to help nourish the soil.
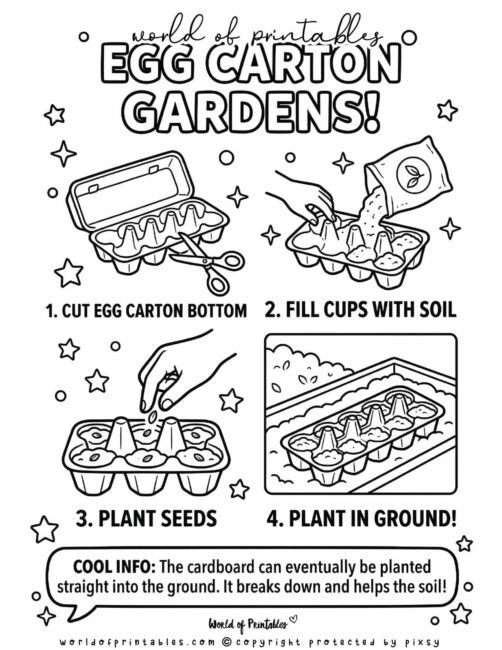
How to Grow Your Garden (Using The Little Maker’s Visual Guide)
Materials Needed:
- Empty cardboard egg carton
- Potting soil
- Plant seeds
- Scissors
To get the best results, we recommend printing out our The Little Maker’s Visual Guide to keep on the table during the craft.
- Cut Carton: Cut out the bottom section of your egg carton.
- Fill: Add potting soil to each of the individual cups.
- Plant: Place your seeds into the soil.
- Relocate: Once they sprout, plant the whole cardboard cup into the ground.
Upcycled Windowsill Garden: Tin Can Planters
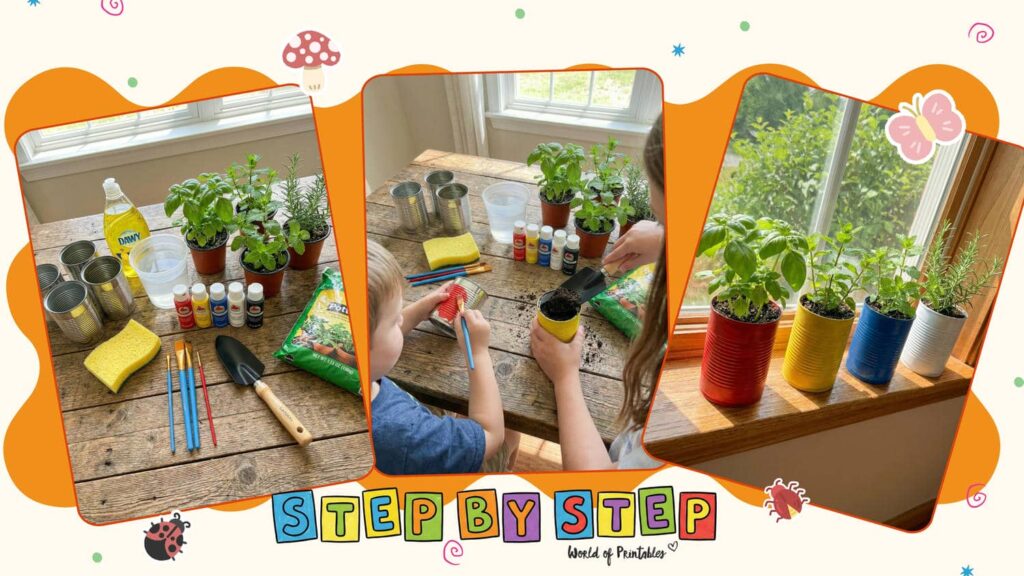
Give your old pantry staples a second life by turning empty tin cans into charming planters! This is a wonderful way to teach kids about upcycling while starting a mini herb garden on your windowsill.
Just remember to poke a few drainage holes in the bottom before you start decorating to ensure your new plants get exactly the amount of water they need to thrive!
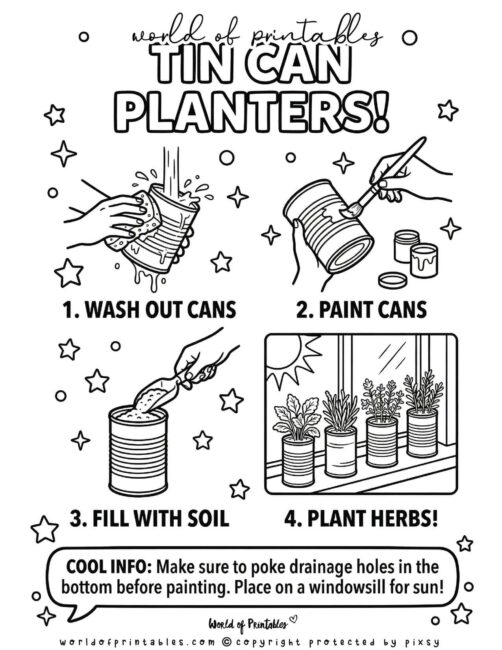
How to Make Tin Can Planters (Using The Little Maker’s Visual Guide)
Materials Needed:
- Empty tin cans (washed and dried)
- Paint and brushes
- Potting soil
- Herb seeds or small plants
- A hammer and nail (for adult use to make drainage holes)
To get the best results, we recommend printing out our The Little Maker’s Visual Guide to keep on the table during the craft.
- Clean Your Cans: Follow Step 1 by thoroughly washing out your empty cans and removing any sharp edges.
- Add Some Color: Get creative in Step 2 by painting your cans with bright colors or fun patterns.
- Add the Foundation: Fill your decorated cans with potting soil as shown in Step 3.
- Plant Your Herbs: Finish Step 4 by planting your favorite herbs and placing the cans on a sunny windowsill to watch them grow!
Vibrant Science: Coffee Filter Earths
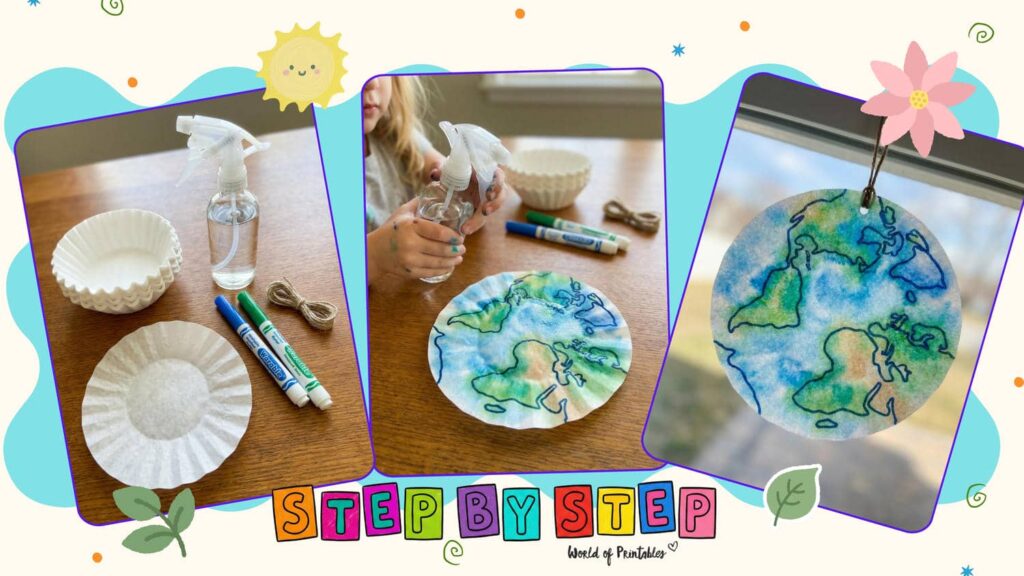
Bring the world to life with this beautiful, watercolor-style project! This craft is a perfect hands-on lesson in how colors mix and blend together, while also helping kids visualize the distribution of Earth’s land and water.
Simply by spraying a little water onto marker drawings, you can watch as your planet transforms into a soft, glowing masterpiece.
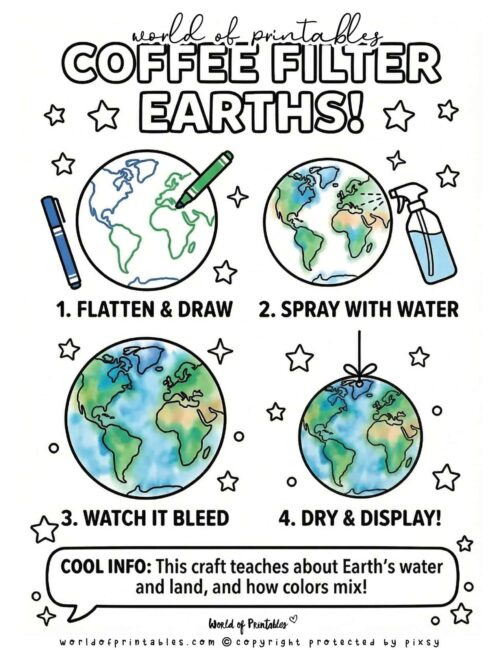
How to Create Coffee Filter Earths (Using The Little Maker’s Visual Guide)
Materials Needed:
- Round white coffee filters
- Washable markers (Blue and green)
- Spray bottle filled with water
- String for hanging
To get the best results, we recommend printing out our The Little Maker’s Visual Guide to keep on the table during the craft.
- Flatten and Draw: Start with a flat coffee filter and use your markers to draw the continents in green and the oceans in blue as shown in Step 1.
- Mist with Water: Follow Step 2 by lightly spraying the filter with water.
- Watch the Magic: Observe in Step 3 as the colors begin to bleed and blend together to create a watercolor effect.
- Dry and Hang: Once your planet is dry, follow Step 4 by adding a string to display your creation in a sunny window!
Imaginative Play: Cardboard Box “Recycle” Robot
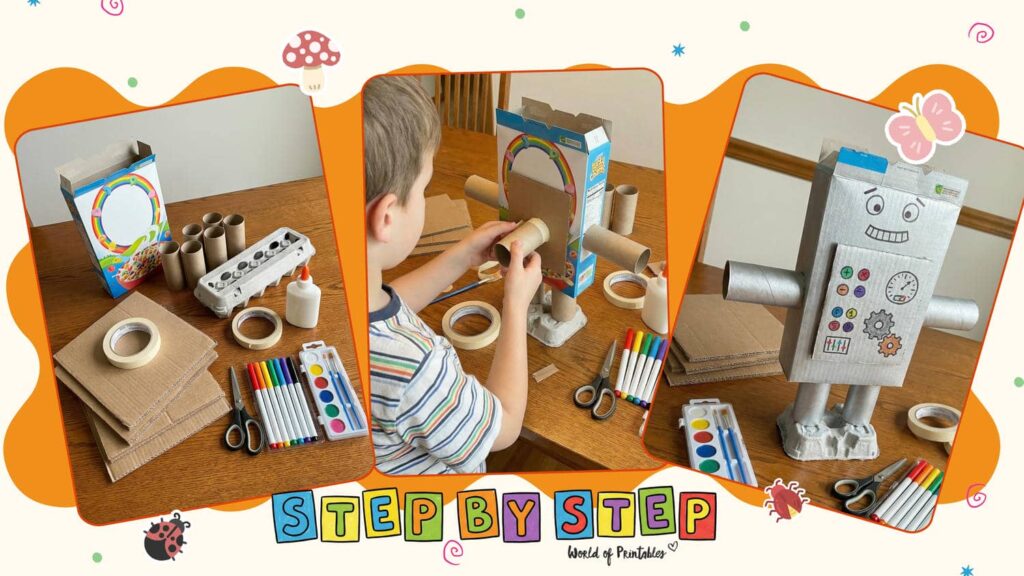
Unleash your child’s inner engineer by transforming empty pantry boxes and paper rolls into a one-of-a-kind robot! This project is a wonderful way to show kids that “trash” can truly become a treasure, teaching them that reusing everyday items helps protect our planet while sparking endless hours of creative play.
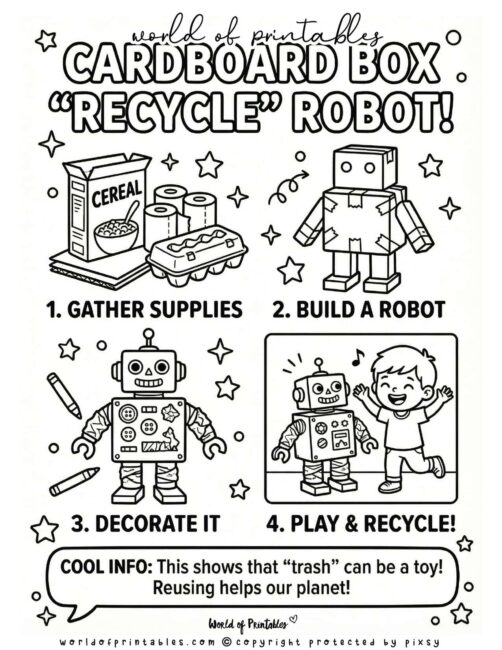
How to Build a Recycle Robot (Using The Little Maker’s Visual Guide)
Materials Needed:
- Empty cardboard boxes (cereal boxes, shoe boxes, etc.)
- Paper rolls (toilet paper or paper towel rolls)
- Tape or glue
- Markers, buttons, or foil for decorating
To get the best results, we recommend printing out our The Little Maker’s Visual Guide to keep on the table during the craft.
- Gather Your Supplies: Follow Step 1 by hunting through your recycling bin for different-sized boxes and rolls.
- Build Your Robot: Use tape or glue to connect your boxes for a body and head, and rolls for the arms and legs as shown in Step 2.
- Decorate It: Get creative in Step 3 by using markers, buttons, or even aluminum foil to give your robot its own unique personality.
- Play and Recycle: Once you’re finished playing, remember that these materials can still be recycled, completing the cycle of helping our Earth!
Nature’s Stained Glass: Pressed Flower Suncatchers

Bring the colors of the garden indoors with these stunning pressed flower suncatchers! This project is a wonderful way to preserve the beauty of spring blooms, as the clear contact paper catches the sunlight and makes the flower colors glow brilliantly in your window.
It’s a simple, mess-free way for kids to create “stained glass” art while appreciating the delicate details of different plants and petals.

How to Create Suncatchers (Using The Little Maker’s Visual Guide)
Materials Needed:
- Clear contact paper
- Fresh flowers and petals
- Scissors
- Tape
To get the best results, we recommend printing out our The Little Maker’s Visual Guide to keep on the table during the craft.
- Arrange Your Nature Finds: Follow Step 1 by laying out your favorite flowers and petals onto the sticky side of a piece of contact paper.
- Seal the Design: Carefully place a second sheet of contact paper on top to seal your flowers inside, as shown in Step 2.
- Cut Your Shapes: Use your scissors in Step 3 to cut the paper into fun shapes like hearts or circles.
- Display in the Sun: Finish Step 4 by taping your finished suncatcher to a sunny window and watching the colors light up!
Backyard Science: Soda Bottle Greenhouse
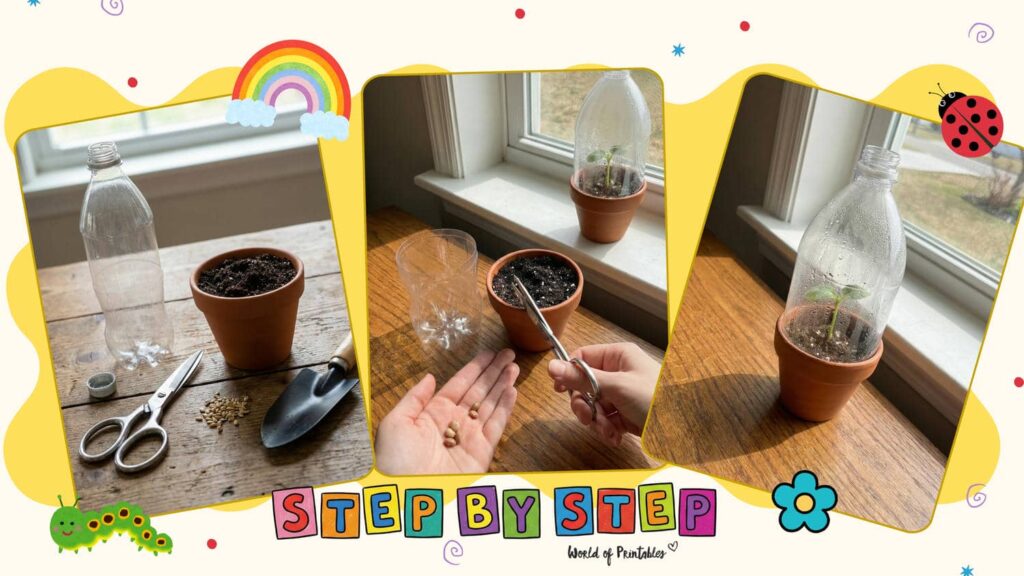
Transform an ordinary plastic bottle into a miniature ecosystem! This project is a fascinating way to show kids how a greenhouse works to trap warmth and moisture, allowing them to see their plant “breathe” as fog forms inside the dome. It’s a wonderful hands-on lesson in biology and the water cycle that you can watch right from your windowsill.
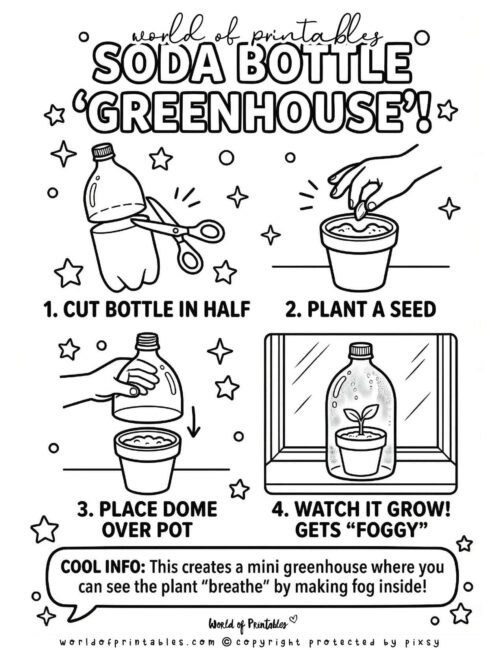
How to Build a Mini Greenhouse (Using The Little Maker’s Visual Guide)
Materials Needed:
- Empty plastic soda bottle (clear works best)
- Small pot with soil
- Plant seeds
- Scissors
To get the best results, we recommend printing out our The Little Maker’s Visual Guide to keep on the table during the craft.
- Prepare the Dome: Have an adult help you carefully cut a clear plastic bottle in half to create your greenhouse lid.
- Start Your Plant: Fill a small pot with soil and gently press your seed into the center.
- Create the Seal: Place the top half of the bottle directly over your pot to trap the air and moisture inside.
- Observe the Magic: Place it in a sunny spot and watch as the inside gets “foggy” – this means your mini-environment is working perfectly!
Let’s Keep Saving the Planet!
By turning your recycling bin into an art studio, you’re showing kids that “waste” is just a resource waiting for a little imagination. We hope these Little Maker’s Visual Guides help your family celebrate Earth Day with creativity and confidence!
If you would like to try more crafts then check out our Ultimate Collection of Crafts for Kids!
More Earth Day Printables
Looking for more ways to celebrate? Check out these other free resources:
- Free Earth Day Activity Hub: Crafts, Scavenger Hunts, and More
- Earth Day Coloring Pages: Fun and relaxing for all ages.
- Recycling Scavenger Hunt: The perfect companion for a nature walk.
Follow World of Printables on Pinterest
COPYRIGHT
The printables that you find here are the copyright of World of Printables – you cannot redistribute or sell any of these printables or templates, although you can link back to our website.
AI TRANSPARENCY: Whilst the majority of our creations have been created completely traditionally, occasionally we utilize AI tools in our design process. We acknowledge the advancements in AI technology and leverage them responsibly to optimize our creative output. However, it is important to note that our utilization of AI does not compromise the human element of our work. Our commitment to delivering high-quality designs through a balanced integration of traditional expertise and AI enhancements remains paramount.