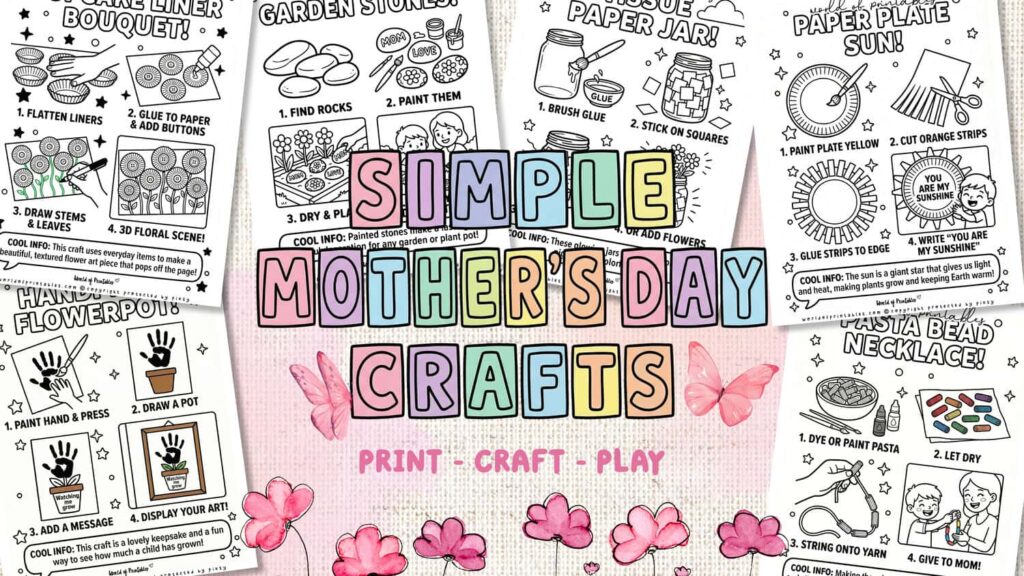
Show Mom or Grandma exactly how much she is loved with a handmade gift from the heart! These 10 simple Mother’s Day crafts are perfect for kids who want to create thoughtful, personalized treasures using easy-to-find materials. From floral keepsakes to custom cards, these projects turn a creative afternoon into a meaningful celebration.
What You’ll Find in This Post:
- Visual Step-by-Step Printables: Simple guides designed for kids to lead the way and build confidence while they create.
- Heartfelt & Recycled Materials: We transform common household items and garden finds into beautiful gifts Mom will cherish forever.
- Moments of Gratitude: Fun prompts to help kids express their favorite things about Mom as they craft.
Scroll down to find your favorite project, click any Visual Guide image to open the printable PDF, and let’s start creating something beautiful for Mom!
💡 Teacher/Parent Tip: Print out The Little Maker’s Visual Guide and set it on the table. It’s designed so kids can follow the pictures and lead the craft themselves – giving them a huge boost of “I did it!” confidence!
DIY Keepsake: Button Flower Card
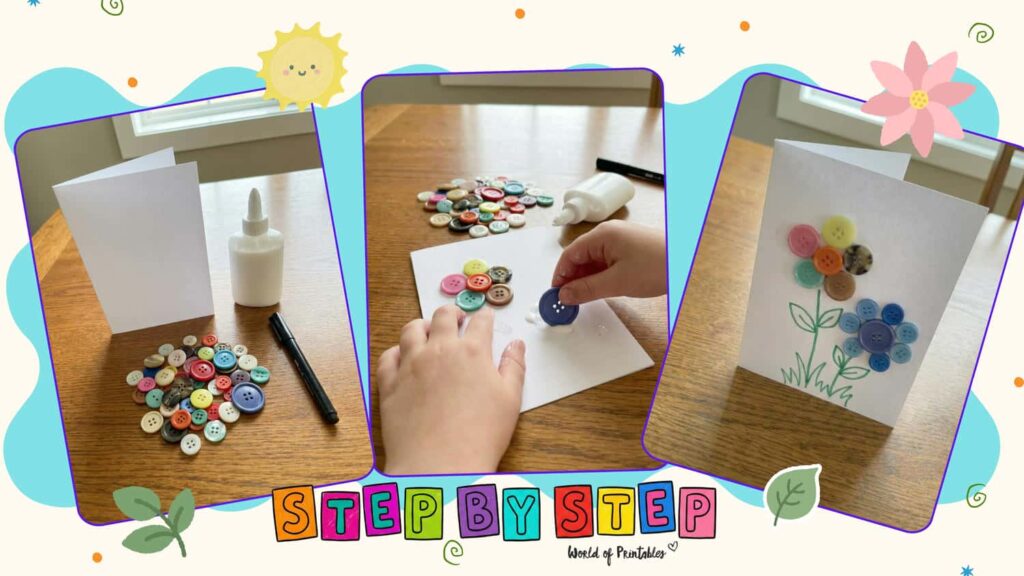
There’s something so nostalgic about a jar of mismatched buttons. This project turns those colorful bits and bobs into a textured little garden. It’s a great way for kids to work on their fine motor skills while making a card that feels much more special than anything you’d pick up at the store.
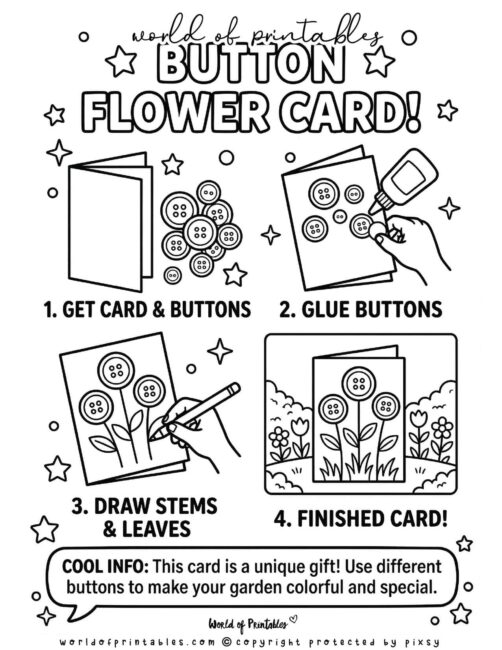
How to Make a Button Flower Card (Using The Little Maker’s Visual Guide)
Materials Needed:
- Cardstock or Blank Card: A sturdy base for your floral design.
- Assorted Colorful Buttons: These act as your bright, textured flower heads.
- Colored Marker: Used to hand-draw stems, leaves, and the grass at the bottom.
- Craft Glue: To securely attach your buttons to the card.
To get the best results, we recommend printing out our The Little Maker’s Visual Guide to keep on the table during the craft.
- Get Card & Buttons: Start with a blank folded card and gather a variety of colorful buttons.
- Glue Buttons: Arrange your buttons on the front of the card and glue them down to form the flower tops.
- Draw Stems & Leaves: Use a colored marker to draw stems and leaves connecting each button to the ground.
- Finished Card: Add a heartfelt message inside, and your garden card is ready for Mom!
Sweet & Simple: Handmade Butterfly Bookmark
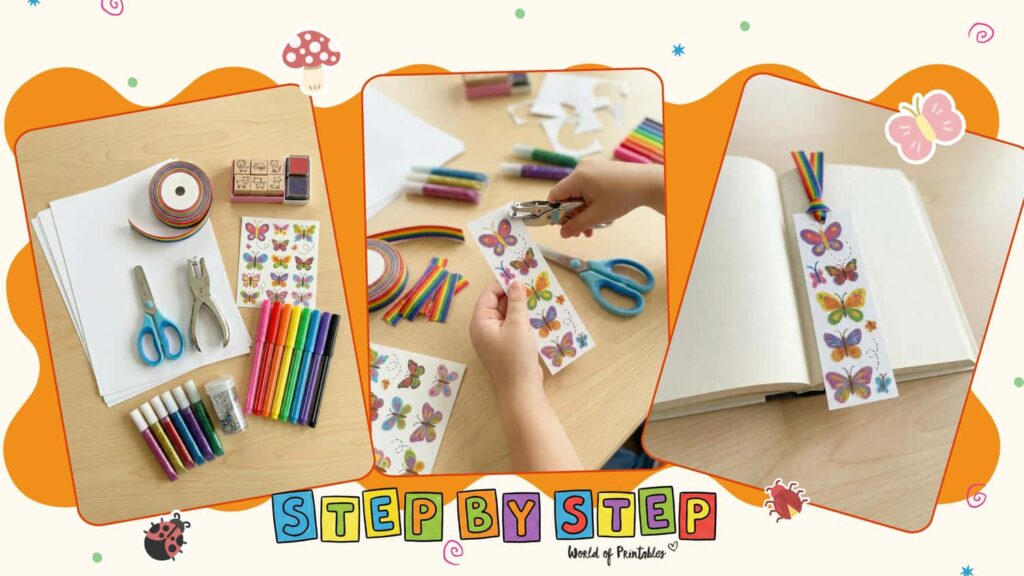
If she’s always got a book on the go, a custom bookmark is such a thoughtful little win. It’s an easy afternoon project that lets kids get creative with stickers and stamps without making a huge mess. Plus, the cute tassel at the top makes it look really finished.
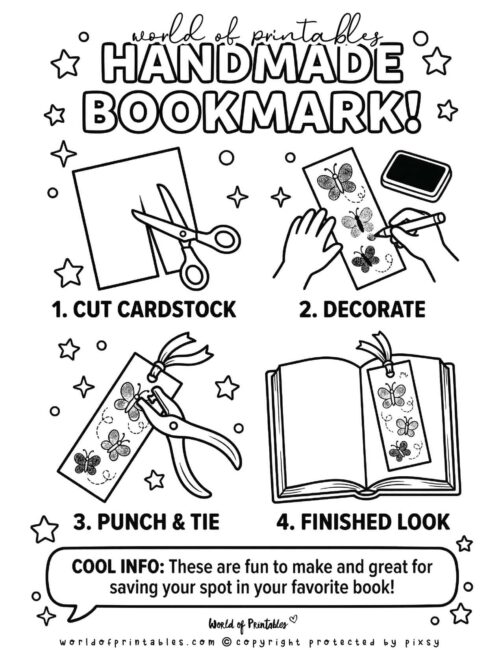
How to Make a Handmade Bookmark (Using The Little Maker’s Visual Guide)
Materials Needed:
- White Cardstock: A thick, durable base to ensure the bookmark lasts.
- Fun Stickers or Stamps: For adding colorful and fun designs.
- Markers & Glitter Glue: To add vibrant details and a bit of holiday sparkle.
- Colorful Ribbon: To create a decorative tassel at the top.
- Hole Punch: To make a precise spot for the ribbon.
- Scissors: To cut the cardstock into the perfect bookmark shape.
To get the best results, we recommend printing out our The Little Maker’s Visual Guide to keep on the table during the craft.
- Cut Cardstock: Start by cutting a rectangular strip out of your white cardstock.
- Decorate: Use stickers, markers, or stamps to decorate the strip with beautiful patterns and colors.
- Punch & Tie: Use a hole punch at the top of the bookmark and thread your ribbon through, tying it securely.
- Finished Look: Your personalized bookmark is ready to be tucked into a book as a sweet Mother’s Day surprise!
Nature-Inspired: Painted Garden Stones
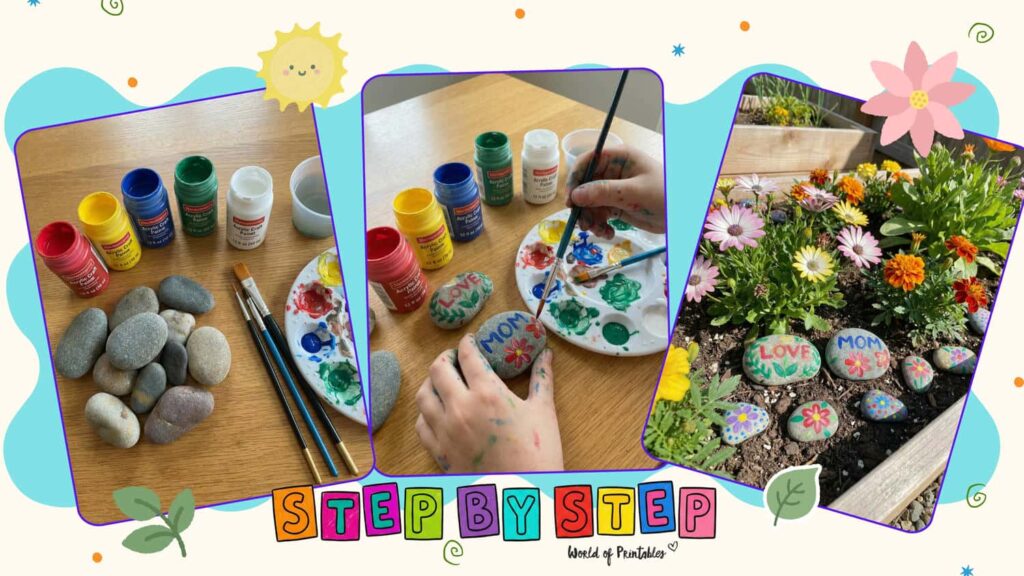
Next time you’re out for a walk, have the kids keep an eye out for smooth stones. Bringing the outdoors in (or just decorating the porch) with some hand-painted art is a classic for a reason. These look beautiful tucked into a flower pot or lining a garden path.
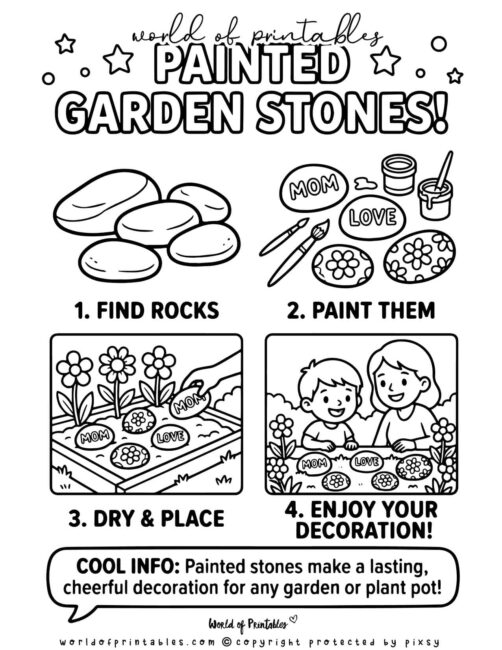
How to Make Painted Garden Stones (Using The Little Maker’s Visual Guide)
Materials Needed:
- Smooth Rocks: Find a variety of flat, smooth stones from the garden or beach.
- Acrylic Paint & Brushes: Use bright, durable colors and a palette for mixing.
- Water Cup: To keep your brushes clean between different colors.
To get the best results, we recommend printing out our The Little Maker’s Visual Guide to keep on the table during the craft.
- Find Rocks: Start by collecting several smooth rocks of different sizes.
- Paint Them: Use your acrylic paints to add colorful designs, floral patterns, or words like “MOM” and “LOVE”.
- Dry & Place: Let your stones dry completely before placing them in a garden bed or a windowsill planter.
- Enjoy Your Decoration: Admire your handmade art as it brings a smile to Mom every time she sees her garden!
Happy Art: Paper Plate Sunshine
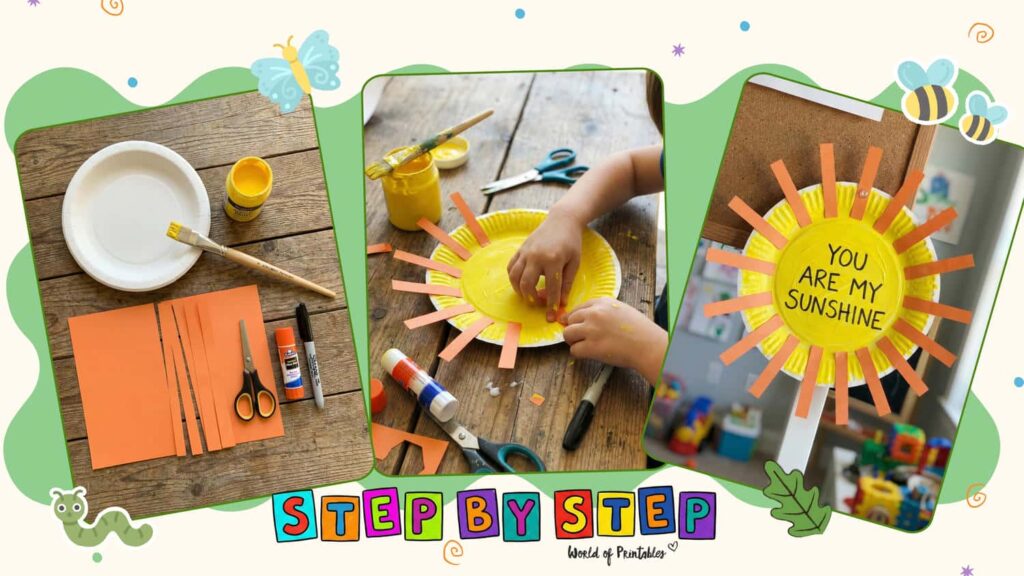
This one is pure joy on a plate. It’s the perfect “rainy day” craft that uses stuff you likely already have in the kitchen cupboard. It’s cheerful, bright, and looks great hanging on the fridge or a bedroom door.
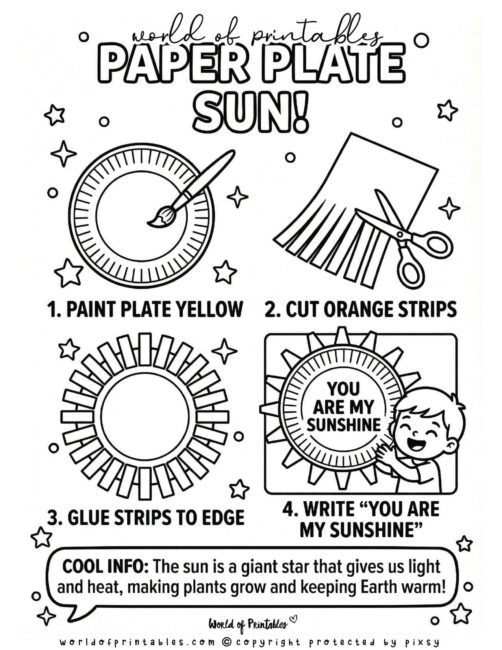
How to Make a Paper Plate Sun (Using The Little Maker’s Visual Guide)
Materials Needed:
- Paper Plate: The sturdy base for your bright sun.
- Yellow Paint & Brush: To give your sun its glowing color.
- Orange Paper: For creating the sun’s rays.
- Black Marker: To write your heartfelt Mother’s Day message.
- Glue Stick: To secure the rays around the edge.
- Scissors: To cut your paper strips to the right length.
To get the best results, we recommend printing out our The Little Maker’s Visual Guide to keep on the table during the craft.
- Paint Plate Yellow: Cover the entire surface of your paper plate with bright yellow paint and let it dry.
- Cut Orange Strips: While the plate dries, cut several thin strips of orange paper to act as the sun’s rays.
- Glue Strips to Edge: Apply glue to the back edge of the plate and attach the orange strips all the way around the rim.
- Write “You Are My Sunshine”: Use your marker to write the sweet message “You Are My Sunshine” right in the center of the plate.
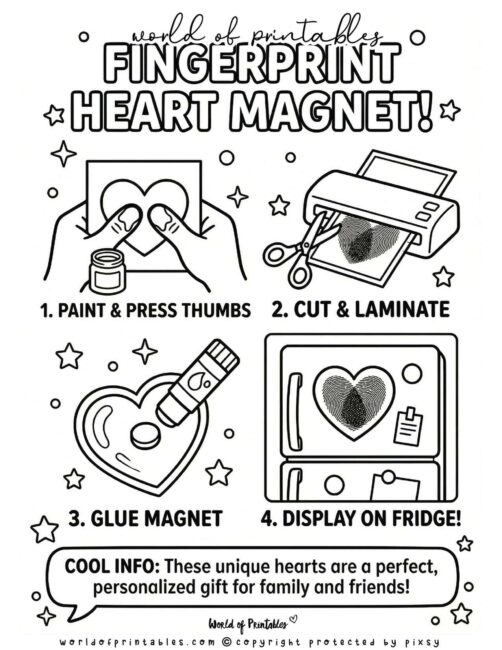
A Personal Touch: Fingerprint Heart Magnets
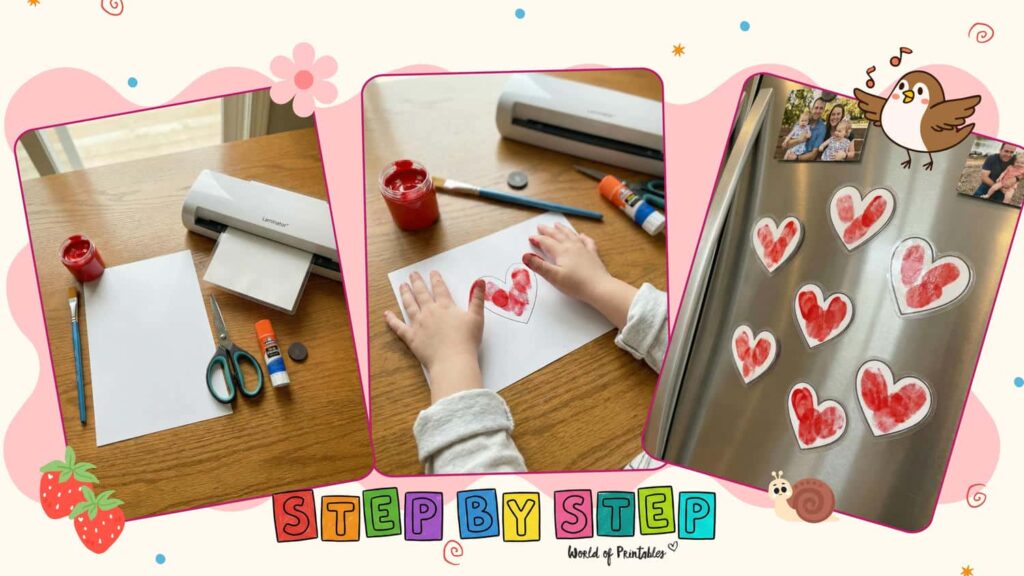
There’s nothing quite like a tiny thumbprint to make a gift feel personal. These little magnets are so simple to put together, but they end up being the kind of things people keep for years. Laminating them keeps the colors bright and ensures they survive the busy life of a kitchen fridge.
How to Make Fingerprint Heart Magnets (Using The Little Maker’s Visual Guide)
Materials Needed:
- White Paper: Your starting point.
- Red Paint: For those little heart-shaped prints.
- Laminator: To make them durable and glossy.
- Small Magnets: To make them stick.
- Glue & Scissors: For the final assembly.
To get the best results, we recommend printing out our The Little Maker’s Visual Guide to keep on the table during the craft.
- Stamp Your Heart: Paint a thumb and press it twice in a “V” shape to make a heart.
- Trim & Protect: Cut around the heart and run it through the laminator.
- Magnetic Backing: Glue a small magnet to the back of your heart.
- Fridge Ready: Stick it up and enjoy a little bit of handmade love every day.
Bright & Textured: Cupcake Liner Bouquet
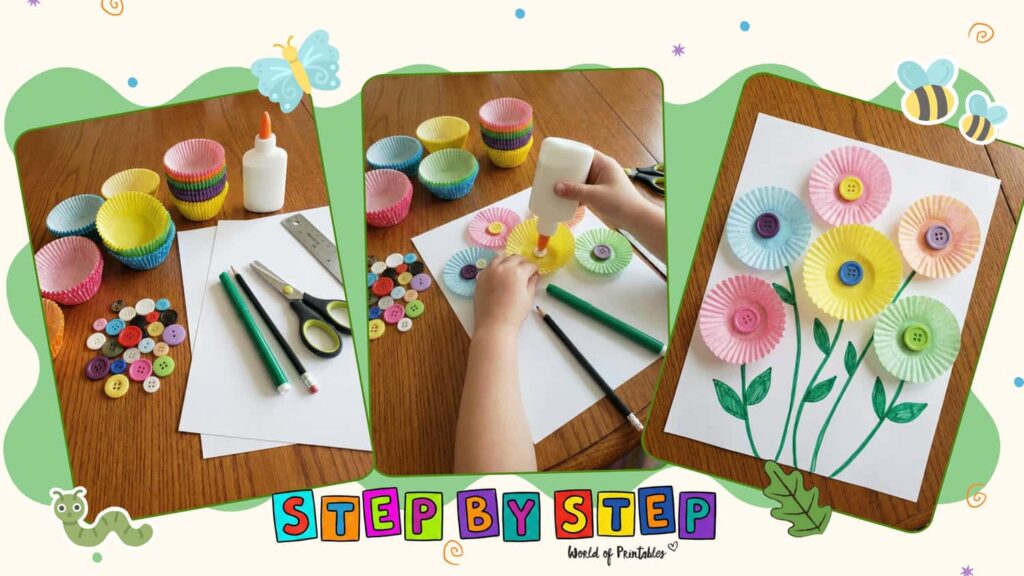
If you have a stash of colorful cupcake liners in the pantry, you’re halfway to a beautiful 3D floral scene. This craft is great because it adds some fun texture that pops right off the page, making it feel more like a piece of art than a flat drawing. It’s a simple way for kids to build a bouquet that stays bright all year round.
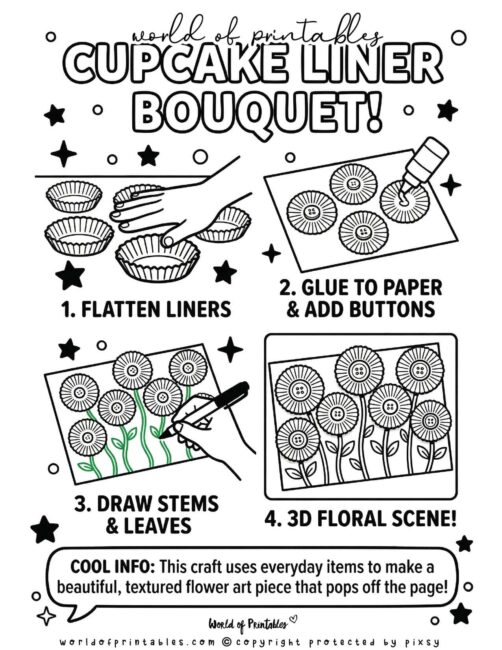
How to Make a Colorful Bouquet (Using The Little Maker’s Visual Guide)
Materials Needed:
- Colorful Cupcake Liners: These create perfect, ruffled flower petals.
- Assorted Buttons: For those colorful, textured centers.
- White Paper: Your background for the garden scene.
- Green Marker: To add your stems and leaves.
- Craft Glue: To keep your liners and buttons in place.
To get the best results, we recommend printing out our The Little Maker’s Visual Guide to keep on the table during the craft.
- Flatten Your Liners: Take your cupcake liners and press them down flat against your paper.
- Glue & Button Up: Glue the flattened liners down and add a colorful button right in the center of each one.
- Draw the Garden: Use your green marker to draw long stems and leafy details reaching up to your flowers.
- Display Your Work: Now you have a vibrant, 3D floral masterpiece ready to share!
Sweet Keepsake: Handprint Flowerpot
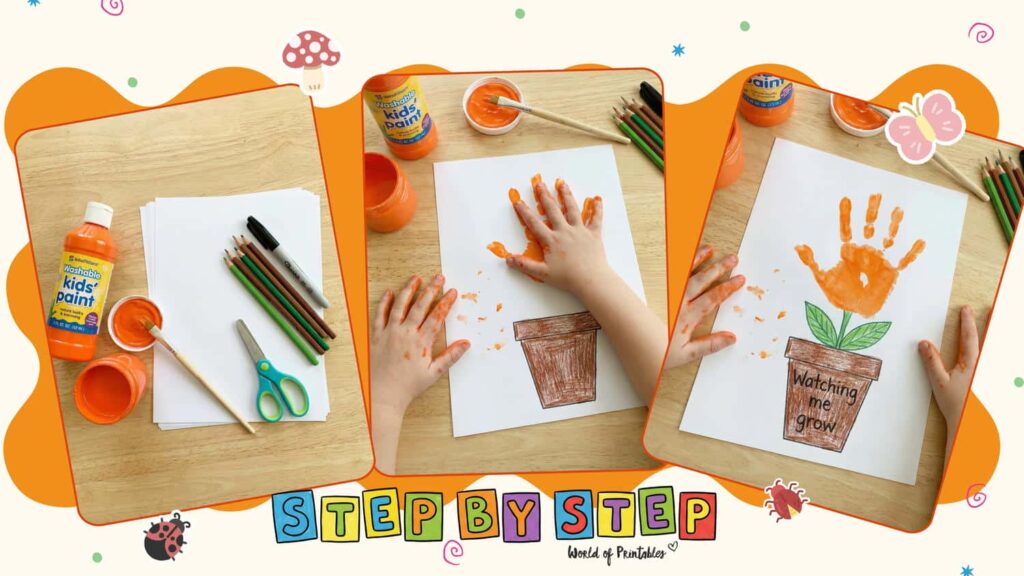
There is something so special about a gift that captures how much a child has grown. This handprint flowerpot does exactly that, turning a simple handprint into a blooming flower. It’s a classic, heartfelt project that makes a wonderful framed memory for any desk or mantle.
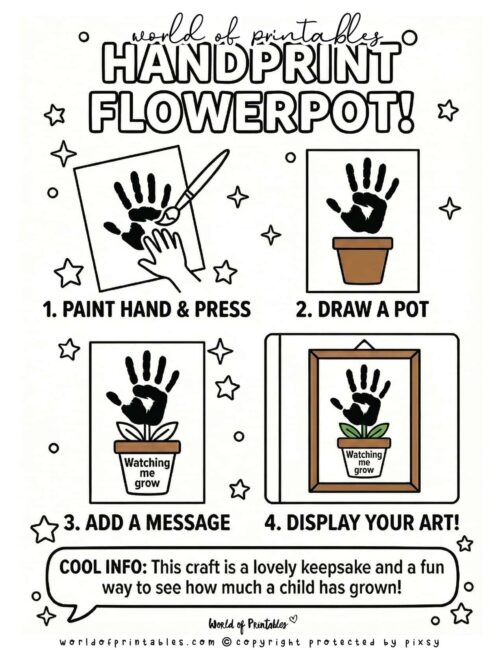
How to Make a Flowerpot Picture (Using The Little Maker’s Visual Guide)
Materials Needed:
- White Paper: Your canvas for the handprint art.
- Washable Paint & Brush: Choose a bright color for the “flower”.
- Markers or Colored Pencils: To draw the pot, leaves, and your message.
- Scissors: For any trimming or framing needs.
To get the best results, we recommend printing out our The Little Maker’s Visual Guide to keep on the table during the craft.
- Paint & Press: Paint your child’s hand with a bright color and press it firmly onto the top half of the paper to create the flower.
- Draw the Pot: Once the paint is dry, use a brown marker or pencil to draw a sturdy flowerpot directly underneath the handprint.
- Add a Message: Draw some green leaves and write a sweet note like “Watching me grow” on the front of the pot.
- Display Your Art: Frame it or hang it up to show off a perfect little snapshot of this year’s growth!
Classic Charm: Pasta Bead Necklace
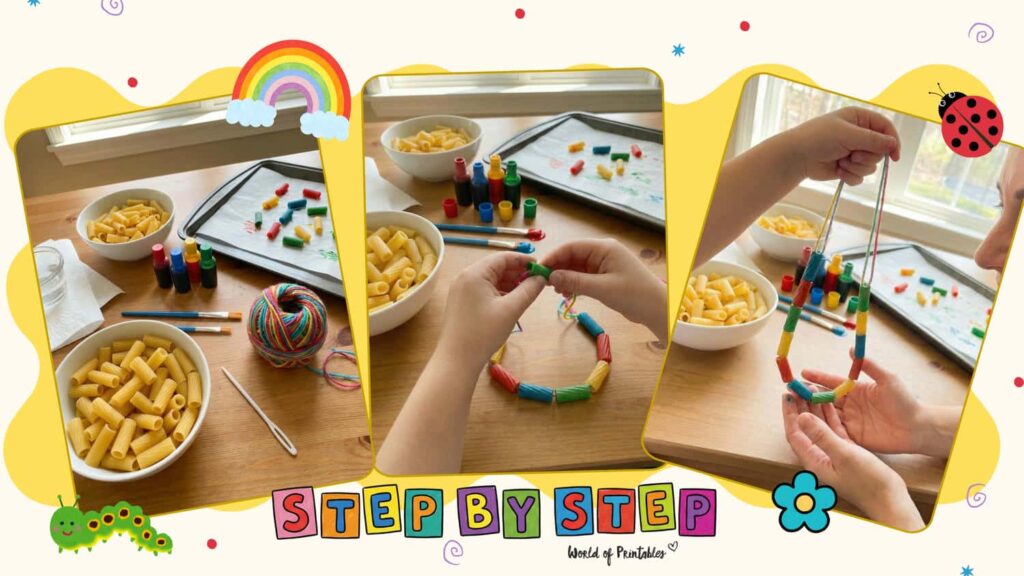
There is something so timeless about a pasta necklace. It’s one of those quintessential childhood crafts that never goes out of style because it’s just so much fun to put together. This project is a fantastic way for kids to play with colors and patterns while making a piece of “jewelry” that is sure to get a smile.
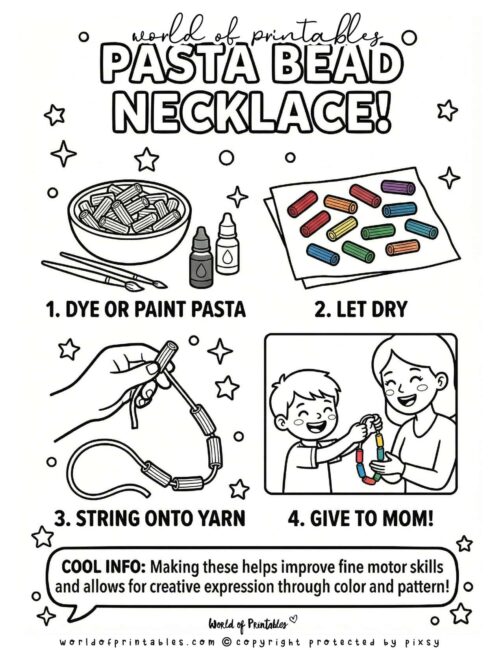
How to Make a Pasta Necklace (Using The Little Maker’s Visual Guide)
Materials Needed:
- Dry Pasta: Rigatoni or penne work best for easy threading.
- Paint or Food Coloring: To give your “beads” a vibrant look.
- Yarn or String: A sturdy base for your necklace.
- Paintbrushes: For adding those bright pops of color.
To get the best results, we recommend printing out our The Little Maker’s Visual Guide to keep on the table during the craft.
- Color Your Pasta: Start by painting your dry pasta shapes in a variety of bright colors and let them dry completely.
- Plan Your Pattern: Line up your colorful pasta beads to decide on a fun sequence.
- Start Stringing: Carefully thread your yarn through the center of each pasta piece until your necklace is as long as you want it.
- Ready to Wear: Tie the ends of the yarn together and your custom-made accessory is ready to be gifted!
A Frame for Memories: Easy Craft Stick Picture Frame
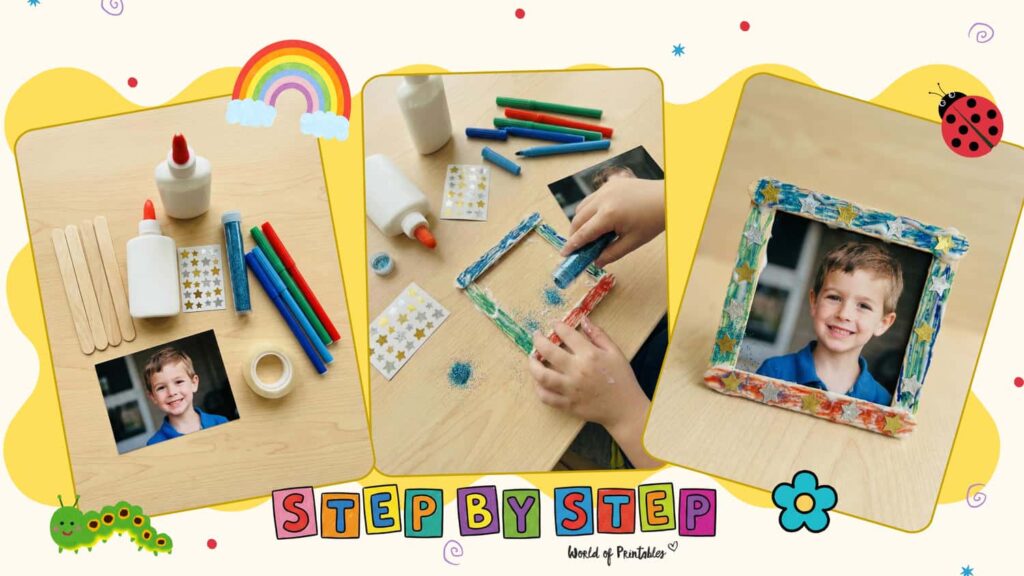
Nothing preserves a sweet moment quite like a handmade frame. This project is a wonderful way for kids to turn their favorite photos into a custom gift using just a few simple supplies. It’s a great activity for practicing symmetry and design while creating something that will look perfect on any desk or bedside table.
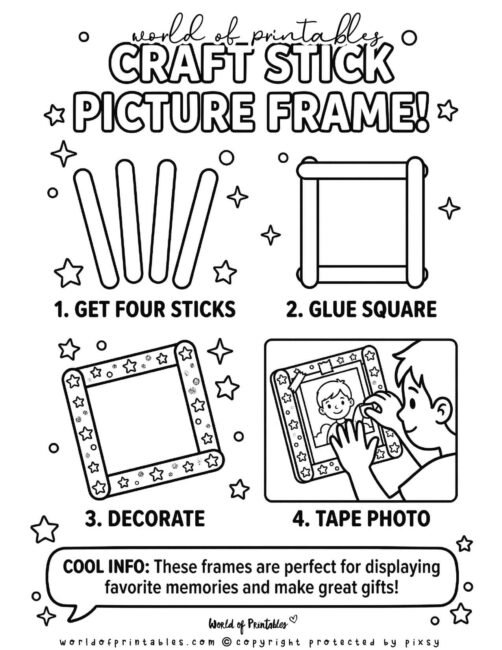
How to Make a Craft Stick Frame (Using The Little Maker’s Visual Guide)
Materials Needed:
- Four Craft Sticks: To build the sturdy square frame.
- A Favorite Photo: Sized to fit perfectly inside your sticks.
- Glue & Tape: To assemble the frame and secure your photo in place.
- Decorations: Grab some markers, glitter, or star stickers to add your own personality.
To get the best results, we recommend printing out our The Little Maker’s Visual Guide to keep on the table during the craft.
- Build Your Square: Take your four craft sticks and glue the corners together to form a square.
- Get Creative: Once the glue is dry, use your markers, stickers, and glitter to decorate the front of the sticks.
- Place Your Photo: Flip the frame over and tape your favorite photo to the back so it peeks through the center.
- Ready to Gift: Your custom frame is finished and ready to display a happy memory!
Soft Glow: Colorful Tissue Paper Jar
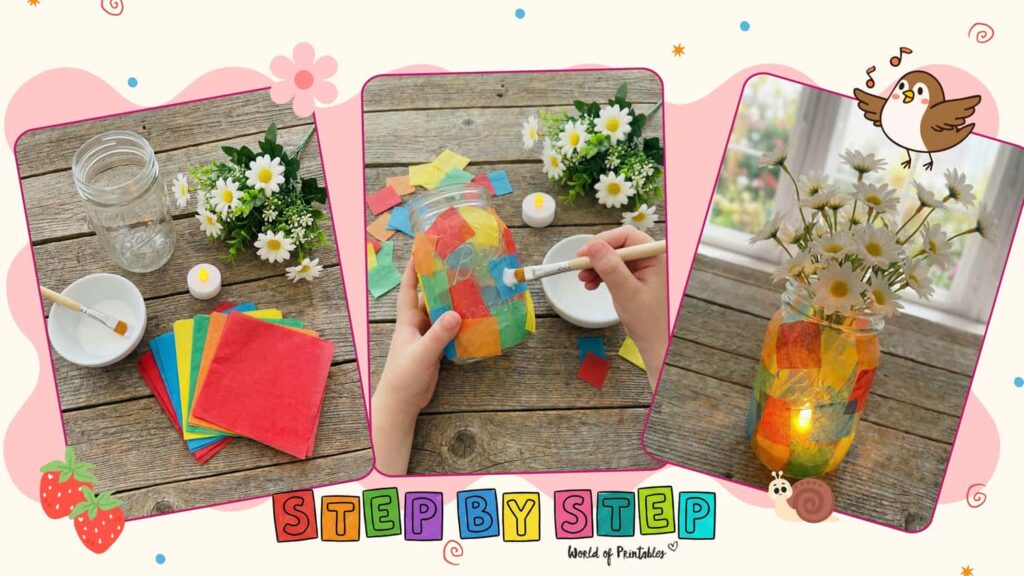
There’s something so cozy about a glowing jar on a windowsill or a bedside table. This project is a wonderful way to recycle a glass jar into a piece of colorful art that catches the light beautifully. Whether you fill it with flowers or a little tea light, it adds a lovely, warm touch to any room.

How to Make a Tissue Paper Jar (Using The Little Maker’s Visual Guide)
Materials Needed:
- Glass Jar: A clean mason jar or any recycled glass jar works perfectly.
- Tissue Paper Squares: Use a variety of bright colors for a stained-glass effect.
- Craft Glue & Brush: To apply the paper smoothly to the glass.
- Tea Light or Flowers: To finish off your glowing creation.
To get the best results, we recommend printing out our The Little Maker’s Visual Guide to keep on the table during the craft.
- Brush on the Glue: Use your brush to apply a thin, even layer of glue to a section of the jar.
- Stick on the Squares: Gently press your colorful tissue paper squares onto the glue, overlapping them slightly to create new colors.
- Let It Dry: Once the jar is covered, let it dry completely until the paper is smooth and secure.
- Add Your Light: Pop a small tea light inside for a soft glow, or fill it with a fresh bouquet of flowers.
Keep the Love Growing!
By turning simple materials into a handmade masterpiece, you’re teaching kids that the most precious gifts are the ones made with love. We hope these Visual Guides help your family celebrate Mom with creativity and joy!
If you’re looking for more ways to stay creative, don’t miss our Ultimate Collection of Crafts for Kids!
More Mother’s Day Crafts & Printables
Looking for more ways to celebrate? Check out these other free resources:
Follow World of Printables on Pinterest
COPYRIGHT
The printables that you find here are the copyright of World of Printables – you cannot redistribute or sell any of these printables or templates, although you can link back to our website.
AI TRANSPARENCY: Whilst the majority of our creations have been created completely traditionally, occasionally we utilize AI tools in our design process. We acknowledge the advancements in AI technology and leverage them responsibly to optimize our creative output. However, it is important to note that our utilization of AI does not compromise the human element of our work. Our commitment to delivering high-quality designs through a balanced integration of traditional expertise and AI enhancements remains paramount.