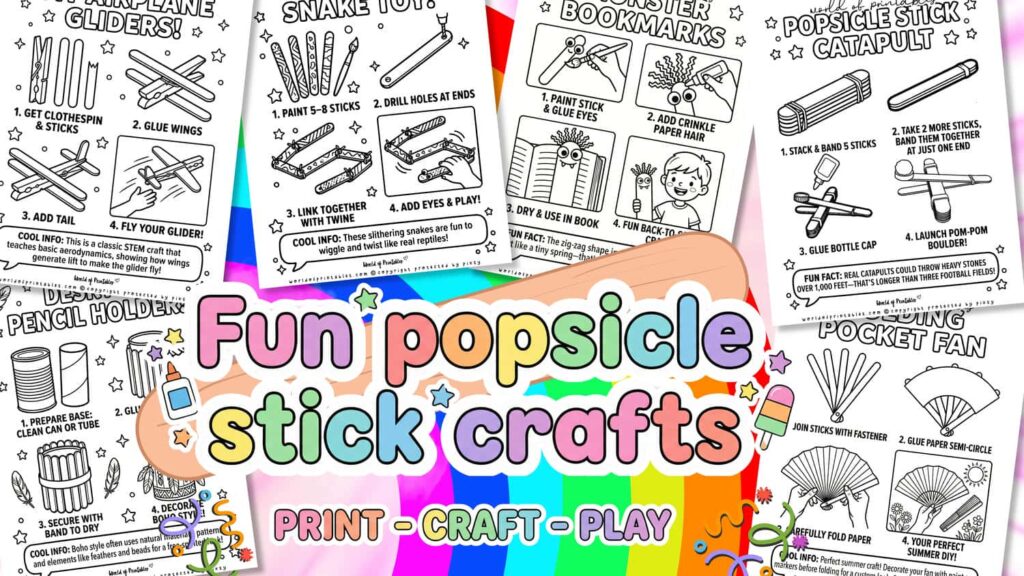
Popsicle sticks are a total craft staple. Instead of letting them sit in a drawer, you can turn them into something great. These versatile wooden sticks work for quick afternoon projects or thoughtful handmade gifts. They’re inexpensive, easy to handle, and a simple way to get creative.
Check out these 10 ideas that will have you grabbing a new pack of sticks. Get ready to glue, paint, and build!
Scroll down to find your favorite project, click any Visual Guide image to open the printable PDF, and let’s start creating something fun!
💡 Teacher/Parent Tip: Print out The Little Maker’s Visual Guide and set it on the table. It’s designed so kids can follow the pictures and lead the craft themselves – giving them a huge boost of “I did it!” confidence!
Craft Stick Picture Frame
This simple frame is a classic way to display a photo or a drawing. It is easy to customize with different colors and decorations, or even by adding initials to make it a true keepsake.
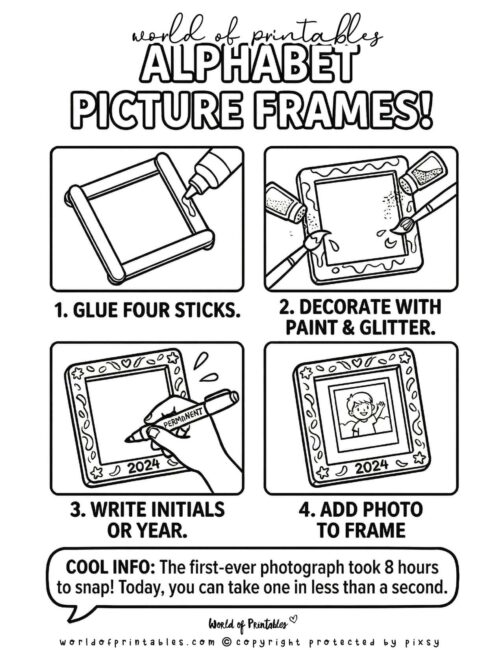
How to Make a Craft Stick Picture Frame (Using The Little Maker’s Visual Guide)
Materials Needed:
- 4 Regular Craft Sticks: To build the sturdy square frame.
- Craft Glue: For securing the overlapping corners.
- A Favorite Photo: Sized to peek through the center of the sticks.
- Paint & Glitter: To add some sparkle and personality to the wood.
- Permanent Marker: For adding names or the year at the bottom.
To get the best results, we recommend printing out our The Little Maker’s Visual Guide to keep on the table during the craft.
- Form the Square: Arrange four sticks into a square and glue the corners.
- Decorate: Use markers, paint, or glitter to add your own style.
- Add Your Photo: Tape your photo to the back so it shows through the center.
- Display: Your custom frame is ready to show off!
Hand-Painted Garden Markers
Add some charm to your plants with these practical markers. They help you keep track of your herbs while adding a pop of color to your pots.
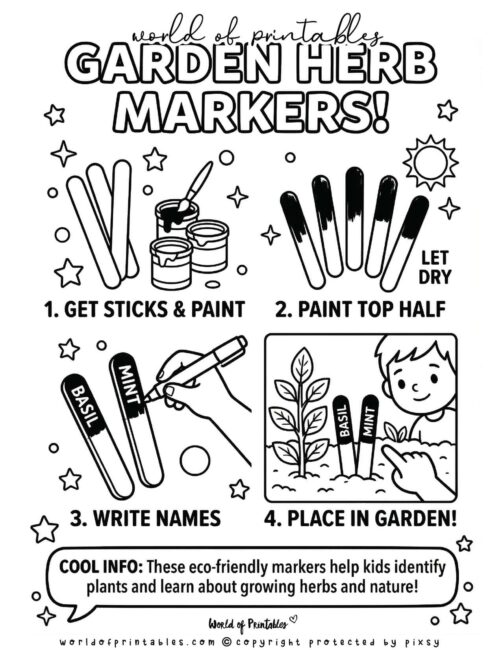
How to Make Hand-Painted Garden Markers (Using The Little Maker’s Visual Guide)
Materials Needed:
- Popsicle Sticks: One for every plant in your garden.
- Colorful Paint: To make the markers easy to see against the green.
- Paintbrushes: For applying smooth, bright colors.
- Permanent Marker: To write the names of the herbs clearly.
To get the best results, we recommend printing out our The Little Maker’s Visual Guide to keep on the table during the craft.
- Paint the Tops: Color the top half of each stick with a bright paint.
- Write the Name: Once dry, use a marker to write the name of your plant.
- Place in Soil: Push the plain end into the dirt next to your flowers or herbs.
Silly Monster Bookmark
Forget boring bookmarks! These goofy monsters are made by painting the sticks and adding fun textures like “hair” and multiple eyes to make them stand out from the top of your book.
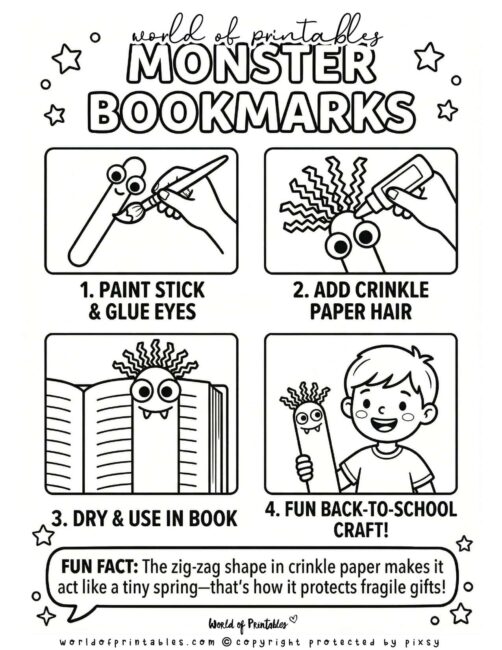
How to Make a Silly Monster Bookmark (Using The Little Maker’s Visual Guide)
Materials Needed:
- Popsicle Sticks: One for each monster.
- Bright Paint: For a bold, monster-like body.
- Googly Eyes: Use one, two, or even three for a silly look.
- Crinkle Paper: These zig-zag strips make perfect messy monster hair.
- Craft Glue: To keep the eyes and hair in place.
To get the best results, we recommend printing out our The Little Maker’s Visual Guide to keep on the table during the craft.
- Paint Your Pal: Give your stick a solid coat of paint in a bright color and let it dry.
- Add the Hair: Glue a small bunch of crinkle paper strips to the very top of the stick.
- Bring Him to Life: Glue your googly eyes just below the hair line.
- Start Reading: Once the glue sets, slide your monster into your book to keep your place.
Boho Desktop Pencil Holder
Tidy up your workspace with a rustic holder made from a recycled tin can and craft sticks.
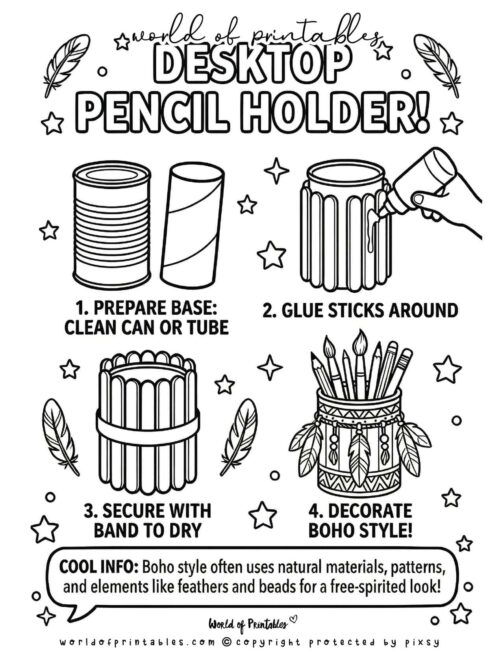
How to Make a Boho Desktop Pencil Holder (Using The Little Maker’s Visual Guide)
Materials Needed:
- Recycled Can or Tube: To act as the sturdy base for your holder.
- Craft Sticks: To wrap the outside in a wooden finish.
- Glue & Rubber Band: To attach the sticks and hold them while they dry.
- Boho Decorations: Like twine or feathers to finish the look.
To get the best results, we recommend printing out our The Little Maker’s Visual Guide to keep on the table during the craft.
- Prepare Base: Clean out your can or tube.
- Glue Sticks: Apply glue and place sticks vertically all the way around the base.
- Secure to Dry: Use a rubber band to hold the sticks in place while the glue sets.
- Decorate: Add patterns or natural elements for a “Boho” look.
Magnetic Stick Heroes
Create custom magnets of your favorite people or heroes! These are perfect for holding up school work or your favorite artwork on the fridge.
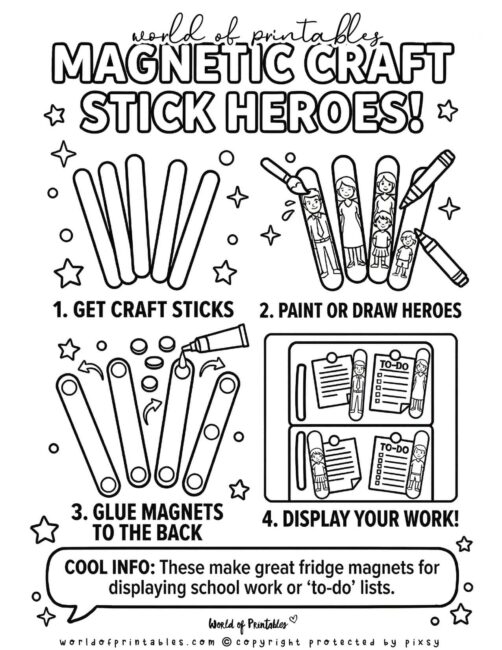
How to Make Magnetic Stick Heroes (Using The Little Maker’s Visual Guide)
Materials Needed:
- Craft Sticks: To serve as the body of your hero.
- Paint or Markers: For drawing on faces and costumes.
- Small Magnets: To make your hero stick to the fridge.
- Strong Glue: To ensure the magnet stays attached to the wood.
To get the best results, we recommend printing out our The Little Maker’s Visual Guide to keep on the table during the craft.
- Draw Heroes: Use markers or paint to draw characters or family members onto the sticks.
- Glue Magnets: Attach small magnets to the back of each stick.
- Display: Stick them on the fridge to hold up your notes.
Folding Pocket Fan
Stay cool on hot days with a custom folding fan. This is a great summer project that is both fun to make and use.
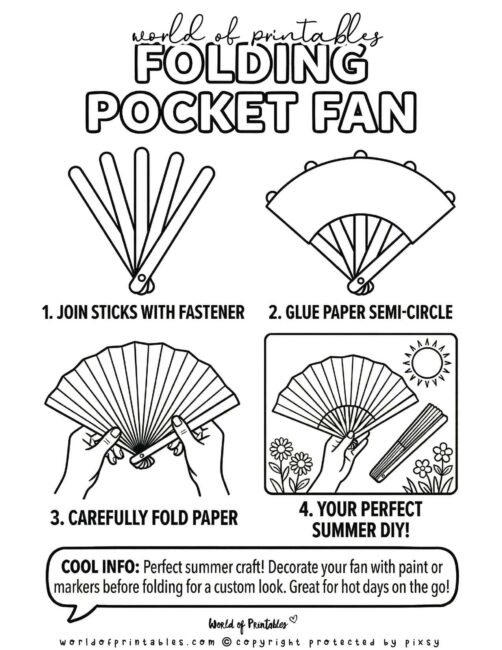
How to Make a Folding Pocket Fan (Using The Little Maker’s Visual Guide)
Materials Needed:
- Craft Sticks: To act as the framework for the fan.
- Metal Fastener: To join the sticks so they can swivel open.
- Paper Semi-Circle: The main part of the fan that catches the air.
- Glue: To secure the paper to the wooden sticks.
To get the best results, we recommend printing out our The Little Maker’s Visual Guide to keep on the table during the craft.
- Join Sticks: Use a fastener to join the ends of several sticks so they can fan out.
- Attach Paper: Glue a paper semi-circle across the tops of the fanned-out sticks.
- Fold: Carefully fold the paper so the fan can open and close smoothly.
DIY Airplane Gliders
Build a classic glider that really flies! This STEM-inspired craft is an easy way to explore how wings work.
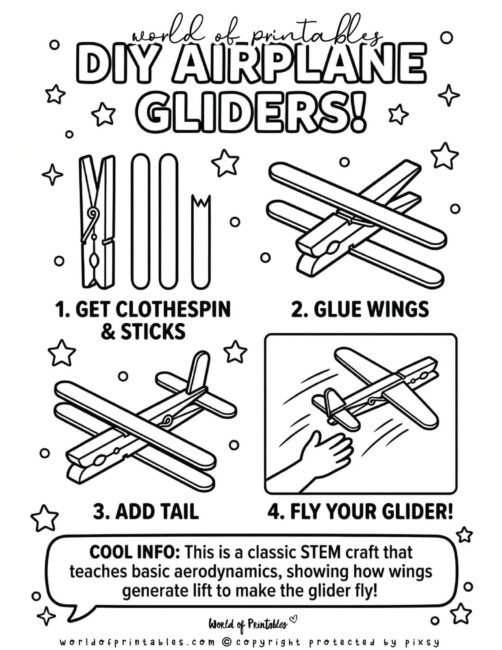
How to Make DIY Airplane Gliders (Using The Little Maker’s Visual Guide)
Materials Needed:
- Wooden Clothespin: To act as the plane’s main body or fuselage.
- Three Regular Craft Sticks: To create the top and bottom wings and tail
- Craft Glue: To hold the wings firmly to the clothespin.
To get the best results, we recommend printing out our The Little Maker’s Visual Guide to keep on the table during the craft.
- Glue Wings: Glue two sticks horizontally across the top and bottom of the clothespin to create wings.
- Add Tail: Break the final craft stick to make a small tail fin and glue to the back.
- Fly: Once dry, your glider is ready for takeoff!
Articulated Snake Toy
Create a slithering snake that wiggles and twists. Kids can have fun painting different patterns on every segment.
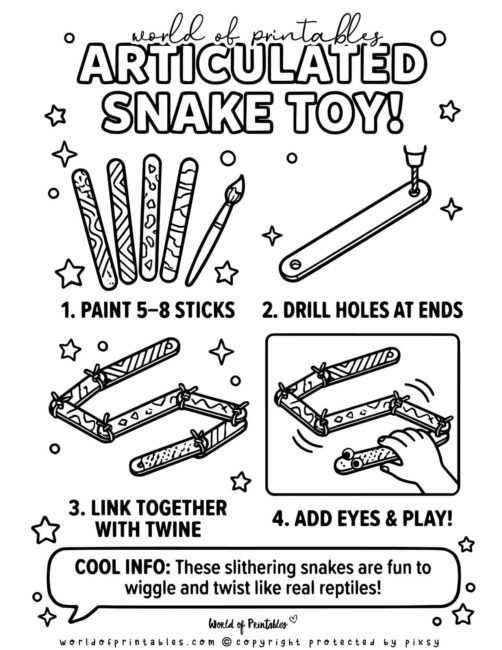
How to Make an Articulated Snake Toy (Using The Little Maker’s Visual Guide)
Materials Needed:
- 5-8 Craft Sticks: To make up the individual segments of the snake.
- Paint & Brushes: For decorating your snake with patterns.
- Stick on eyes: So your snake can see where he is going!
- Twine: To link the segments together so they can wiggle.
- Small Drill: (Adult help needed) to make the holes for the twine.
To get the best results, we recommend printing out our The Little Maker’s Visual Guide to keep on the table during the craft.
- Paint Segments: Decorate each stick with unique patterns.
- Drill Holes: Have an adult help drill small holes at both ends of each stick.
- Link Together: Use twine to tie the sticks together in a long chain.
- Add Eyes: Glue on eyes at the front and start wiggling!
Miniature Picket Fence
Build a tiny fence to use as a backdrop for a fairy garden or a school project. It adds a “shabby chic” look to any miniature scene.
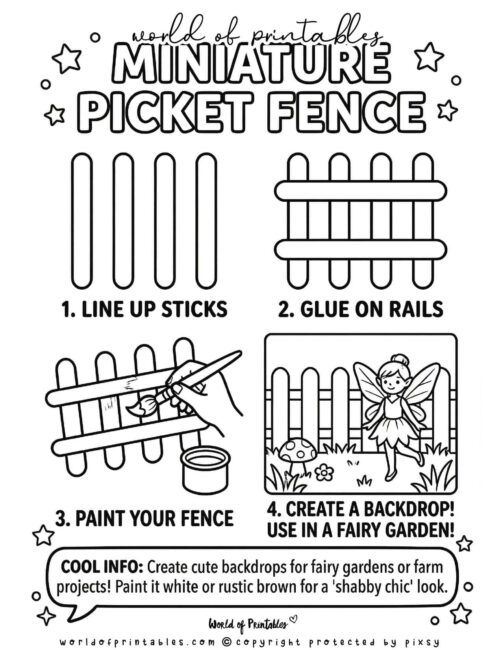
How to Make a Miniature Picket Fence (Using The Little Maker’s Visual Guide)
Materials Needed:
- Several Craft Sticks: To create the pickets and the rails.
- Glue: To hold the fence structure together.
- Paint: For a classic, finished fence look use white or brown, but get creative with colors too!
To get the best results, we recommend printing out our The Little Maker’s Visual Guide to keep on the table during the craft.
- Line Up Sticks: Lay several sticks vertically next to each other.
- Glue Rails: Glue two sticks horizontally across them to create the rails.
- Paint: Give it a coat of paint to finish the look.
Popsicle Stick Catapult
Launch small pom-poms with this simple machine! It is a great way to see physics in action while having fun.
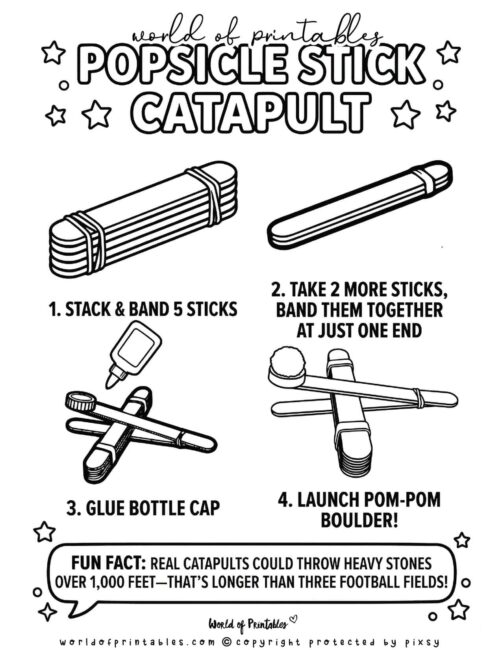
How to Make a Popsicle Stick Catapult (Using The Little Maker’s Visual Guide)
Materials Needed:
- 7-10 Craft Sticks: To build the base and the launching arm.
- Rubber Bands: To provide the tension needed for launching.
- One Bottle Cap: To hold your “boulder” or pom-pom.
- Glue: To attach the bottle cap to the launching arm.
To get the best results, we recommend printing out our The Little Maker’s Visual Guide to keep on the table during the craft.
- Make the Base: Stack five sticks and secure them with rubber bands on both ends.
- Build the Lever: Band two more sticks together at just one end.
- Assemble: Slide the five-stick stack between the two lever sticks and secure with another band.
- Add Cup: Glue a bottle cap to the top stick to hold your pom-pom.
Keep the Creativity Building!
By turning simple wooden sticks into handmade treasures, you’re showing that a little imagination can turn the everyday into something extraordinary. We hope these Visual Guides inspire your family to grab a pack of sticks and start building something wonderful together!
If you’re looking for more ways to stay creative, don’t miss our Ultimate Collection of Crafts for Kids!
More Fun Crafts & Printables
Check out these other free resources:
- 10 Simple Mother’s Day Crafts for Kids: Easy DIY Gift Ideas
- 10 Easy Easter Crafts for Kids: Fun DIY Activities for Little Makers
- 10 Easy Spring Crafts for Kids: Fun, Floral, and Eco-Friendly!
- 10 Creative Earth Day Crafts for Kids: Turn Trash into Treasure!
Follow World of Printables on Pinterest
COPYRIGHT
The printables that you find here are the copyright of World of Printables – you cannot redistribute or sell any of these printables or templates, although you can link back to our website.
AI TRANSPARENCY: Whilst the majority of our creations have been created completely traditionally, occasionally we utilize AI tools in our design process. We acknowledge the advancements in AI technology and leverage them responsibly to optimize our creative output. However, it is important to note that our utilization of AI does not compromise the human element of our work. Our commitment to delivering high-quality designs through a balanced integration of traditional expertise and AI enhancements remains paramount.