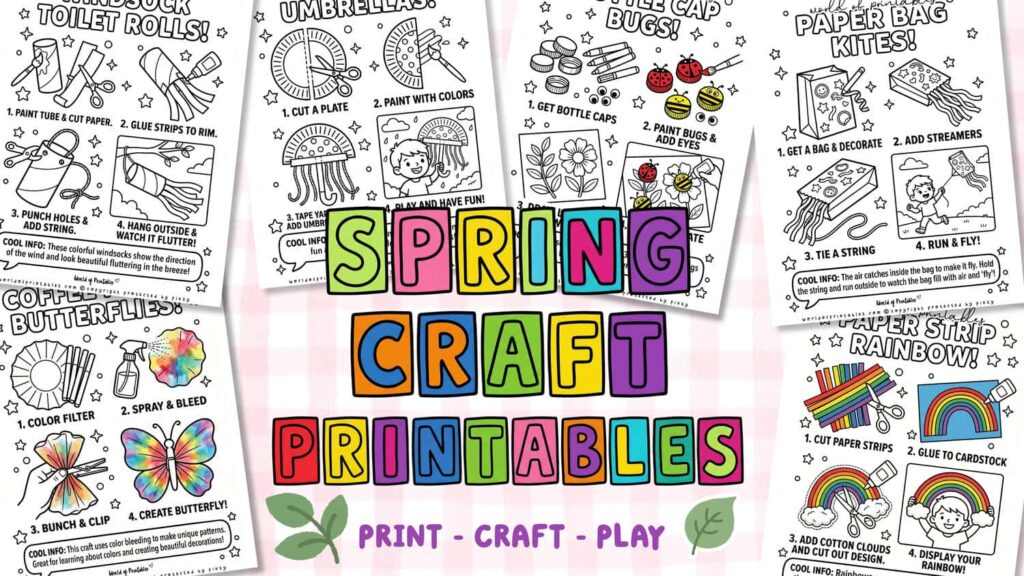
As the world wakes up and the flowers begin to bloom, it’s the perfect time to bring some of that vibrant spring energy into your home or classroom. These 10 easy spring crafts are designed for “Little Makers” who love color, nature, and creating something beautiful out of simple materials.
What You’ll Find in This Post:
- Visual Step-by-Step Printables: Simple guides designed for Little Makers to lead the way.
- Nature & Recycled Materials: We use garden finds and items from your recycling bin to keep it eco-friendly!
- Spring Learning Moments: Fun facts about flowers, bees, and the changing seasons as you create.
Scroll down to find your favorite project, click any Little Maker’s Visual Guide image to open the printable PDF, and let’s celebrate the magic of Spring, one craft at a time!
💡 Teacher/Parent Tip: Print out The Little Maker’s Visual Guide and set it on the table. It’s designed so kids can follow the pictures and lead the craft themselves – giving them a huge boost of “I did it!” confidence!
Sky Explorers: Paper Bag Kites
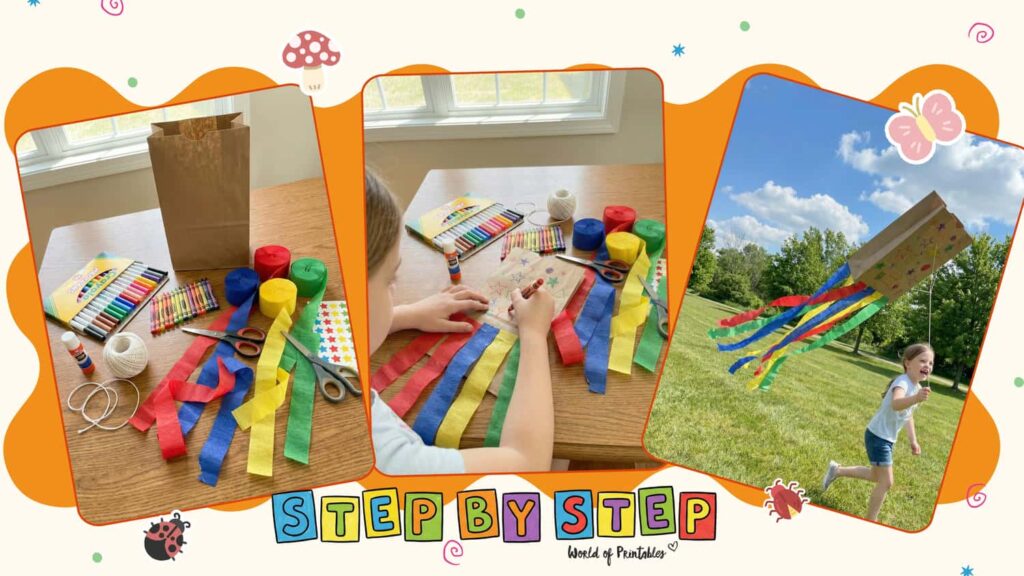
Harness the power of a spring breeze with this classic, high-flying craft! This project is a fantastic way to teach kids about aerodynamics and wind resistance as they watch their handmade kite dance in the air. It’s the perfect companion for a trip to the park or a windy afternoon in the backyard, giving Little Makers a front-row seat to how air movement can create lift and flight.
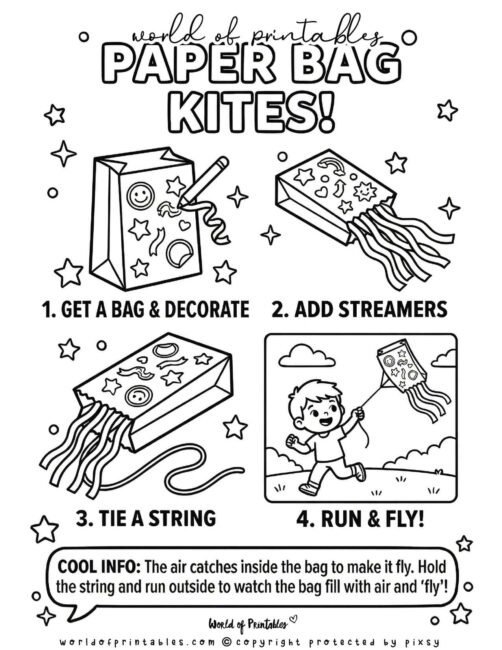
How to Build a Paper Bag Kite (Using The Little Maker’s Visual Guide)
Materials Needed:
- Paper bag: A standard lunch-sized bag.
- Art supplies: Markers, stickers, or crayons for personalizing.
- Streamers: Colorful ribbons or paper strips to catch the wind.
- String: To hold onto your kite while it flies.
To get the best results, we recommend printing out our The Little Maker’s Visual Guide to keep on the table during the craft.
- Get a Bag & Decorate: Start by personalizing your kite! Use markers, stickers, or crayons to decorate your paper bag while it is still flat.
- Add Streamers: Glue or tape long streamers and ribbons to the open end of the bag to help it catch the wind and look beautiful in flight.
- Tie a String: Have an adult help you poke a small hole in the bottom of the bag to thread your string through. Tie a sturdy knot inside to keep it secure.
- Run & Fly!: Head outside on a breezy day! Hold onto your string and run fast to let the air fill the bag and watch your kite take flight.
Color Science: Coffee Filter Butterflies
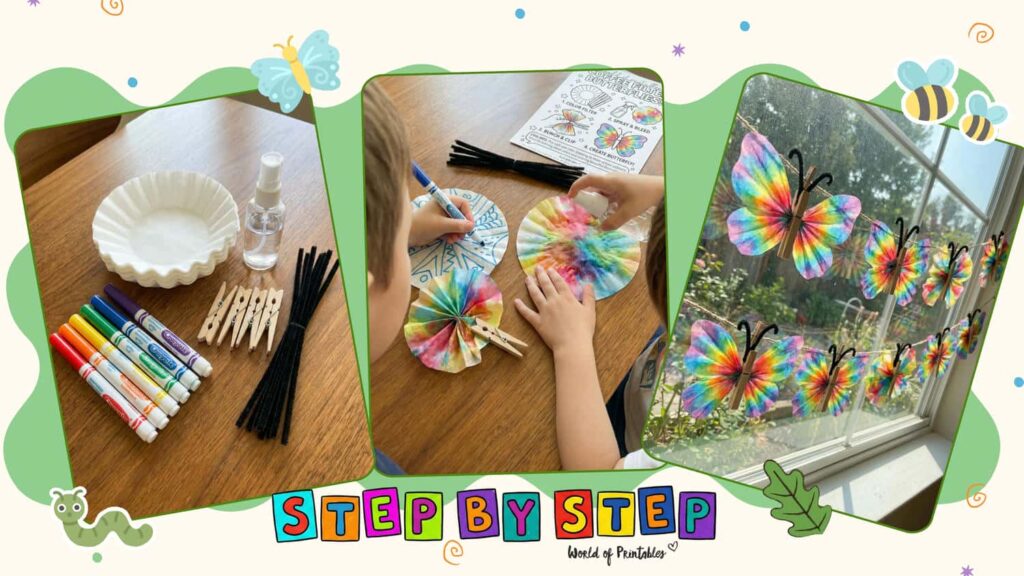
Transform simple household items into vibrant spring decorations! This project uses a fascinating color-bleeding technique to create unique, colorful patterns on butterfly wings. It is a wonderful hands-on lesson in color mixing and absorption that results in beautiful, tie-dye inspired art to brighten up any room.
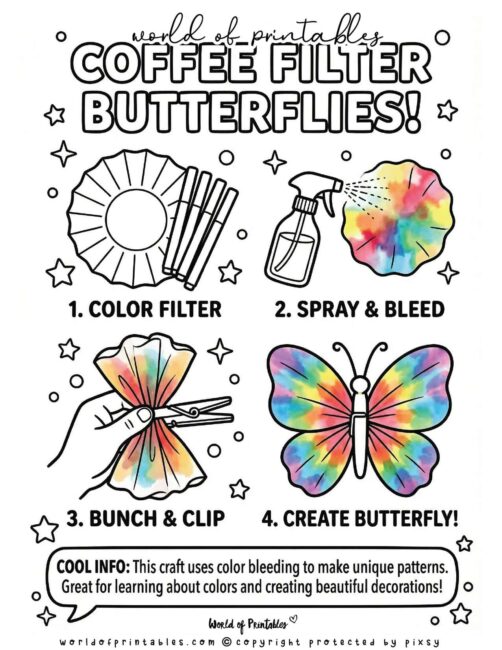
How to Create a Coffee Filter Butterfly (Using The Little Maker’s Visual Guide)
Materials Needed:
- Coffee filter: The “wings” of your butterfly.
- Washable markers: For creating colorful patterns.
- Spray bottle: Filled with water to start the color bleeding.
- Clothespin: To hold the wings together in the center.
- Pipe cleaners: To create the antennae.
To get the best results, we recommend printing out our The Little Maker’s Visual Guide to keep on the table during the craft.
- Color Filter: Use your markers to draw bright patterns and shapes all over the coffee filter.
- Spray & Bleed: Lightly mist the filter with water and watch as the colors begin to bleed together into a beautiful design.
- Bunch & Clip: Once dry, bunch the filter together in the middle and secure it with a clothespin.
- Create Butterfly: Fan out the sides to reveal your colorful wings, add pipe cleaner antennae and complete your butterfly!
Garden Buddies: Rock Bees

Bring your garden to life with these cheerful, hand-painted rock bees! This simple outdoor craft is perfect for toddlers and teaches them to look closely at the tiny insects that help our flowers grow. These durable little friends make wonderful garden decorations and provide a great opportunity to talk about the important role bees play in nature.
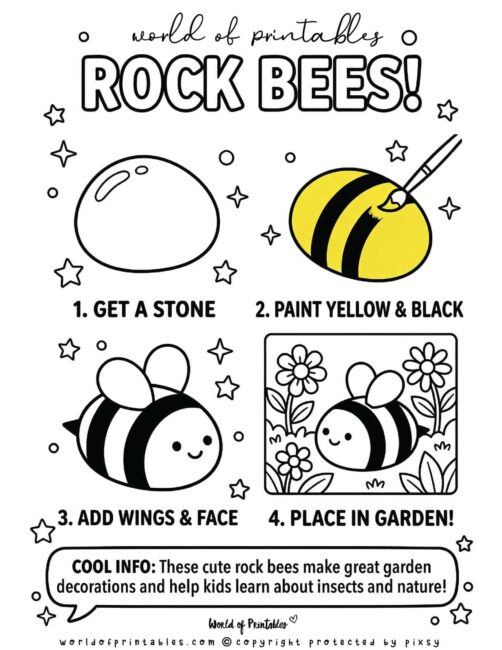
How to Make Rock Bees (Using The Little Maker’s Visual Guide)
Materials Needed:
- Smooth stones or rocks
- Yellow and black acrylic craft paint (and other colors if you want)
- Paintbrushes
- Black permanent marker
- Paint palette
To get the best results, we recommend printing out our The Little Maker’s Visual Guide to keep on the table during the craft.
- Get a Stone: Find a smooth, round stone from your garden or a local park.
- Paint Yellow & Black: Paint your stone with bright yellow paint, then add bold black stripes once the yellow is dry.
- Add Wings & Face: Paint on small white wings and use a marker to give your bee a friendly, smiling face.
- Place in Garden!: Find a cozy spot among the flowers for your new bee friends to live!
Eco-Art: Bottle Cap Bugs
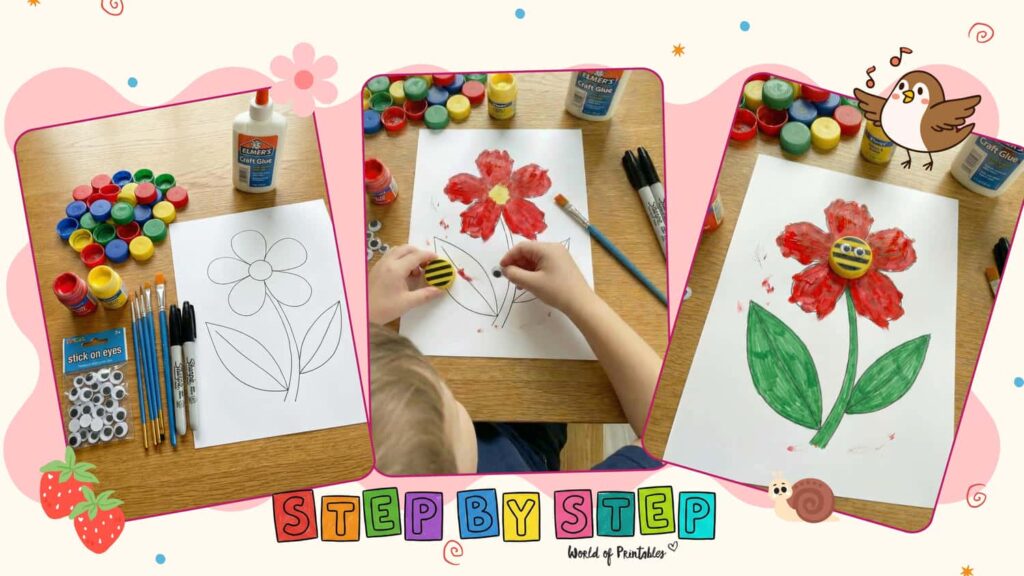
Give your recycling bin a second life with these charming 3D Garden Bugs! This project is a brilliant way to show kids how everyday “trash” can be transformed into beautiful art. By combining bottle caps with bright paints and markers, Little Makers can create a miniature 3D ecosystem while learning about important backyard pollinators like ladybugs and bees.
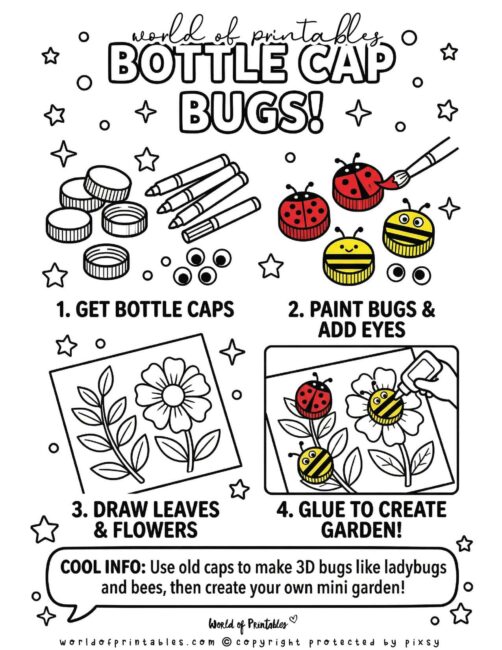
How to Create a Bottle Cap Garden (Using The Little Maker’s Visual Guide)
Materials Needed:
- Recycled Bottle Caps: Plastic caps in various sizes.
- Paint & Brushes: Red and yellow acrylic paint for the bug bodies.
- Markers: Black permanent markers for drawing stripes, spots, and garden leaves.
- Googly Eyes: Small “stick-on” eyes to give your bugs personality.
- Paper & Glue: Craft paper and strong craft glue to assemble your garden.
To get the best results, we recommend printing out our The Little Maker’s Visual Guide to keep on the table during the craft.
- Get Bottle Caps: Collect various plastic caps from around your home.
- Paint Bugs & Add Eyes: Paint your caps to look like ladybugs (red with black spots) or bees (yellow with black stripes). Once dry, stick on your googly eyes.
- Draw Leaves & Flowers: Use your markers to draw a beautiful spring garden on your paper, including green leaves and colorful flowers.
- Glue to Create Garden: Use your craft glue to secure your 3D bugs onto your drawings, making them look like they are crawling through your handmade garden!
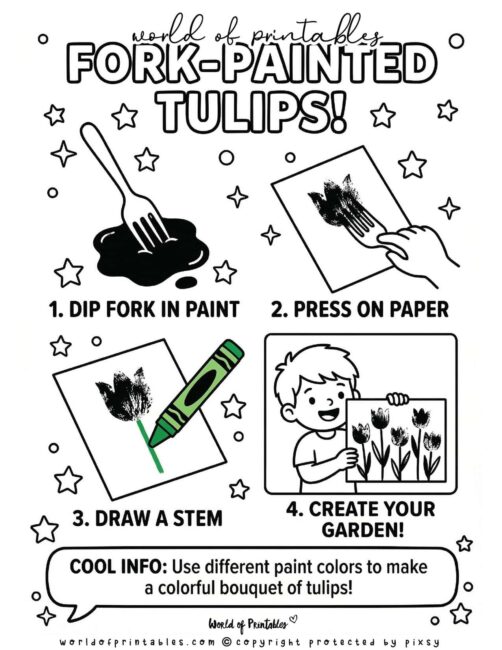
Garden Art: Fork-Painted Tulips
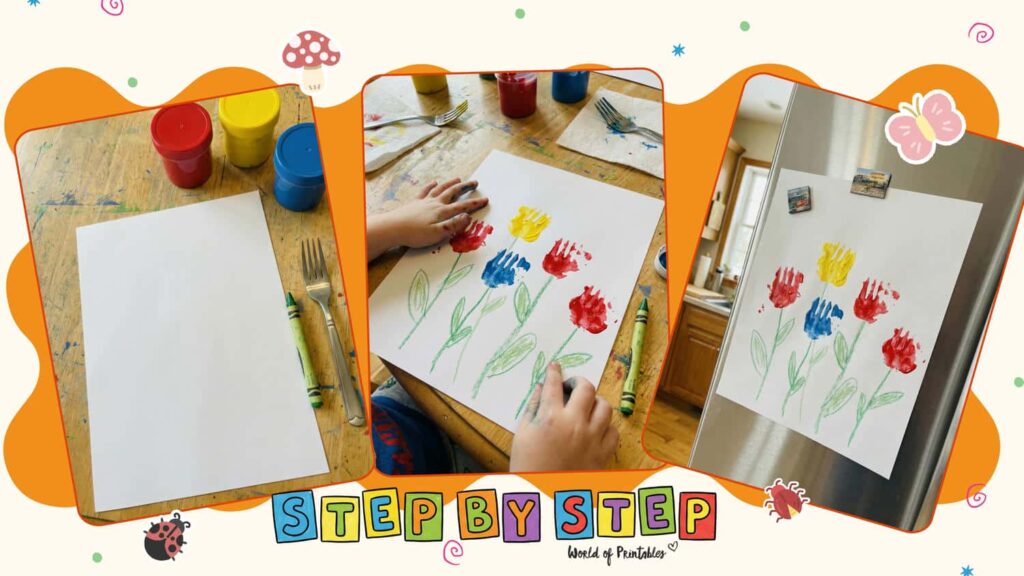
Create a vibrant spring bouquet without ever picking a flower! This project uses a common kitchen tool to create instant, textured tulip shapes that pop off the page. It’s a wonderful sensory art activity that encourages kids to experiment with different paint colors while practicing their fine motor skills to build a beautiful, indoor paper garden.
How to Paint a Fork Tulip Garden (Using The Little Maker’s Visual Guide)
Materials Needed:
- Paper: A clean sheet to plant your garden on.
- Paint: Red, yellow, and blue acrylic or tempera paint.
- Fork: Used as a stamp to create the flower petals.
- Green Crayon: For drawing the stems and leaves.
- Paint Palette or Small Tubs: To hold your different paint colors.
To get the best results, we recommend printing out our The Little Maker’s Visual Guide to keep on the table during the craft.
- Dip Fork in Paint: Dip the back of your fork into your chosen paint color until the tines are well-covered.
- Press on Paper: Press the fork firmly onto your paper to create the textured tulip head.
- Draw a Stem: Use your green crayon to draw a straight stem and a leaf reaching up to each flower.
- Create Your Garden: Repeat the process with different colors to create a full, colorful bouquet of tulips on your page.
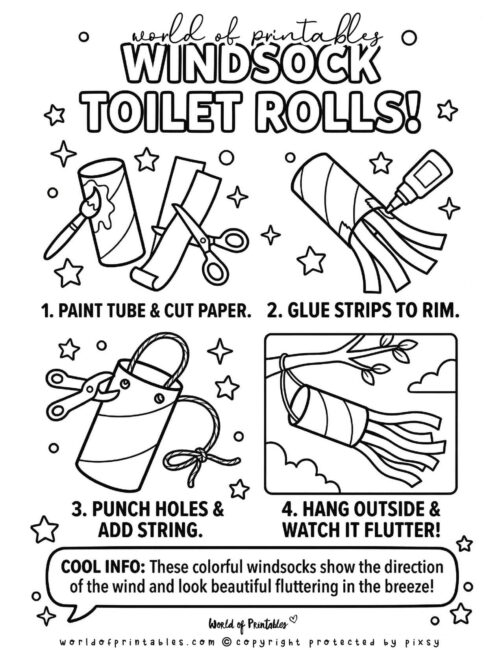
Breezy Fun: Windsock Toilet Rolls
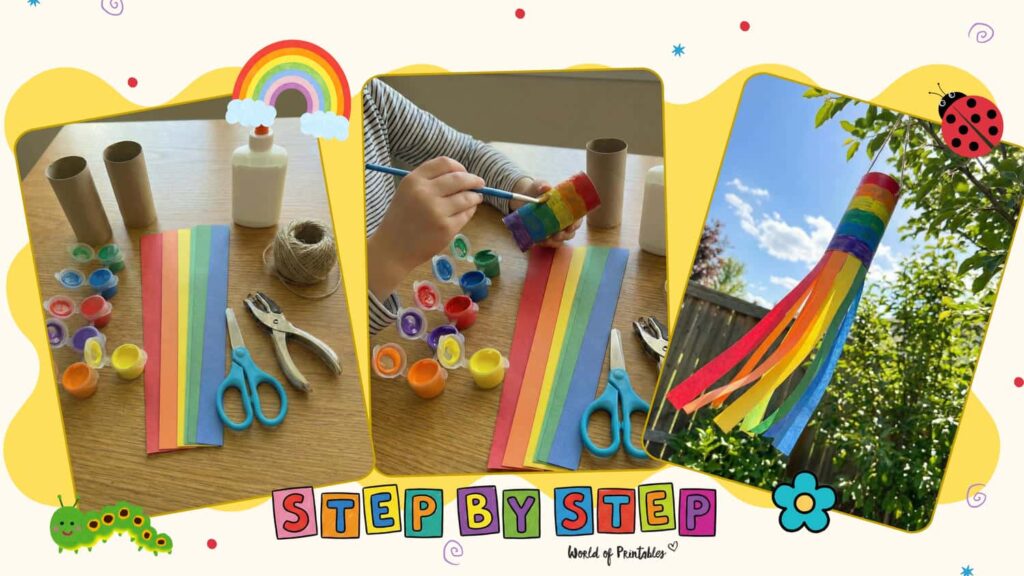
Catch the spring breeze with these vibrant, dancing windsocks! This project is a fantastic way to introduce Little Makers to the concept of wind direction and air movement. By upcycling simple cardboard tubes and adding long, colorful tails, kids can create a beautiful piece of moving art that flutters cheerfully in the backyard.
How to Build a Windsock (Using The Little Maker’s Visual Guide)
Materials Needed:
- Cardboard Tubes: Upcycled toilet paper or paper towel rolls.
- Paint & Brushes: Rainbow colors to decorate your tube.
- Colorful Paper Strips: To create the long, fluttering streamers.
- Scissors: For cutting your paper into strips.
- Craft Glue: To secure the streamers to the rim of the tube.
- Hole Puncher: To create attachment points for your hanging string.
- String or Twine: For hanging your windsock outside.
To get the best results, we recommend printing out our The Little Maker’s Visual Guide to keep on the table during the craft.
- Paint Tube & Cut Paper: Start by painting your cardboard tube in bright colors and cutting your paper into long, thin strips.
- Glue Strips to Rim: Apply glue around the inside bottom rim of the tube and attach your colorful paper strips so they hang down.
- Punch Holes & Add String: Use a hole puncher to make two holes at the top of the tube and thread your string through to create a hanger.
- Hang Outside & Watch it Flutter!: Find a breezy spot on a tree branch or porch to hang your windsock and watch it show which way the wind is blowing!
Garden Science: Grass Hair Pots
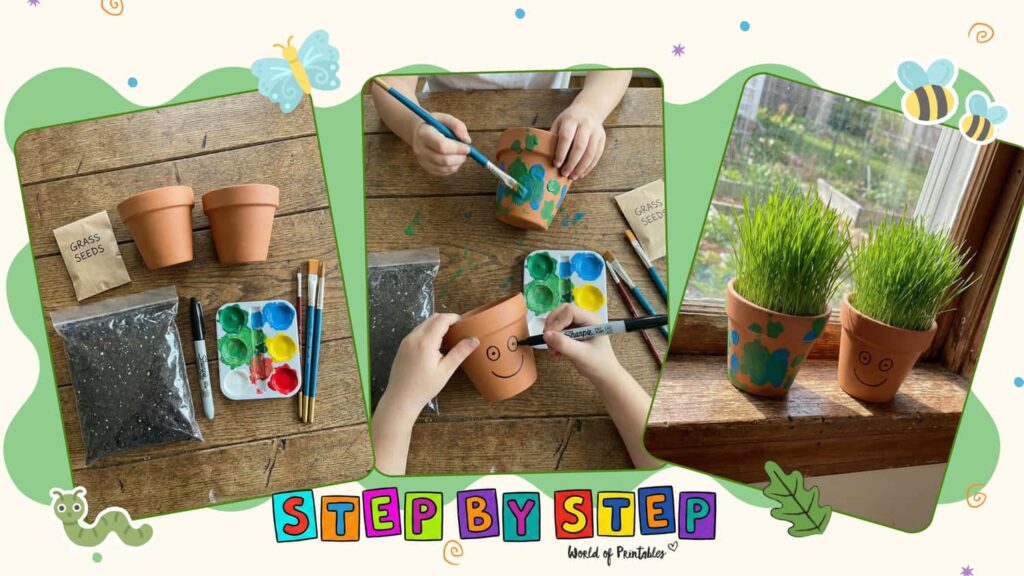
Watch nature in action with these adorable “living” characters! This project is a fantastic way to teach kids how plants grow from seeds and the importance of water and sunlight. Little Makers will love personalizing their pots with silly faces and watching as their character “grows” a wild head of bright green grass hair right on the windowsill.
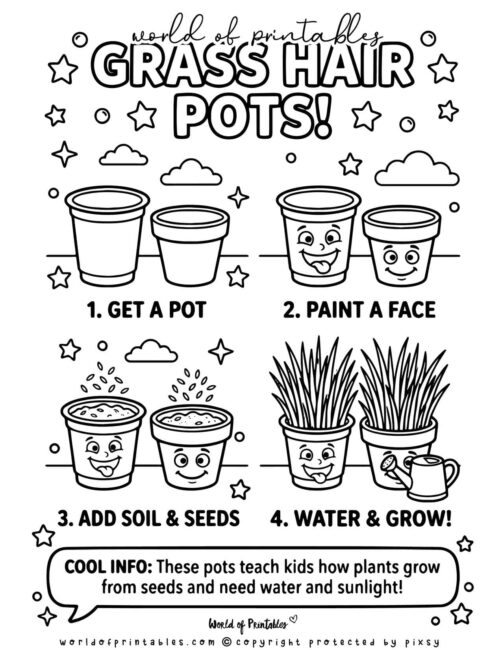
How to Grow Grass Hair Pots (Using The Little Maker’s Visual Guide)
Materials Needed:
- Small Pots: Terra cotta or plastic pots.
- Potting Soil: A small bag to fill your pots.
- Grass Seeds: To grow the “hair”.
- Paint & Brushes: For decorating your pots with bright colors.
- Paint Palette: To hold and mix your spring colors.
- Black Permanent Marker: To draw on the silly faces.
To get the best results, we recommend printing out our The Little Maker’s Visual Guide to keep on the table during the craft.
- Get a Pot: Start with a clean pot that is ready for decorating.
- Paint a Face: Use your paints and marker to give your pot a unique personality and a friendly, smiling face.
- Add Soil & Seeds: Fill your decorated pot with soil and sprinkle a healthy layer of grass seeds over the top.
- Water & Grow!: Give your seeds a drink of water and place the pot in a sunny spot to watch the grass hair begin to sprout!
Fine Motor Fun: Egg Carton Tree
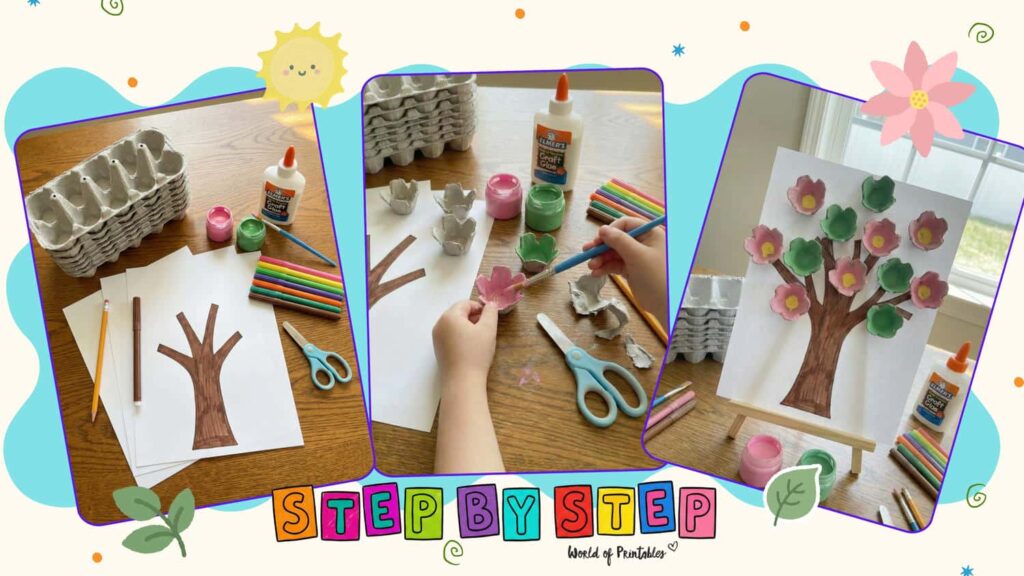
Upcycle your way to a beautiful blooming masterpiece! This project is a fantastic way to develop fine motor skills as Little Makers cut, paint, and glue recycled egg cartons to create a 3D spring tree. It’s a wonderful hands-on lesson in shapes and textures that lets kids build their very own seasonal forest right on paper.
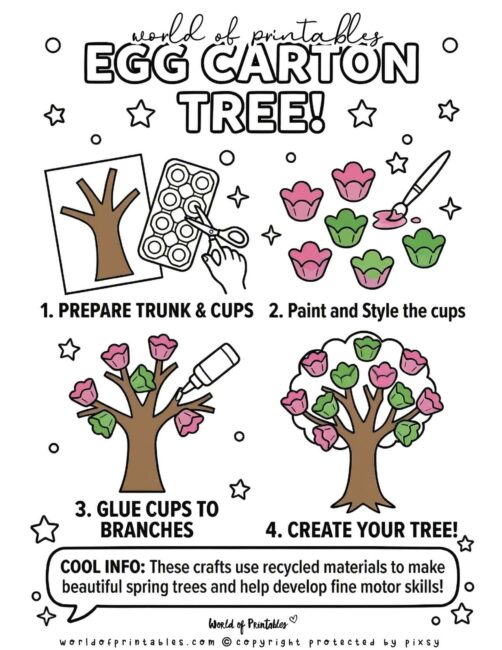
How to Build an Egg Carton Tree (Using The Little Maker’s Visual Guide)
Materials Needed:
- Egg Cartons: Cardboard cartons to create your 3D blossoms.
- Paper: A sturdy white sheet for your tree base.
- Paint & Brushes: Pink and green paint for the floral cups.
- Markers: A brown marker for drawing the trunk and branches.
- Scissors: For cutting the individual egg carton cups.
- Craft Glue: To secure your blossoms to the tree.
- Pencil: To sketch your tree outline before coloring.
To get the best results, we recommend printing out our The Little Maker’s Visual Guide to keep on the table during the craft.
- Prepare Trunk & Cups: Use your brown marker to draw a sturdy tree trunk with several branches on your paper. Have an adult help you cut the individual cups out of the egg carton.
- Paint and Style the Cups: Paint your egg carton cups in bright spring colors like pink and green. Let them dry completely before the next step.
- Glue Cups to Branches: Apply a small dab of craft glue to the bottom of each painted cup and press it firmly onto a branch.
- Create Your Tree: Continue adding your recycled blossoms until your tree is full of spring color and ready to display!
Colorful Skies: Paper Strip Rainbow
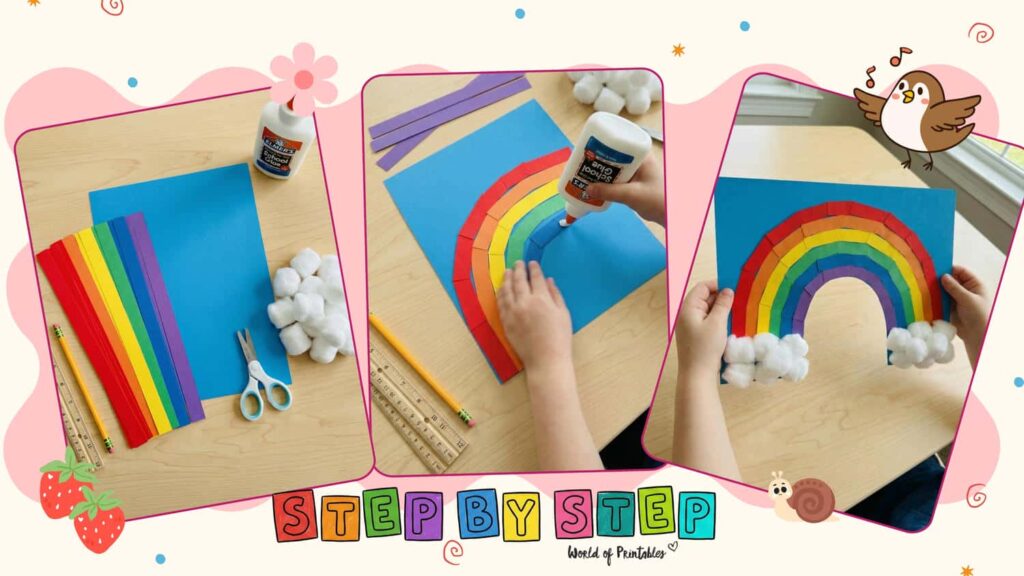
Bring the magic of a spring rain shower indoors with this vibrant 3D rainbow! This project is a wonderful way to introduce kids to the science of light and color while they practice their measuring and cutting skills. Little Makers will love seeing how flat strips of paper can transform into a textured masterpiece, complete with soft, fluffy cotton clouds that make the rainbow pop right off the page.
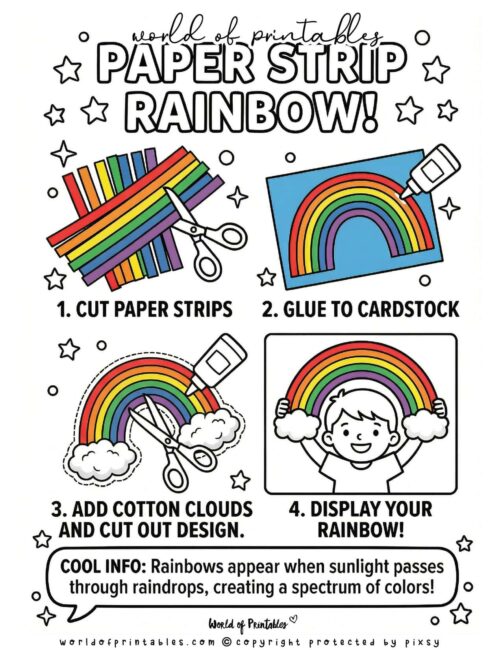
How to Build a Paper Strip Rainbow (Using The Little Maker’s Visual Guide)
Materials Needed:
- Colored Paper Strips: Pre-cut strips in red, orange, yellow, green, blue, and purple.
- Blue Cardstock: A sturdy base to represent the spring sky.
- Cotton Balls: To create soft, fluffy clouds.
- School Glue: For securing the paper strips and cotton.
- Scissors: To trim your rainbow design.
- Pencil & Ruler: To help with straight lines and alignment.
To get the best results, we recommend printing out our The Little Maker’s Visual Guide to keep on the table during the craft.
- Cut Paper Strips: Use your ruler and pencil to mark out straight lines, then carefully cut your colored paper into even strips.
- Glue to Cardstock: Apply lines of school glue in an arch shape on your blue cardstock and press each colored strip down, starting with red on the outside.
- Add Cotton Clouds: Glue several fluffy cotton balls at each end of your rainbow to create “clouds,” then use your scissors to cut out the finished design.
- Display Your Rainbow!: Hold up your colorful creation and find a bright spot in your home to show off your spectrum of colors!
Rainy Day Magic: 3D Paper Plate Umbrellas
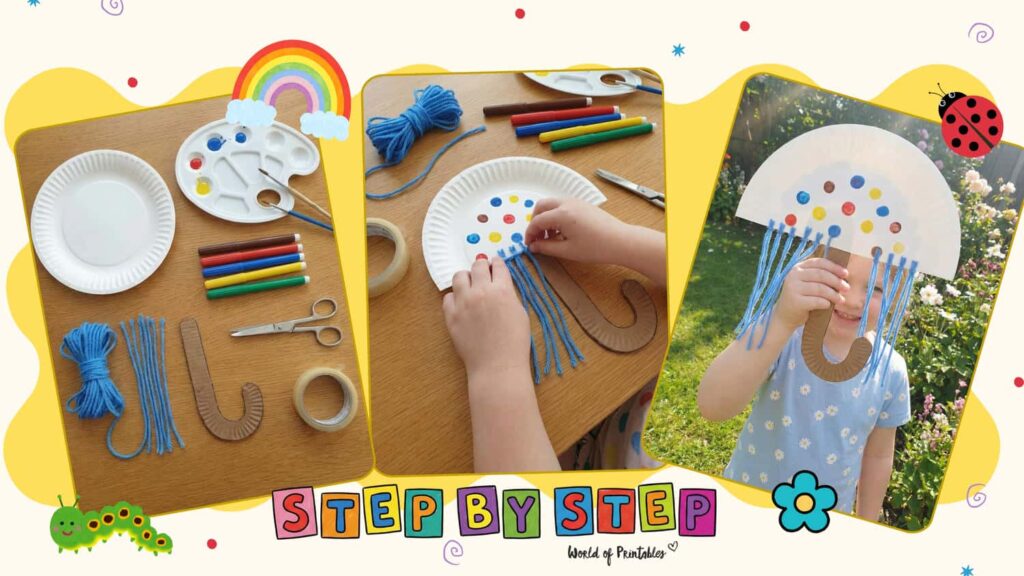
Bring the magic of a spring shower to life with this interactive 3D craft! Instead of a flat drawing, Little Makers create a handheld umbrella using a paper plate and a sturdy handle. This project is perfect for practicing fine motor skills through painting, cutting, and tying yarn “raindrops” that actually dangle, making it a wonderful piece of hanging art for the home.
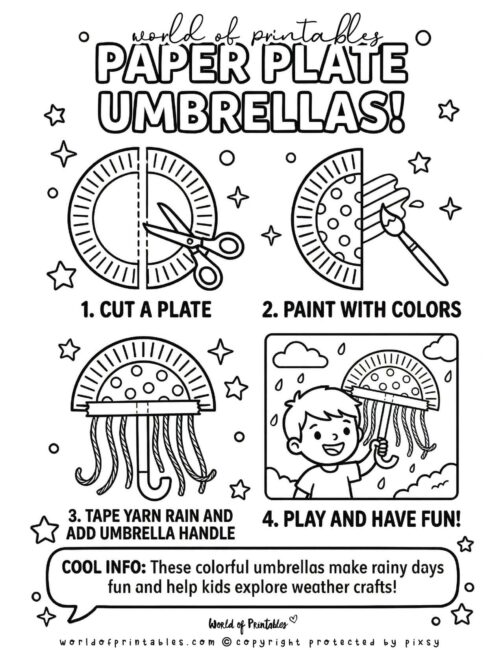
How to Build a 3D Paper Plate Umbrella (Using The Little Maker’s Visual Guide)
Materials Needed:
- Paper Plate: Cut in half to form the umbrella canopy.
- Cardstock or Paper Plate Scrap: To be colored brown and cut into a “J” shape for the handle.
- Paint & Brushes: Bright colors to decorate your umbrella canopy.
- Blue Yarn: Cut into lengths to represent falling raindrops.
- Brown Marker: To color the handle if using white card or plate scraps.
- Glue or Tape: To securely attach the handle to the back of the plate.
To get the best results, we recommend printing out our The Little Maker’s Visual Guide to keep on the table during the craft.
- Paint Your Canopy: Start by painting half of a paper plate with bright colors and patterns to create a cheerful umbrella top.
- Create the Handle: Cut a “J” shape from cardstock or a paper plate scrap and color it brown with your marker.
- Attach the Handle: Use glue or tape to fix the straight end of the handle to the back of your painted plate.
- Tie the Raindrops: Create small holes along the bottom edge of your plate and tie lengths of blue yarn through them so the “rain” hangs down.
- Display Your Craft: Your 3D umbrella is now ready to be held, played with, or hung up as a beautiful spring decoration!
Let’s Keep Celebrating Spring!
By turning everyday materials into a creative art studio, you’re showing kids that a little imagination is all it takes to bring the magic of the season to life. We hope these Little Maker’s Visual Guides help your family celebrate the bright colors and new growth of spring with creativity and confidence!
If you would like to try even more seasonal activities, be sure to check out our Ultimate Collection of Crafts for Kids!
More Spring Crafts & Printables
Looking for more ways to celebrate? Check out these other free resources:
- Spring Coloring Pages
- Spring Templates and Worksheets
- Flower Coloring Pages
- Free Earth Day Activity Hub
Follow World of Printables on Pinterest
COPYRIGHT
The printables that you find here are the copyright of World of Printables – you cannot redistribute or sell any of these printables or templates, although you can link back to our website.
AI TRANSPARENCY: Whilst the majority of our creations have been created completely traditionally, occasionally we utilize AI tools in our design process. We acknowledge the advancements in AI technology and leverage them responsibly to optimize our creative output. However, it is important to note that our utilization of AI does not compromise the human element of our work. Our commitment to delivering high-quality designs through a balanced integration of traditional expertise and AI enhancements remains paramount.