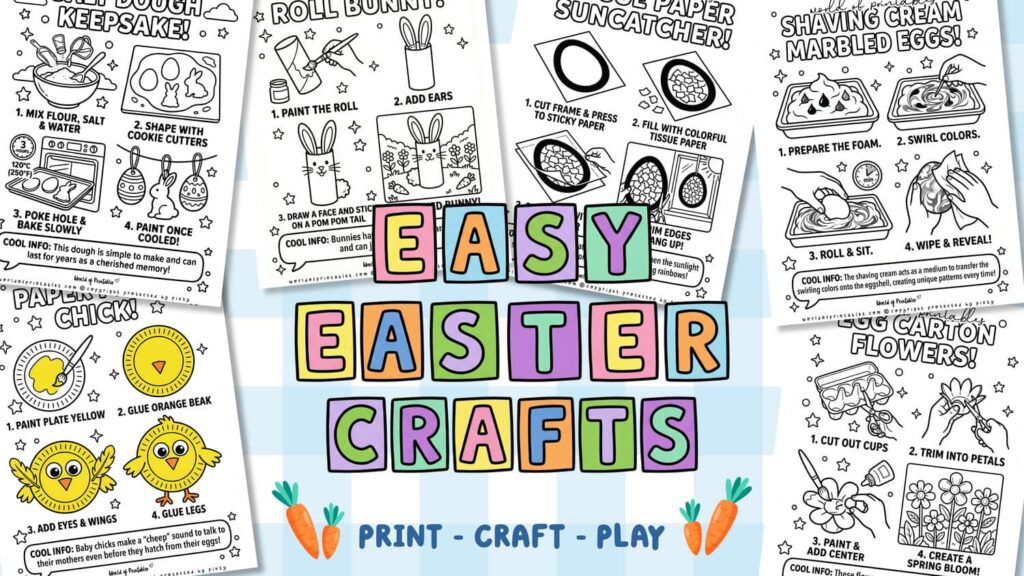
Celebrate the season of renewal with a splash of creativity and festive fun! These 10 easy Easter crafts are perfect for “Little Makers” who want to bring adorable bunnies, colorful eggs, and chirpy chicks to life using simple, everyday materials.
What You’ll Find in This Post:
- Visual Step-by-Step Printables: Simple guides designed for Little Makers to lead the way and follow along with ease.
- Recycled & Household Materials: We transform common items like cardboard rolls, plastic spoons, and bubble wrap into festive treasures!
- Easter Learning Moments: Fun seasonal facts about nature and cool textures to discover while you create.
Scroll down to find your favorite project, click any Little Maker’s Visual Guide image to open the printable PDF, and let’s celebrate the joy of Easter, one craft at a time!
💡 Teacher/Parent Tip: Print out The Little Maker’s Visual Guide and set it on the table. It’s designed so kids can follow the pictures and lead the craft themselves – giving them a huge boost of “I did it!” confidence!
Fluffy Friends: Fork-Painted Easter Chicks
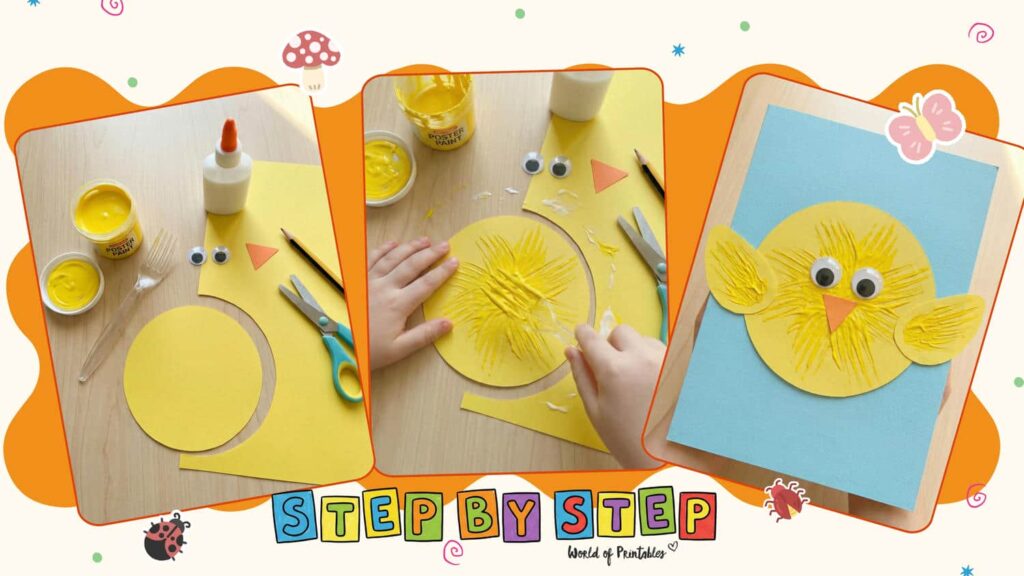
Get ready for some “egg-stra” special Easter fun with these textured little chicks! This project is a fantastic way for toddlers and kids to explore texture by using a simple plastic fork instead of a paintbrush. By pressing the fork into paint, Little Makers create a feathery, 3D effect that brings these chirpy Easter characters to life.
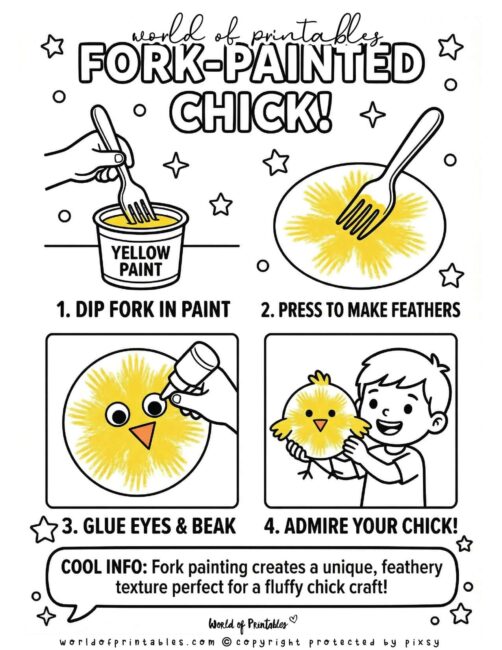
How to Make a Fork-Painted Chick (Using The Little Maker’s Visual Guide)
Materials Needed:
- Yellow Paint: To create the bright, fluffy body of your chick.
- Plastic Fork: Your secret tool for painting realistic-looking feathers.
- Yellow Cardstock: To cut out a round circle for the body and two small wings.
- Orange Construction Paper: For a small, triangular beak.
- Googly Eyes: To give your little chick a cute personality.
- Blue Background Paper: A bright base to mount your finished chick.
- Scissors & Glue: To cut your shapes and assemble your Easter scene.
To get the best results, we recommend printing out our The Little Maker’s Visual Guide to keep on the table during the craft.
- Prepare Your Shapes: Cut a large circle and two smaller wing shapes out of your yellow cardstock.
- Paint the Feathers: Dip your plastic fork into the yellow paint and press it repeatedly onto your yellow circle, working from the center outward to create a feathery texture.
- Assemble the Face: Once the paint is dry, glue your googly eyes and orange triangular beak onto the center of the feathery circle.
- Build Your Scene: Glue your textured chick body onto the blue background paper and attach the two yellow wings to the sides to complete your fluffy friend!
Radiant Easter Eggs: Tissue Paper Suncatchers
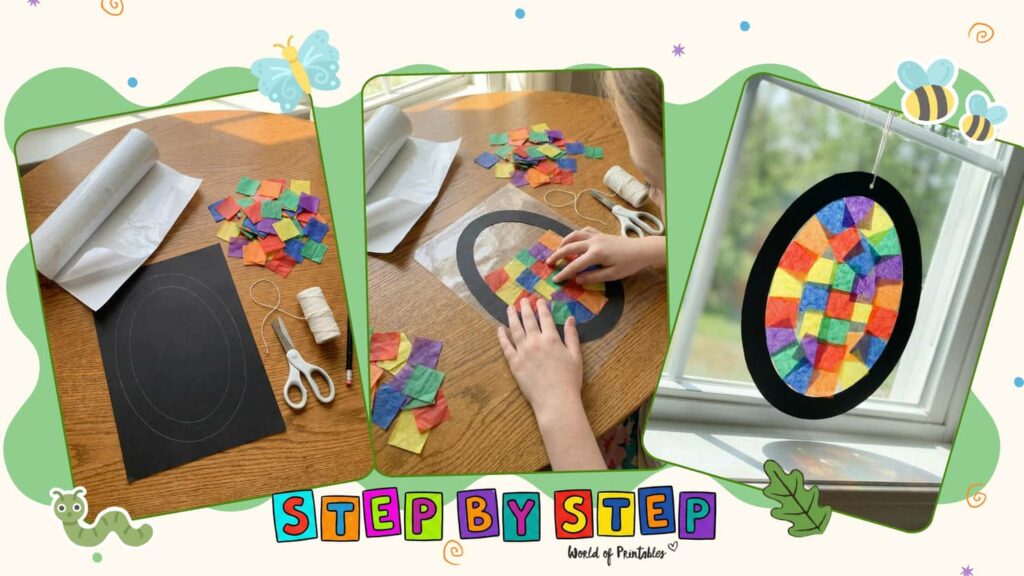
Brighten up your windows this Easter with these stunning stained-glass style suncatchers! This project is a wonderful way for kids to play with light and color as they layer vibrant tissue paper inside a sleek egg-shaped frame. When the sun shines through, these colorful eggs create beautiful rainbows, making them the perfect festive decoration for any room.
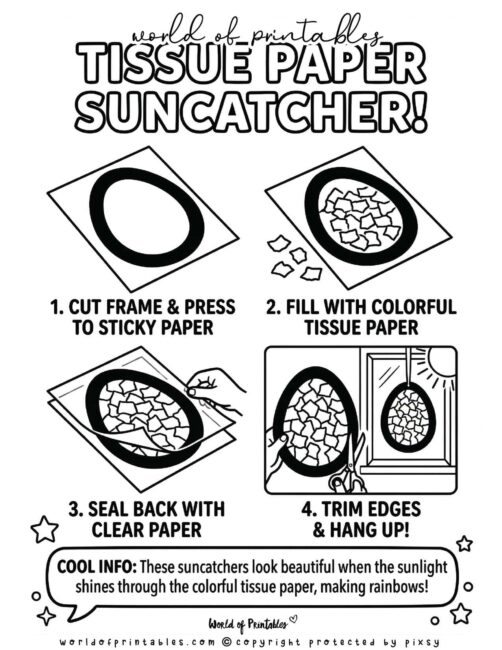
How to Create a Tissue Paper Suncatcher (Using The Little Maker’s Visual Guide)
Materials Needed:
- Black Construction Paper: To cut out your sturdy egg-shaped frame.
- Colorful Tissue Paper: Cut into small squares to fill your egg with color.
- Clear Contact Paper: To hold all your colorful pieces in place.
- White String: To hang your finished suncatcher in a sunny window.
- Scissors: For trimming the contact paper and cutting out your frame.
- Pencil: To trace your egg shape onto the black paper.
To get the best results, we recommend printing out our The Little Maker’s Visual Guide to keep on the table during the craft.
- Cut Your Frame: Trace and cut an egg-shaped frame from black construction paper, then press it onto a sticky sheet of clear contact paper.
- Fill With Color: Fill the inside of your frame with overlapping squares of colorful tissue paper until the space is completely covered.
- Seal the Back: Peel the backing off a second sheet of clear contact paper and carefully place it over the tissue paper to seal everything inside.
- Trim & Hang: Use your scissors to trim away the excess contact paper, punch a small hole at the top for your string, and hang it up to catch the sunlight!
Textured Treasures: Bubble Wrap Printed Eggs
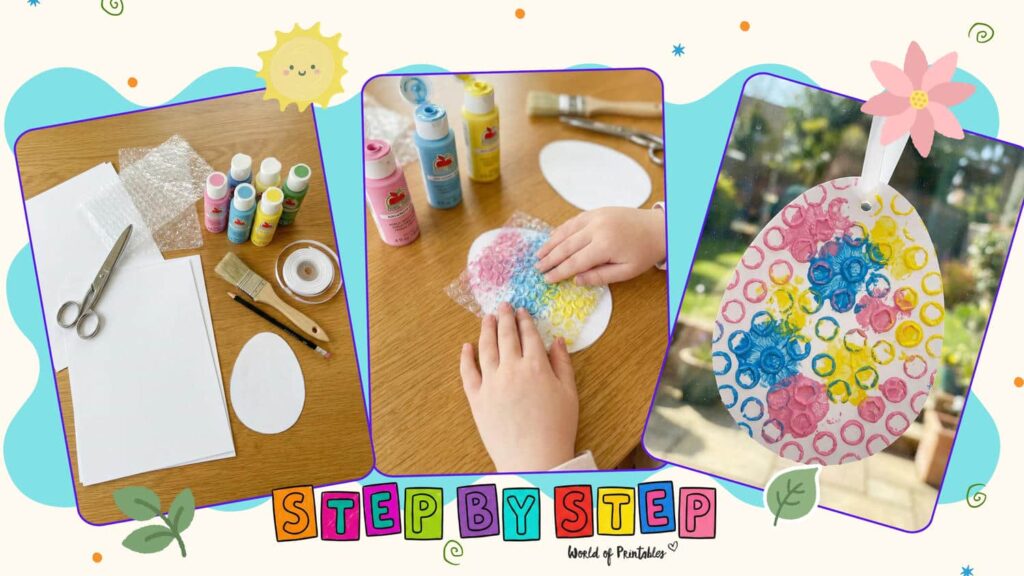
Add a pop of pattern to your Easter decorations with these vibrant, textured eggs! This project uses recycled bubble wrap as a unique printing tool, allowing Little Makers to experiment with color mixing and patterns. It’s a sensory-friendly way to create beautiful, honeycomb-style designs that look stunning as a hanging display.
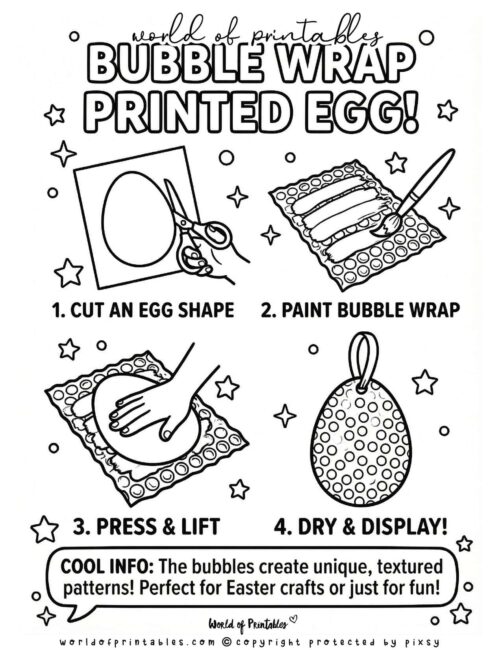
How to Make a Bubble Wrap Printed Egg (Using The Little Maker’s Visual Guide)
Materials Needed:
- White Cardstock: To cut out your sturdy egg shapes.
- Bubble Wrap: The secret to creating those fun, circular patterns.
- Acrylic Paint: A variety of bright Easter colors like pink, blue, and yellow.
- Paintbrush: To apply the paint onto the bubble wrap.
- White Ribbon: For hanging your finished masterpiece.
- Scissors: To carefully cut your egg shapes.
- Pencil: To trace your egg template before cutting.
To get the best results, we recommend printing out our The Little Maker’s Visual Guide to keep on the table during the craft.
- Cut Your Egg: Trace an egg shape onto your white cardstock and cut it out with scissors.
- Paint the Bubbles: Use your brush to apply different colors of paint directly onto the bumpy side of a piece of bubble wrap.
- Press and Print: Carefully lay your paper egg onto the wet paint and press down firmly with your hand to transfer the texture.
- Lift and Reveal: Peel the egg away to reveal the colorful pattern, let it dry, and then attach a ribbon through a small hole at the top to display your work!
Sweet Treats: Plastic Spoon Bunnies
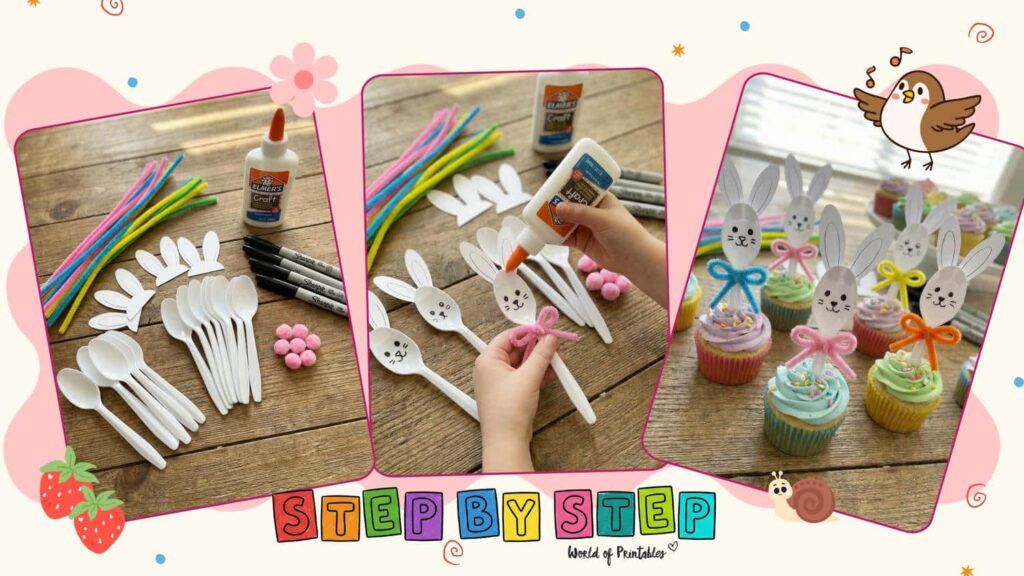
Hop into the holiday spirit with these adorable plastic spoon bunnies! This project is a clever way to transform simple kitchen staples into festive characters that double as charming cupcake toppers. It’s a wonderful hands-on activity that encourages Little Makers to use their imagination while practicing fine motor skills through drawing and assembly.

How to Make a Plastic Spoon Bunny (Using The Little Maker’s Visual Guide)
Materials Needed:
- White Plastic Spoons: To serve as the body and head of your bunny.
- Paper Ears: Pre-cut bunny ear shapes ready for assembly.
- Colorful Pipe Cleaners: For creating a bright, decorative bow.
- Black Marker: To draw a sweet bunny face.
- Craft Glue: To secure the ears and decorations.
- Mini Pink Pom-Poms: For a cute finishing touch on the handle.
To get the best results, we recommend printing out our The Little Maker’s Visual Guide to keep on the table during the craft.
- Get Your Base: Start with a clean white plastic spoon and a pair of paper ears.
- Add the Face: Use your black marker to draw eyes, a nose, and whiskers directly onto the back of the spoon’s bowl.
- Attach the Ears: Carefully glue your paper ears onto the top of the spoon to give your bunny its signature look.
- Tie a Bow: Wrap a colorful pipe cleaner around the “neck” of the spoon and twist it into a neat bow.
- Decorate and Display: Add a mini pom-pom for extra detail and place your finished bunny into a cupcake or Easter display for a festive treat!
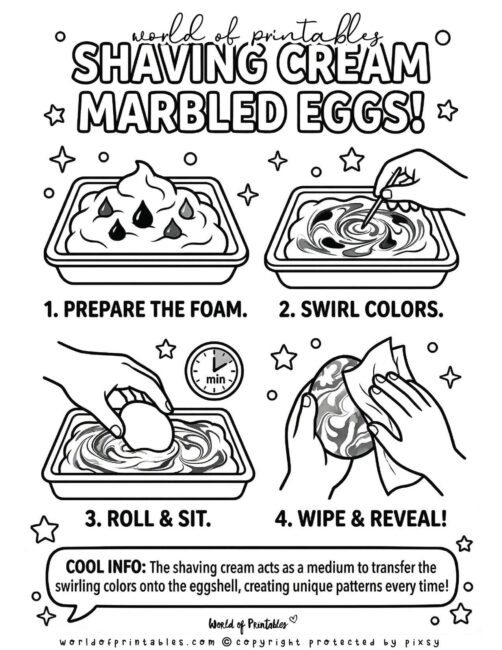
Messy Masterpieces: Shaving Cream Marbled Eggs
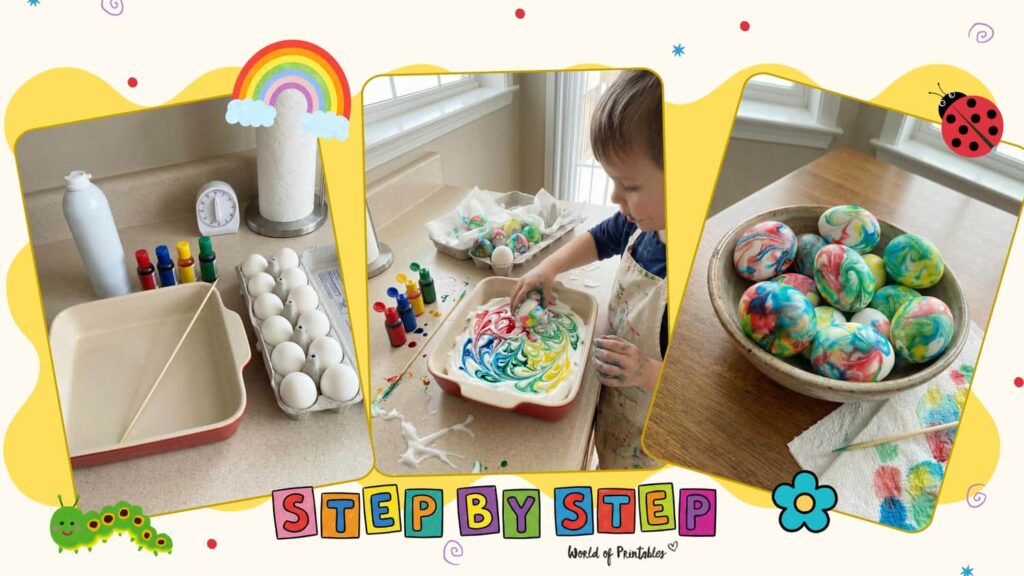
Get ready for a sensory explosion with these swirling, marbled Easter eggs! This activity is a total crowd-pleaser for Little Makers because it turns shaving foam into a magical canvas for color mixing. By rolling real eggs through vibrant foam, kids create one-of-a-kind, psychedelic patterns that look professionally dyed but are purely the result of messy, hands-on play.
How to Make Marbled Eggs (Using The Little Maker’s Visual Guide)
Materials Needed:
- Hard-Boiled Eggs: Freshly cooked and cooled eggs ready for their makeover.
- Shaving Cream: A canister of white foam to act as your swirling medium.
- Food Coloring or Liquid Watercolors: Bright primary colors like red, yellow, blue, and green.
- Deep Baking Dish: A tray or pan to hold your colorful foam mixture.
- Wooden Skewer or Stirrer: To swirl the colors into beautiful patterns.
- Paper Towels: Essential for wiping away the excess foam to reveal the design.
To get the best results, we recommend printing out our The Little Maker’s Visual Guide to keep on the table during the craft.
- Prepare the Foam: Fill your baking dish with a thick layer of shaving cream and add drops of different colored dyes across the surface.
- Swirl the Colors: Use your wooden skewer to gently drag the colors through the foam, creating a marbled, rainbow effect.
- Roll and Sit: Carefully place an egg into the foam and roll it around until it’s completely coated in color. Let it sit for a few minutes to allow the dye to transfer to the shell.
- Wipe and Reveal: Use a paper towel to gently wipe away the shaving cream, revealing a stunning marbled pattern underneath. Place your finished eggs in a bowl to display your vibrant Easter collection!
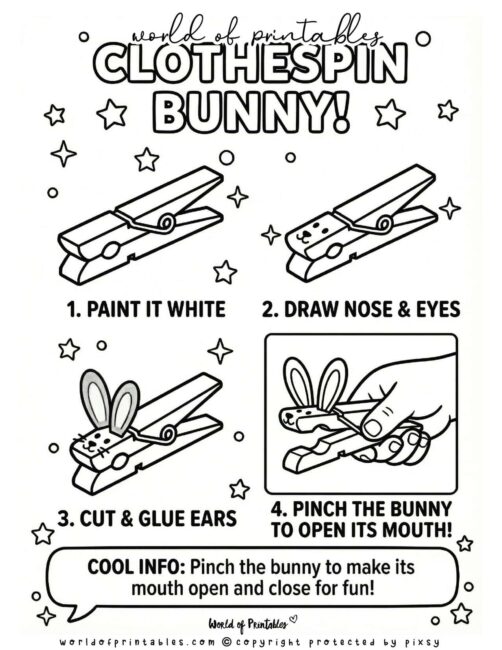
Adorable Spring Friends: Clothespin Bunnies
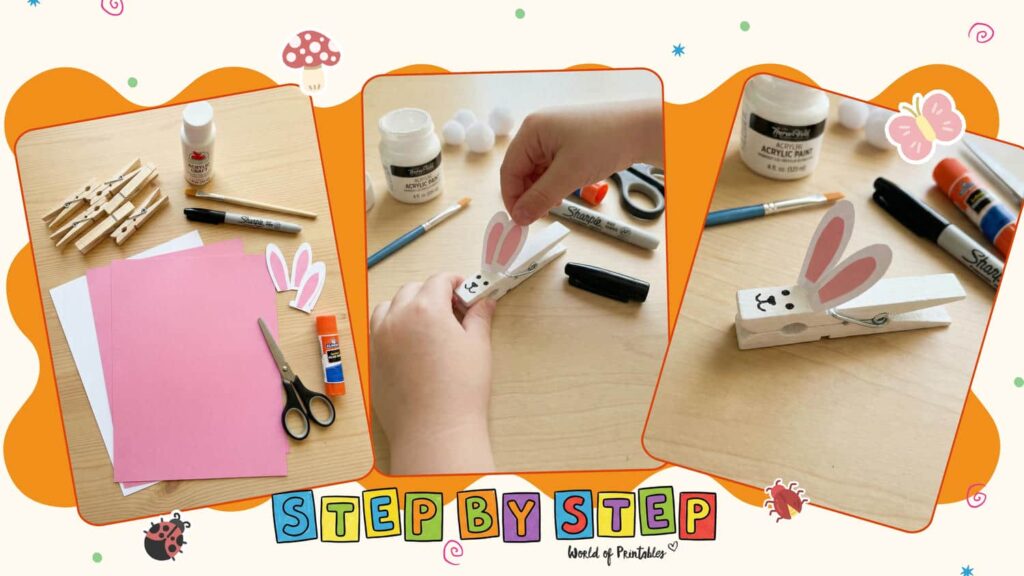
Hop into Easter with these charming clothespin bunnies! This project is a wonderful way for Little Makers to transform a simple household item into a festive character. It’s a great hands-on activity that encourages fine motor skills through painting, cutting, and careful assembly to create a bunny that can “clip” onto anything!
How to Make a Clothespin Bunny (Using The Little Maker’s Visual Guide)
Materials Needed:
- Wooden Clothespin: To serve as the sturdy body of your bunny.
- White Paint & Brush: To give your bunny its clean, bright color.
- Pink and White Cardstock: For cutting out the iconic bunny ears.
- Black Marker: To draw a sweet face directly onto the wood.
- Scissors: To carefully shape the paper ears.
- Glue Stick: To secure the ears in place.
- White Pom-Poms: To add a soft, fluffy tail to the back.
To get the best results, we recommend printing out our The Little Maker’s Visual Guide to keep on the table during the craft.
- Paint the Body: Start by painting your wooden clothespin completely white and let it dry.
- Add the Face: Use your black marker to draw two eyes and a tiny bunny nose and mouth at the top of the clothespin.
- Craft the Ears: Cut out two white ear shapes and two smaller pink inner-ear shapes, then glue them together.
- Assemble Your Bunny: Glue the finished ears to the back of the clothespin’s “head” and stick a fluffy white pom-pom on the bottom for the tail.
- Clip and Play: Your bunny is ready! Use it to hold Easter cards, decorate a basket, or just hop around for fun.
Timeless Treasures: Salt Dough Easter Keepsakes
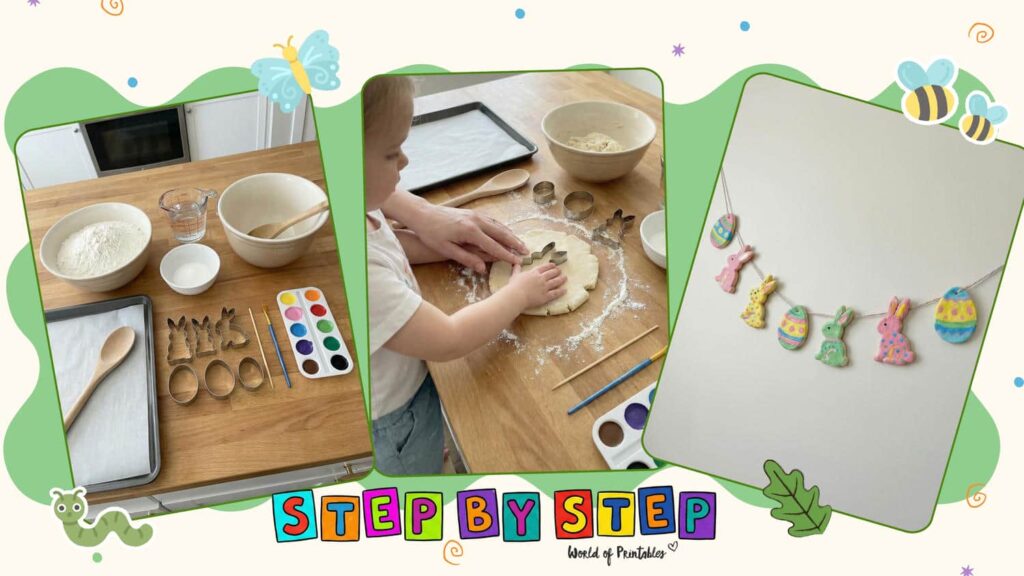
Capture the magic of the season with these beautiful, handmade salt dough ornaments! This classic craft is a wonderful way for Little Makers to get hands-on in the kitchen, mixing simple ingredients to create lasting decorations. Whether you’re making festive eggs or hopping bunnies, these keepsakes are perfect for hanging on an Easter tree or gifting to loved ones.
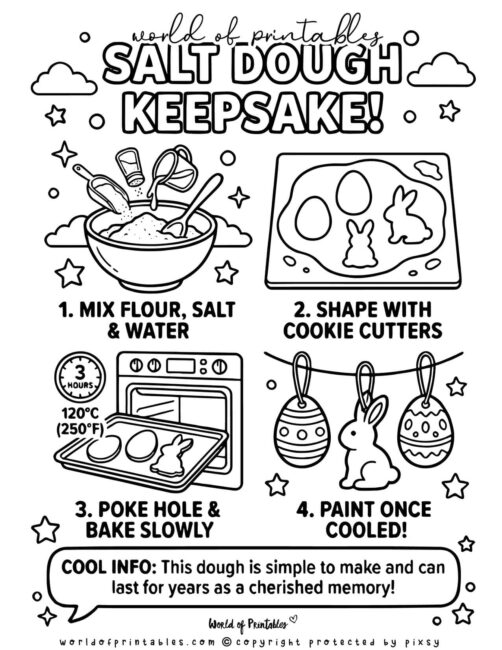
How to Make Salt Dough Keepsakes (Using The Little Maker’s Visual Guide)
Materials Needed:
- Dough Ingredients: Flour, salt, and water to create your sculpting base.
- Mixing Tools: A large bowl and a wooden spoon for combining your ingredients.
- Easter Cookie Cutters: Bunny and egg shapes to create your festive designs.
- Baking Tray & Paper: To hold your creations while they bake slowly in the oven.
- Wooden Skewer: To poke a small hole at the top of each shape for hanging.
- Watercolors & Brush: A palette of bright colors to decorate your keepsakes once they have cooled.
- Twine or String: To loop through your ornaments and create a beautiful hanging garland.
To get the best results, we recommend printing out our The Little Maker’s Visual Guide to keep on the table during the craft.
- Mix Your Dough: Combine your flour, salt, and water in a bowl and stir until you have a smooth, firm dough.
- Shape Your Ornaments: Roll out the dough and use your Easter cookie cutters to press out bunny and egg shapes.
- Bake Slowly: Use a wooden skewer to poke a hole at the top of each shape. Place them on a lined tray and bake at 120°C (250°F) for about 3 hours until completely firm.
- Paint and Display: Once cooled, use your watercolors to add vibrant patterns and colors. String them onto your twine to create a stunning Easter display!
Bloom into Spring: Egg Carton Flowers
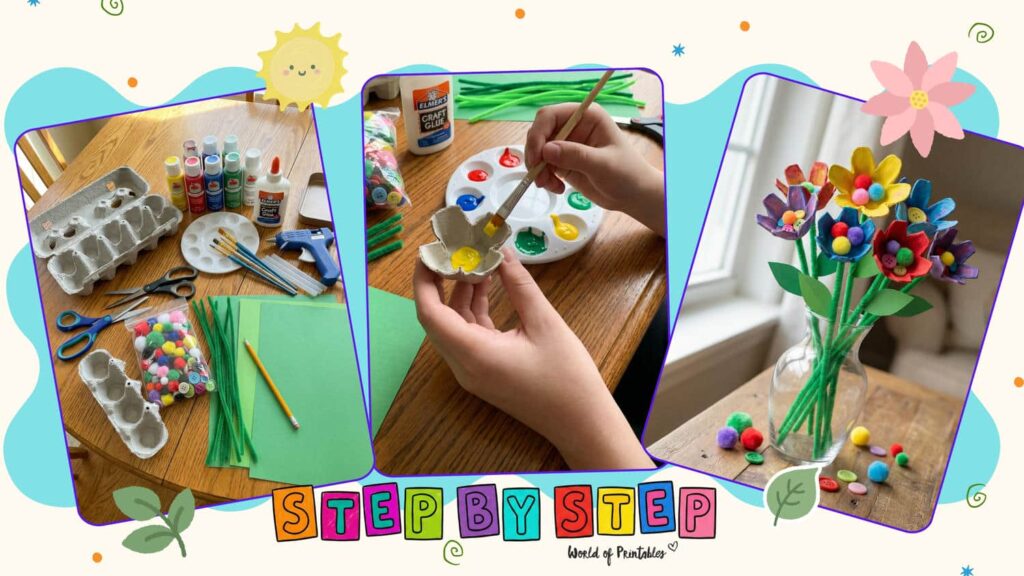
Upcycle your leftover egg cartons into a stunning bouquet of everlasting flowers! This craft is a brilliant way for Little Makers to practice recycling while exploring color and assembly. By transforming simple cardboard cups into vibrant petals, kids can create a cheerful spring centerpiece that brings a pop of color to any room.
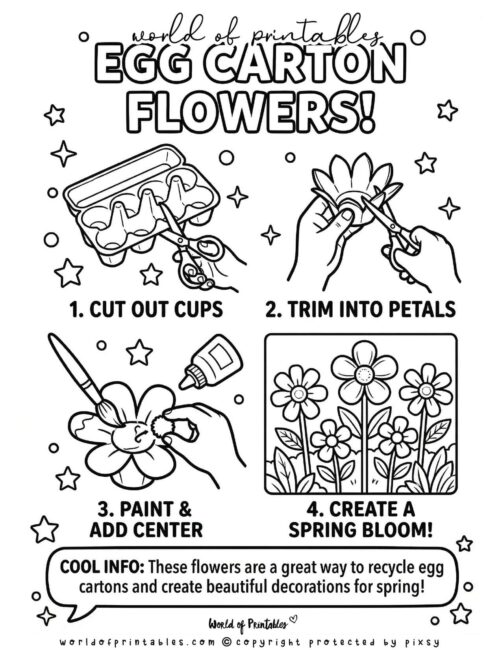
How to Make Egg Carton Flowers (Using The Little Maker’s Visual Guide)
Materials Needed:
- Egg Carton: The cardboard base for your floral cups.
- Acrylic Paint & Brushes: A palette of bright colors like yellow, red, and blue to decorate your petals.
- Green Pipe Cleaners: To act as sturdy, flexible flower stems.
- Green Construction Paper: For cutting out vibrant leaf shapes.
- Colorful Pom-Poms & Buttons: To create fun, textured centers for each bloom.
- Glue: Both liquid craft glue and a glue gun (with adult help) for secure assembly.
- Scissors: To trim the carton and shape your petals.
To get the best results, we recommend printing out our The Little Maker’s Visual Guide to keep on the table during the craft.
- Cut Out Cups: Carefully cut individual cups out of the egg carton.
- Trim into Petals: Use your scissors to trim the edges of each cup into rounded or pointed petal shapes.
- Paint and Center: Paint your flowers with your favorite bright colors. Once dry, glue a pom-pom or button into the center of each cup for a decorative touch.
- Create a Spring Bloom: Attach a green pipe cleaner stem to the base of each flower and add paper leaves to finish your bouquet.
Chirpy Friends: Paper Plate Chicks
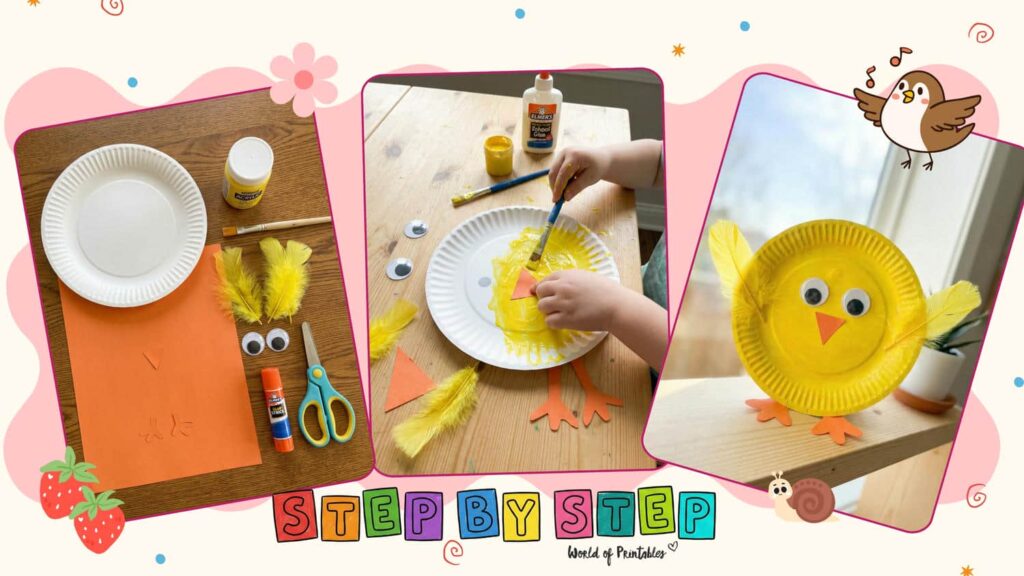
Bring a burst of sunshine into your home with these cheerful paper plate chicks! This project is a fantastic way for Little Makers to explore different textures by combining smooth paper, fuzzy feathers, and cardstock. It’s a simple yet engaging craft that results in a bold, 3D character perfect for a spring windowsill or a festive Easter display.
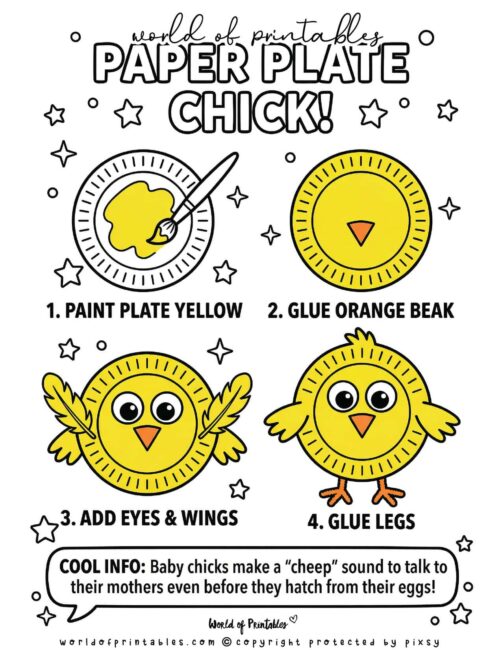
How to Make a Paper Plate Chick (Using The Little Maker’s Visual Guide)
Materials Needed:
- Small White Paper Plate: To serve as the sturdy, round body of your chick.
- Yellow Acrylic Paint & Brush: To give your chick its bright, sunny color.
- Orange Construction Paper: For cutting out a triangular beak and two little chick feet.
- Large Googly Eyes: To give your chick a fun and friendly expression.
- Yellow Feathers: To add a soft, “fluffy” texture to the wings.
- Glue Stick: For easy assembly of the face and legs.
- Scissors: To carefully cut your orange paper shapes.
To get the best results, we recommend printing out our The Little Maker’s Visual Guide to keep on the table during the craft.
- Paint the Plate: Cover the entire front of your paper plate with bright yellow paint and let it dry completely.
- Add the Face: Glue your large googly eyes near the top and your orange triangular beak in the center of the plate.
- Attach the Wings: Glue a yellow feather to each side of the plate to create soft, textured wings.
- Finish with Feet: Glue your pre-cut orange chick legs to the bottom of the plate. Now your chirpy friend is ready to be admired!
Recycled Fun: Toilet Paper Roll Bunnies
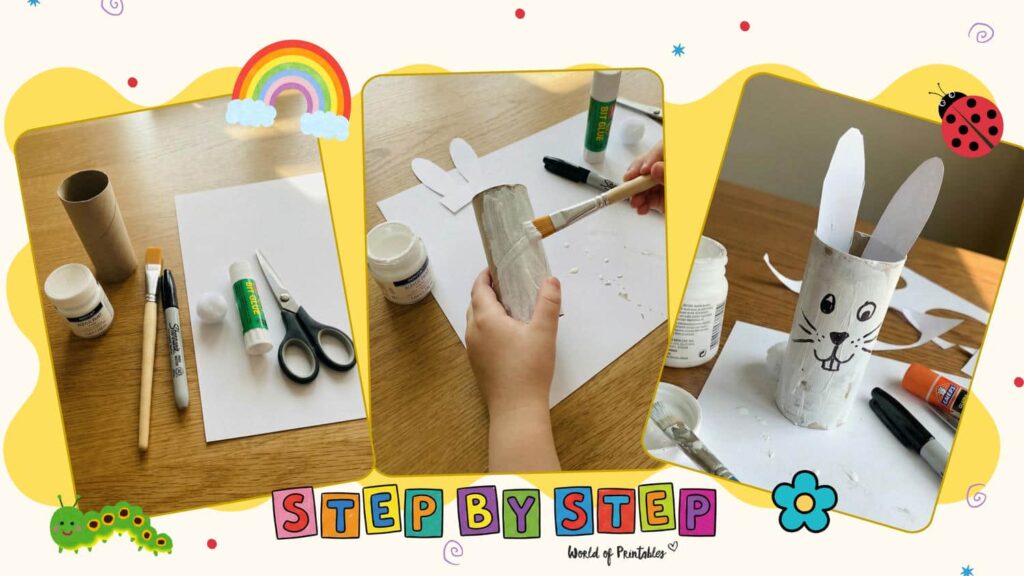
Hop into the holiday spirit by upcycling everyday items into these charming Easter characters! This project is a fantastic way for Little Makers to transform a simple cardboard tube into a festive bunny that stands on its own. It’s a great hands-on activity that encourages fine motor skills through painting, drawing, and careful assembly.
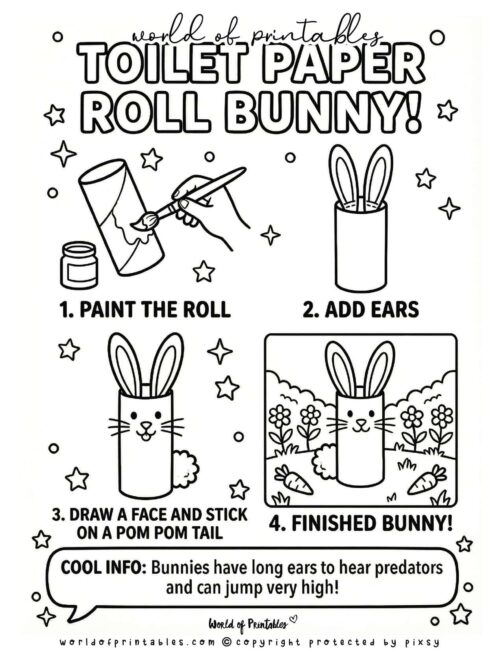
How to Make a Toilet Paper Roll Bunny (Using The Little Maker’s Visual Guide)
Materials Needed:
- Cardboard Toilet Paper Roll: The recycled base for your bunny’s body.
- White Paint & Brush: To give your bunny a bright, clean coat.
- White & Pink Paper: For cutting out the iconic long bunny ears.
- Black Marker: To draw a sweet face and long whiskers.
- White Pom-Pom: To add a soft, fluffy tail to the back.
- Glue: To secure the ears and the pom-pom tail.
- Scissors: To carefully shape your paper ears.
To get the best results, we recommend printing out our The Little Maker’s Visual Guide to keep on the table during the craft.
- Paint the Roll: Start by painting your cardboard roll completely white and letting it dry.
- Add the Ears: Cut out two long ear shapes and glue them to the inside top of the roll.
- Draw the Face: Use your black marker to draw two eyes, a nose, a mouth, and whiskers on the front.
- Attach the Tail: Stick a fluffy white pom-pom onto the bottom back of the roll to finish your bunny!
Keep the Easter Magic Hopping!
By transforming simple household items into a festive art studio, you’re teaching Little Makers that a spark of imagination is all you need to celebrate the holiday. We hope these Visual Guides inspire your family to embrace the bright colors and playful spirit of the season with creativity and confidence!
If you’re looking for more ways to stay busy this season, don’t miss our Ultimate Collection of Holiday Crafts for Kids!
More Easter Crafts & Printables
Looking for more ways to celebrate? Check out these other free resources:
- Free Printable Easter Coloring Pages
- Free Printable Easter Cards – Save, Print & Fold!
- 10 Easy Spring Crafts for Kids: Fun, Floral, and Eco-Friendly!
- Free Printable Easter Egg Hunt Clues
- Spring Coloring Pages
- Spring Templates and Worksheets
Follow World of Printables on Pinterest
COPYRIGHT
The printables that you find here are the copyright of World of Printables – you cannot redistribute or sell any of these printables or templates, although you can link back to our website.
AI TRANSPARENCY: Whilst the majority of our creations have been created completely traditionally, occasionally we utilize AI tools in our design process. We acknowledge the advancements in AI technology and leverage them responsibly to optimize our creative output. However, it is important to note that our utilization of AI does not compromise the human element of our work. Our commitment to delivering high-quality designs through a balanced integration of traditional expertise and AI enhancements remains paramount.