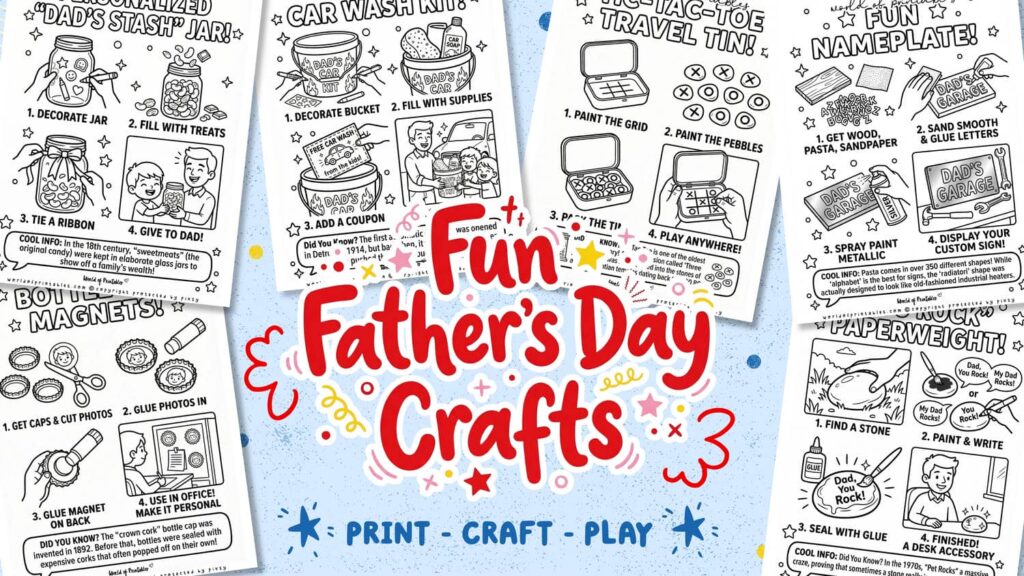
Skip the store-bought card this year (use our printable cards) and help the kids create something Dad will actually treasure! While we love a quick printable, there’s nothing quite like a handmade gift that Dad can use at his desk, in the garage, or outdoors. From “tech-savvy” organizers to “handyman” keepsakes, these 10 DIY Father’s Day crafts are designed to be fun, functional, and – most importantly – easy for little hands to put together.
Scroll down to find your favorite project, click any Visual Guide image to open the printable PDF, and let’s start creating something fun!
💡 Teacher/Parent Tip: Print out The Little Maker’s Visual Guide and set it on the table. It’s designed so kids can follow the pictures and lead the craft themselves – giving them a huge boost of “I did it!” confidence!
Bottle Cap Magnets
Looking for a unique way to display family photos? These DIY bottle cap magnets are a fantastic, upcycled gift that turns simple soda caps into a “mini gallery” of dads favorite people. They are perfectly sized for an office whiteboard or the kitchen fridge, making them a practical and sentimental keepsake.
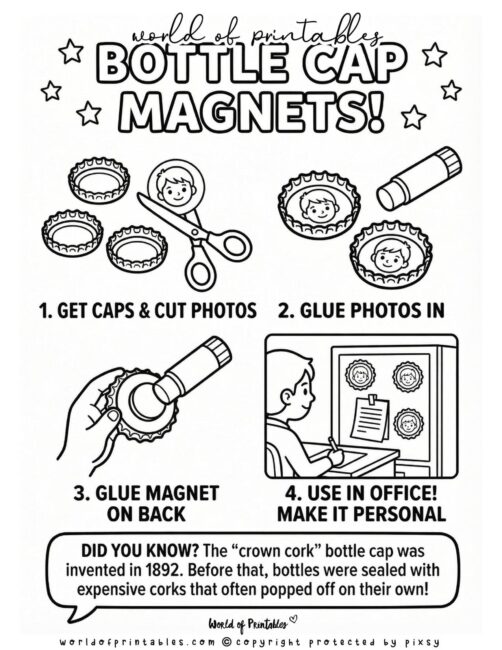
How to Make Bottle Cap Magnets (Using The Little Maker’s Visual Guide)
Materials Needed:
- Bottle Caps: Collect several clean metal caps from Dad’s favorite beverages.
- Small Photos: Print out small pictures of the kids’ faces to fit inside the caps.
- Scissors: To carefully trim your photos into perfect circles.
- Glue Stick or Strong Craft Glue: To secure the photos and the magnets in place.
- Magnets: Small, sturdy magnets to attach to the back of each finished cap.
To get the best results, we recommend printing out our The Little Maker’s Visual Guide to keep on the table during the craft.
- Get Caps & Cut Photos: Gather your bottle caps and use your scissors to cut your printed photos into circles that fit snugly inside the caps.
- Glue Photos In: Apply a small amount of glue to the back of each photo and press them firmly into the bottom of the bottle caps.
- Glue Magnet on Back: Flip the caps over and glue a magnet to the center of the underside.
- Use in Office!: Once dry, these magnets are ready to hold up notes and photos in Dad’s office, adding a personal touch to his workspace!
Dad’s Car Wash Kit
Help dad keep his favorite ride sparkling clean with a customized car wash kit! This practical and fun gift is perfect for kids who want to give dad something he can actually use while spending some quality time together outdoors. Personalizing the bucket makes it a standout gift that shows just how much you care.
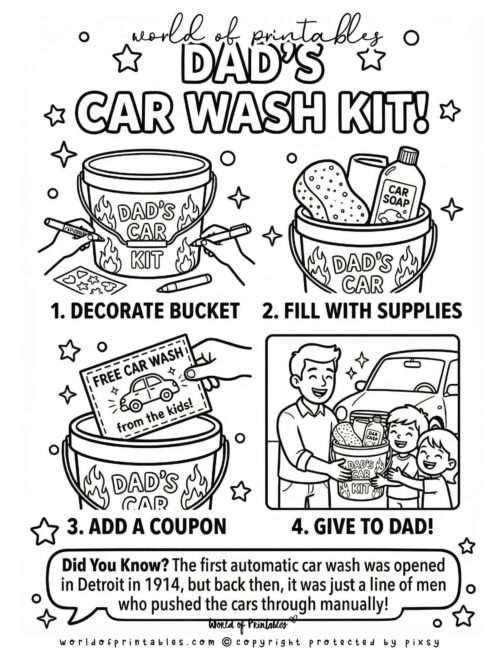
How to Make Dad’s Car Wash Kit (Using The Little Maker’s Visual Guide)
Materials Needed:
- Plastic Bucket: A large, sturdy bucket to hold all the supplies and serve as the main wash basin.
- Markers or Stickers: For decorating the outside of the bucket
- Car Soap, Sponge, and Towel: Essential cleaning supplies to fill the kit.
- Cardstock: To create a special “Free Car Wash” coupon from the kids.
To get the best results, we recommend printing out our The Little Maker’s Visual Guide to keep on the table during the craft.
- Decorate Bucket: Use your markers or stickers to decorate the bucket, making sure to label it clearly as “Dad’s Car Kit”.
- Fill with Supplies: Place your car soap, sponge, and any other cleaning tools inside the bucket.
- Add a Coupon: Create a “Free Car Wash from the kids!” coupon and tuck it right on top of the supplies.
- Give to Dad!: Present the finished kit to Dad for a Father’s Day gift he can get to work with right away!
Golf Tee Holder
For the Dad who loves to spend his weekends on the green, this DIY Golf Tee Holder is the perfect desktop accessory! It’s a fun, hands-on project that uses air-dry clay to create a functional piece of art, ensuring Dad always has his spare tees within arm’s reach when he needs them!
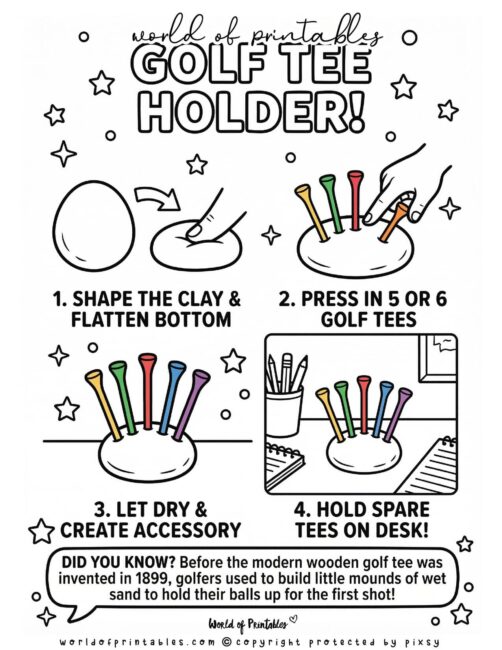
How to Make a Golf Tee Holder (Using The Little Maker’s Visual Guide)
Materials Needed:
- Air-Dry Clay: To shape the sturdy base of your holder.
- Golf Tees: Use 5 or 6 colorful tees to create the “spikes” of the holder.
- Paint (Optional): If you want to add an extra splash of color to the clay base once it’s dry.
To get the best results, we recommend printing out our The Little Maker’s Visual Guide to keep on the table during the craft.
- Shape the Clay & Flatten Bottom: Roll your air-dry clay into a smooth ball or oval, then press it gently against the table to create a flat, stable bottom.
- Press in 5 or 6 Golf Tees: Carefully push your colorful golf tees into the top of the clay, spacing them out so they stand upright.
- Let Dry & Create Accessory: Leave the clay to sit undisturbed until it is completely hard, creating a permanent desk accessory.
- Hold Spare Tees!: Once set, Dad can use his new holder to keep his favorite tees organized and ready for his next round of golf!
Handprint “Catch-All” Dish
Capture a moment in time with this sweet and practical “catch-all” dish! This handprint craft creates a unique bowl shape that is perfect for holding Dad’s keys, rings, or spare change. It’s a wonderful keepsake that combines a child’s personal touch with a useful item for Dad’s bedside table or dresser.
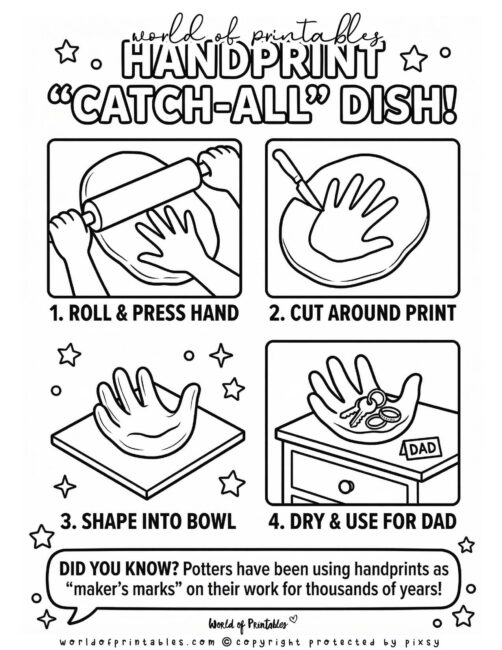
How to Make a Handprint “Catch-All” Dish (Using The Little Maker’s Visual Guide)
Materials Needed:
- Air-Dry Clay or Salt Dough: To provide a soft, moldable base for the handprint.
- Rolling Pin: To smooth out the clay into an even layer before pressing.
- Butter Knife or Clay Tool: For carefully cutting out the shape of the handprint.
- Small Bowl (Optional): To help shape the hand into a curved “dish” while it dries.
To get the best results, we recommend printing out our The Little Maker’s Visual Guide to keep on the table during the craft.
- Roll & Press Hand: Use a rolling pin to flatten your clay, then have the child press their hand firmly into the center to leave a deep impression.
- Cut Around Print: Use a butter knife or clay tool to carefully cut around the outline of the handprint.
- Shape Into Bowl: Gently lift the clay hand and curve the fingers upward to create a bowl-like shape.
- Dry & Use For Dad: Once the clay is completely dry and hard, it’s ready to be gifted to Dad to hold his smallest treasures!
Fun Nameplate
If Dad has a dedicated workspace or garage, he definitely needs a custom sign to make it official! This “Fun Nameplate” project uses a clever kitchen pantry staple – alphabet pasta – to create professional-looking industrial lettering. It’s a fantastic way for kids to practice spelling while creating a rugged piece of decor that looks like it’s made of heavy-duty metal once it’s finished.
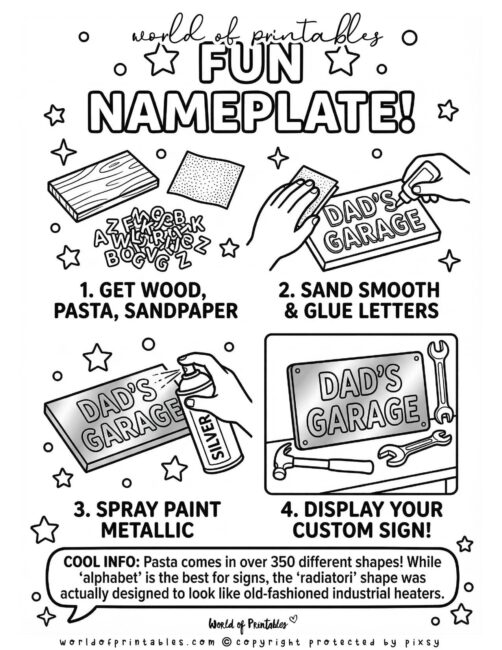
How to Make a Fun Nameplate (Using The Little Maker’s Visual Guide)
Materials Needed:
- Wood: A small rectangular piece of scrap wood to serve as the base.
- Alphabet Pasta: To spell out “Dad’s Garage” or his name.
- Sandpaper: To smooth out the edges of the wood for a clean finish.
- Glue: To secure the pasta letters firmly to the wood.
- Silver Spray Paint: To give the entire sign a metallic, industrial look.
To get the best results, we recommend printing out our The Little Maker’s Visual Guide to keep on the table during the craft.
- Get Wood, Pasta, & Sandpaper: Gather your materials and choose the letters you need to spell your message.
- Sand Smooth & Glue Letters: Use the sandpaper to smooth the wood, then carefully glue your pasta letters onto the surface.
- Spray Paint Metallic: In a well-ventilated area, have an adult help spray the entire sign with silver paint until it looks like metal.
- Display Your Custom Sign!: Once dry, Dad can hang his new nameplate in his garage or office to show off his custom space!
Personalized “Dad’s Stash” Jar
Does Dad have a sweet tooth or a favorite savory snack? This personalized “stash” jar is a simple and thoughtful way to keep his favorite treats organized and easily accessible. It’s a great project for younger kids who love to decorate, and it results in a custom gift that Dad can keep right on his desk or nightstand.
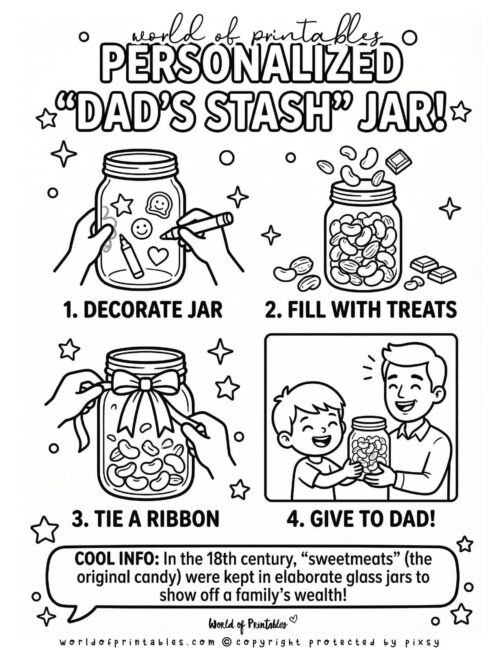
How to Make a Personalized “Dad’s Stash” Jar (Using The Little Maker’s Visual Guide)
Materials Needed:
- Glass or Plastic Jar: A clean jar with a lid to hold the treats.
- Markers or Stickers: To decorate the jar with stars, hearts, and smiley faces.
- Favorite Treats: Fill the jar with Dad’s favorite nuts, chocolates, or candies.
- Ribbon: To tie a decorative bow around the neck of the jar for a finished look.
To get the best results, we recommend printing out our The Little Maker’s Visual Guide to keep on the table during the craft.
- Decorate Jar: Use markers or stickers to add a personal touch to the outside of the jar, making sure to leave plenty of room for your designs.
- Fill With Treats: Carefully pour Dad’s favorite snacks into the jar until it is full.
- Tie a Ribbon: Cut a piece of ribbon and tie it into a beautiful bow around the top of the jar.
- Give to Dad!: Present the “Stash Jar” to Dad so he can enjoy his treats whenever he needs a little pick-me-up!
Magnetic Parts Dish
Every handyman knows the frustration of losing tiny screws and bolts in the middle of a project! This Magnetic Parts Dish is a brilliant solution that’s as fun to make as it is useful. By combining a personalized touch with a powerful magnet, the kids can create a workshop essential that keeps Dad’s workspace organized and his hardware right where he needs it.
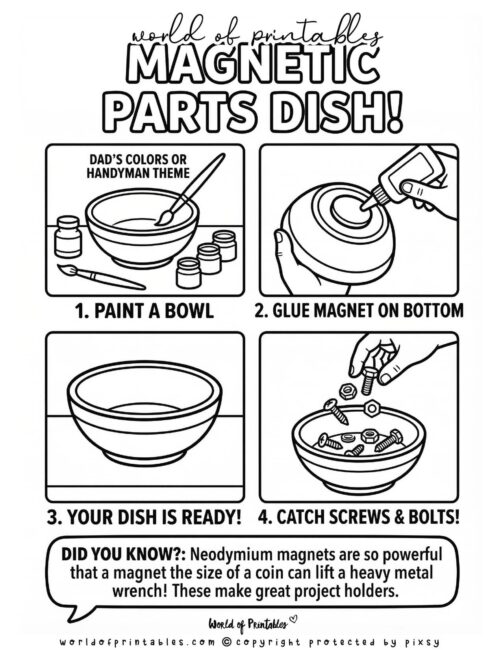
How to Make a Magnetic Parts Dish (Using The Little Maker’s Visual Guide)
Materials Needed:
- Small Bowl: Choose a ceramic or plastic bowl to serve as the base.
- Paint: Use colors Dad loves or create a “Handyman” theme with greys, blues, or yellows.
- Strong Magnet: A neodymium magnet to attach to the bottom of the dish.
- Strong Glue: To ensure the magnet stays securely in place.
To get the best results, we recommend printing out our The Little Maker’s Visual Guide to keep on the table during the craft.
- Paint a Bowl: Decorate your bowl using Dad’s favorite colors or a fun handyman theme.
- Glue Magnet on Bottom: Once the paint is dry, apply a dab of strong glue to the center of the underside and press the magnet firmly in place.
- Your Dish is Ready!: Let the glue set completely so the magnet is secure.
- Catch Screws & Bolts!: Dad can now use his new dish to catch and hold metal screws, nuts, and bolts while he works on his latest project!
Nuts and Bolts Picture Frame
If Dad loves spending time in his workshop, this “Nuts and Bolts” picture frame is the perfect industrial-style gift for his desk or bedside table! It turns a simple, plain frame into a rugged masterpiece using real hardware, making it a great way to showcase a favorite family memory with a “handyman” twist.
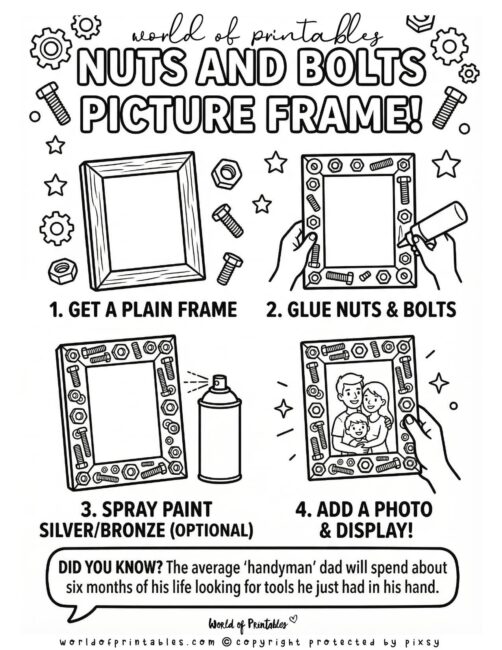
How to Make a Nuts and Bolts Picture Frame (Using The Little Maker’s Visual Guide)
Materials Needed:
- Plain Frame: Start with a simple wooden or plastic frame.
- Nuts & Bolts: A variety of metal hex nuts, bolts, and washers from the hardware store.
- Strong Glue: To ensure the heavy hardware stays attached to the frame.
- Spray Paint (Optional): Silver or bronze paint if you want a uniform, metallic finish.
- Family Photo: A favorite picture to place inside the finished frame.
To get the best results, we recommend printing out our The Little Maker’s Visual Guide to keep on the table during the craft.
- Get a Plain Frame: Find a basic frame with flat edges that are wide enough to hold your hardware.
- Glue Nuts & Bolts: Apply glue to the back of your nuts and bolts and arrange them all around the border of the frame.
- Spray Paint Silver/Bronze (Optional): If you want a specific look, have an adult help spray paint the decorated frame a metallic color.
- Add a Photo & Display!: Once the glue and paint are completely dry, slide in your photo and find the perfect spot for Dad to display it!
“You Rock” Paperweight
Brighten up Dad’s workspace with a gift that’s as solid as he is! This “You Rock” paperweight is a wonderful nature-inspired project that turns a simple stone into a personalized desk accessory. It’s a great way for kids to show their appreciation while creating something practical that Dad can use to keep his important papers in place.
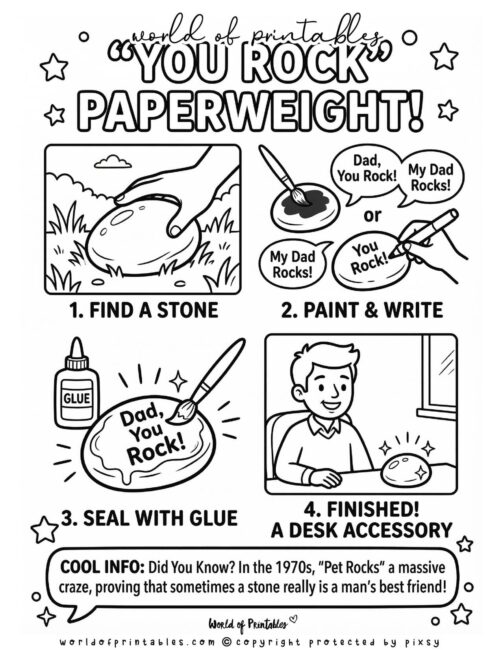
How to Make a “You Rock” Paperweight (Using The Little Maker’s Visual Guide)
Materials Needed:
- Smooth Stone: Find a medium-sized stone with a flat surface for painting and writing.
- Paint and Brushes: Use acrylic paints to give your stone a colorful base.
- Permanent Marker: To write a special message like “Dad, You Rock!” or “My Dad Rocks!”.
- Clear Glue or Sealer: To coat the finished rock and give it a shiny, durable finish.
To get the best results, we recommend printing out our The Little Maker’s Visual Guide to keep on the table during the craft.
- Find a Stone: Head outside to find the perfect smooth stone for your project.
- Paint & Write: Paint your stone a solid color, let it dry, and then use a marker to write your “You Rock” message.
- Seal with Glue: Apply a thin layer of clear glue or sealer over the top to protect your design and make it shine.
- Finished! A Desk Accessory: Once dry, your custom paperweight is ready to take its place on Dad’s desk!
Tic-Tac-Toe Travel Tin
Turn a simple mint tin into a portable game set that Dad can take anywhere! This project is perfect for keeping the fun going during car rides, camping trips, or even while waiting at a restaurant. It’s a classic game with a handmade twist that Dad can slip right into his pocket or keep in the glove box for family game time on the go.

How to Make a Tic-Tac-Toe Travel Tin (Using The Little Maker’s Visual Guide)
Materials Needed:
- Metal Tin: A small, empty hinged tin (like an Altoids tin).
- Small Pebbles: 10 flat, smooth stones that fit easily inside the tin.
- Paint and Brushes: For creating the grid and marking your game pieces.
To get the best results, we recommend printing out our The Little Maker’s Visual Guide to keep on the table during the craft.
- Paint the Grid: Carefully paint a tic-tac-toe grid (two vertical lines and two horizontal lines) on the inside bottom of your tin.
- Paint the Pebbles: Use your paint to mark 5 pebbles with an “X” and 5 pebbles with an “O”.
- Pack the Tin: Once the paint is completely dry, place all 10 game pieces inside the tin and snap the lid shut.
- Play Anywhere!: Present the travel set to Dad so he’s always ready for a quick challenge, no matter where you are!
We hope these handmade gifts bring a huge smile to Dad’s face this Father’s Day! There is truly no better gift than one made with love (and maybe a little bit of glue). Happy Father’s Day!
More Fun Crafts & Printables
Check out these other free resources:
- 150+ Printable Father’s Day Cards
- Father’s Day Coloring Pages
- Free Father’s Day Certificates – Fun & Easy Gift Idea!
- 10 Creative & Easy Paper Plate Crafts for Kids
- Pipe Cleaner Crafts: 10 Easy & Colorful DIY Ideas
- Popsicle Stick Crafts: 10 Fun & Easy DIY Ideas
Follow World of Printables on Pinterest
COPYRIGHT
The printables that you find here are the copyright of World of Printables – you cannot redistribute or sell any of these printables or templates, although you can link back to our website.
AI TRANSPARENCY: Whilst the majority of our creations have been created completely traditionally, occasionally we utilize AI tools in our design process. We acknowledge the advancements in AI technology and leverage them responsibly to optimize our creative output. However, it is important to note that our utilization of AI does not compromise the human element of our work. Our commitment to delivering high-quality designs through a balanced integration of traditional expertise and AI enhancements remains paramount.