Get ready to turn your home into a vibrant fiesta! Cinco de Mayo is the perfect time to celebrate Mexican culture with bright colors, music, and a lot of creativity. These 10 simple projects use everyday household items like paper plates, dried beans, and cardboard tubes to create festive treasures that the whole family will love.
Scroll down to find your favorite project, click any Visual Guide image to open the printable PDF, and let’s start creating something fun!
💡 Teacher/Parent Tip: Print out The Little Maker’s Visual Guide and set it on the table. It’s designed so kids can follow the pictures and lead the craft themselves – giving them a huge boost of “I did it!” confidence!
Handprint Cactus
Bring a touch of the desert indoors with this adorable and prickly (but soft!) cactus friend. This handprint craft is a wonderful way to capture a moment in time while celebrating the vibrant spirit of Cinco de Mayo.
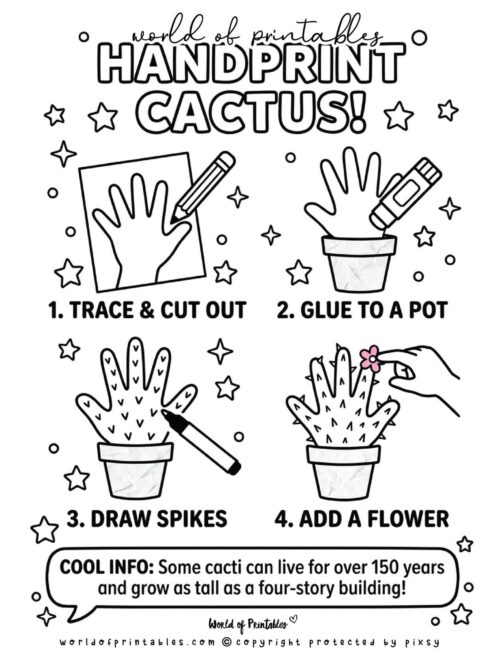
How to Make a Handprint Cactus (Using The Little Maker’s Visual Guide)
Materials Needed:
- Green Paper: To trace and cut out your unique handprint shape.
- Paper Cup: To act as the sturdy “pot” for your cactus to sit in.
- Markers: For drawing the little “v” shapes that look like spikes.
- Small Paper Flower: To give your cactus a bright, blooming final touch.
To get the best results, we recommend printing out our The Little Maker’s Visual Guide to keep on the table during the craft.
- Trace & Cut Out: Trace your hand onto green paper and carefully cut it out to form the cactus body.
- Glue to a Pot: Secure the bottom of the handprint into a small paper cup or onto a brown paper “pot”.
- Draw Spikes: Use a black marker to draw little “v” shapes all over the fingers for cactus spikes., or cut out little green spikes and glue them on!
- Add a Flower: Glue a tiny pink paper flower to the top of one finger for a finished, blooming look.
Popsicle Stick Flag
Learn about the colors and symbols of Mexico while building a sturdy, handheld flag. This project is a wonderful way for kids to practice their painting skills while creating a festive decoration for any Cinco de Mayo celebration.
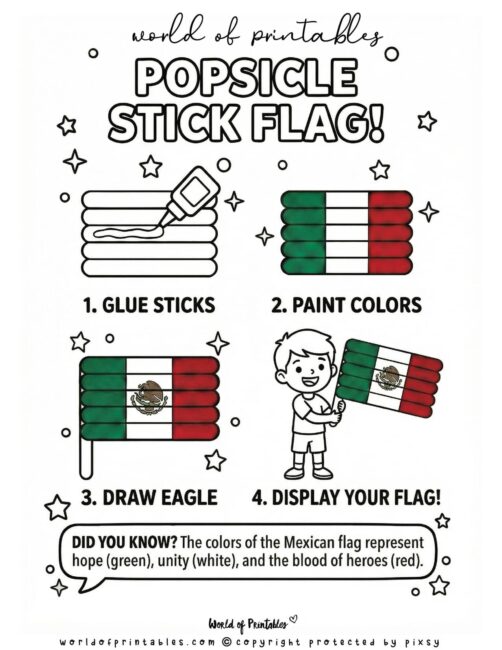
How to Make a Popsicle Stick Flag (Using The Little Maker’s Visual Guide)
Materials Needed:
- Popsicle Sticks: To form the base and handle of your flag.
- Glue: To securely bond the sticks together into a flat rectangle.
- Green, White, and Red Paint: For the official colors of the Mexican flag.
- Markers: To draw the detailed eagle emblem in the center.
To get the best results, we recommend printing out our The Little Maker’s Visual Guide to keep on the table during the craft.
- Glue Sticks: Glue five popsicle sticks together side-by-side to create a flat, rectangular base for your flag.
- Paint Colors: Paint the left section green, the middle section white, and the right section red to represent the three vertical stripes.
- Draw Eagle: Once the paint is completely dry, use a brown marker to carefully draw the eagle emblem in the center of the white stripe.
- Display Your Flag: Glue one final stick vertically to the back of your rectangle to act as a flagpole and display your finished creation!
Paper Plate Sombrero
Transform simple household items into a festive and wearable party hat! This paper plate sombrero is the perfect accessory for any Cinco de Mayo celebration, allowing kids to express their creativity through vibrant colors and patterns.
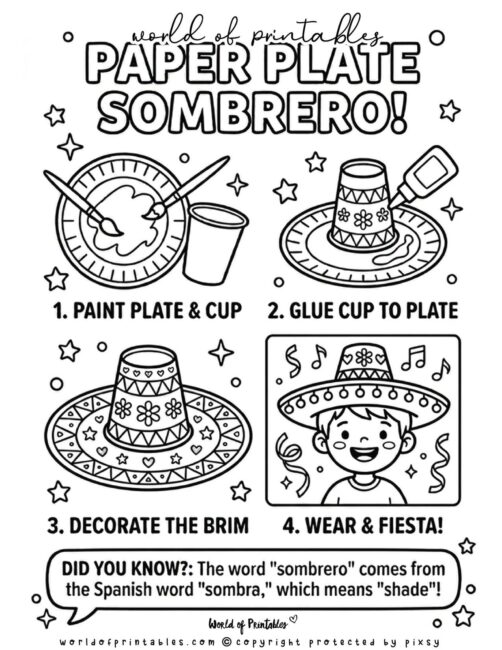
How to Make a Paper Plate Sombrero (Using The Little Maker’s Visual Guide)
Materials Needed:
- Paper Plate: To form the wide, protective brim of your festive sombrero.
- Paper Cup: To create the tall crown section in the center of the hat.
- Paint & Brush: For giving your sombrero a bold, colorful base and intricate patterns.
- Glue: To securely attach the crown to the brim.
To get the best results, we recommend printing out our The Little Maker’s Visual Guide to keep on the table during the craft.
- Paint Plate & Cup: Use bright colors to paint your paper plate and cup, adding fun designs like flowers or zig-zags as they dry.
- Glue Cup to Plate: Flip the paper cup upside down and glue it firmly onto the center of the painted paper plate.
- Decorate the Brim: Use markers or extra paint to add colorful patterns and stars all around the brim of your hat.
- Wear & Fiesta!: Once the glue is completely dry, put on your new sombrero and get ready to celebrate!
Cardboard Tube Maracas
Get ready to bring some music to your fiesta with these easy DIY maracas! This simple project uses recycled materials to create rhythmic instruments that kids can shake along to their favorite songs.

How to Make Cardboard Tube Maracas (Using The Little Maker’s Visual Guide)
Materials Needed:
- Cardboard Tube: A sturdy base for your instrument, like an empty toilet paper or paper towel roll.
- Markers: To add vibrant, festive patterns and colorful designs to your maraca.
- Tape: To securely seal both ends so your shaker filling stays safely inside.
- Beans or Rice: Small items to place inside the tube to create that classic rattling sound.
To get the best results, we recommend printing out our The Little Maker’s Visual Guide to keep on the table during the craft.
- Get Your Supplies: Gather your cardboard tube, markers, tape, and a spoonful of dried beans or rice to begin.
- Decorate Tube: Use your markers to draw colorful zig-zags, waves, and festive patterns all over the outside of the tube.
- Tape & Fill One End: Seal one end of the tube completely with tape, then carefully pour your beans or rice into the open end.
- Seal & Shake!: Securely tape the other end shut and start shaking your new instrument to create rhythm and sound!
Paper Bag Piñata
Get ready for a smashing good time with this easy, mess-free piñata! Perfect for a backyard fiesta, this simple paper bag version is a great way to celebrate Cinco de Mayo with a hidden surprise tucked inside.
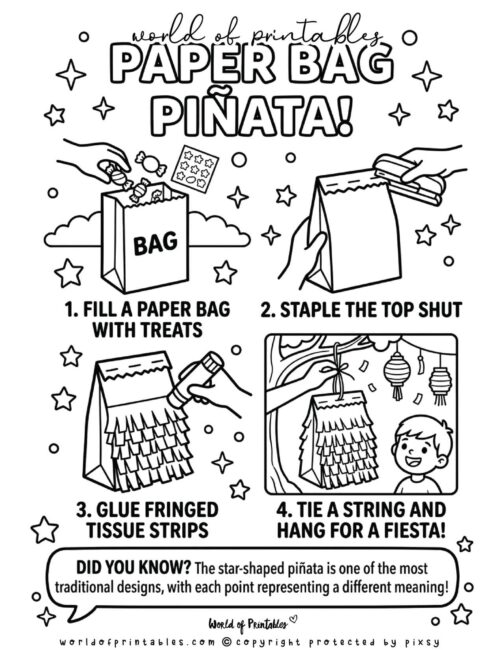
How to Make a Paper Bag Piñata (Using The Little Maker’s Visual Guide)
Materials Needed:
- Paper Bag: To act as the sturdy base and container for your festive creation.
- Treats: Small candies, stickers, or tiny toys to fill your piñata.
- Stapler: To securely seal the top of the bag so nothing falls out.
- Tissue Paper Strips: For creating that classic fringed, colorful look.
- Glue: To attach your vibrant, fringed decorations to the bag.
- String: To tie around the top so you can hang your finished piñata.
To get the best results, we recommend printing out our The Little Maker’s Visual Guide to keep on the table during the craft.
- Fill with Treats: Start by filling a brown paper bag with your favorite small treats, stickers, or fun surprises.
- Staple the Top: Fold the top of the bag over neatly and staple it shut to keep all the contents secure.
- Glue Fringed Strips: Apply glue to the bag and attach colorful, fringed tissue paper strips in layers until the bag is completely covered.
- Tie & Hang: Tie a piece of string around the top and hang it up to get your fiesta celebration started!
Paper Plate Taco
Create a “delicious” paper taco using a simple paper plate and colorful paper strips. This craft is a fun way to celebrate Cinco de Mayo by making one of the most famous Mexican dishes while practicing fine motor skills like folding and cutting.
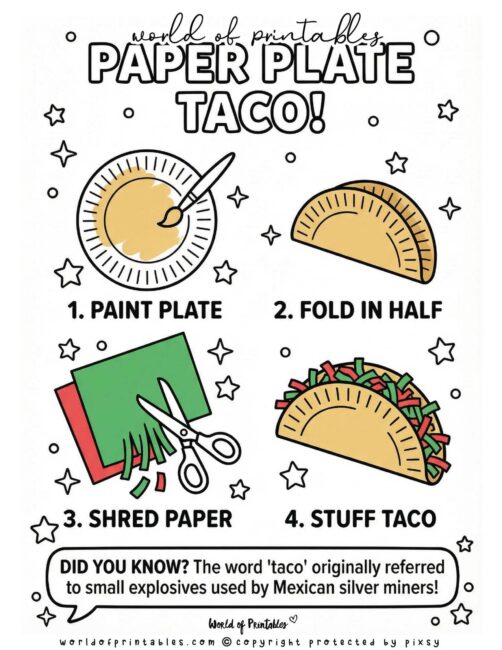
How to Make a Paper Plate Taco (Using The Little Maker’s Visual Guide)
Materials Needed:
- Paper Plate: To serve as the base for your sturdy taco shell.
- Paint: To color the plate and give it an authentic, toasted shell look.
- Red and Green Paper: These will be shredded into tasty-looking lettuce and tomato toppings.
- Scissors: Used to carefully shred the colored paper into thin strips.
To get the best results, we recommend printing out our The Little Maker’s Visual Guide to keep on the table during the craft.
- Paint Plate: Paint your paper plate a light yellow or tan color to represent a corn tortilla.
- Fold in Half: Once the paint is completely dry, carefully fold the paper plate in half to create the classic taco shape.
- Shred Paper: Use your scissors to cut thin, irregular strips of red and green paper to make your taco fillings.
- Stuff Taco: Place your shredded paper strips inside the folded plate to finish your colorful paper taco!
Paper Strip Corn (Elote)
Learn about the history of one of Mexico’s most important crops with this textured and colorful “Elote” craft. This project is a fantastic way for kids to practice cutting shapes and layering materials to create a fun, 3D version of grilled street corn.
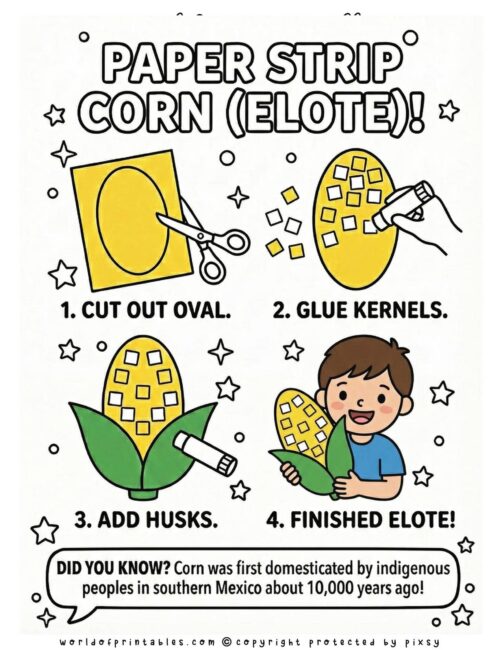
How to Make a Paper Strip Corn (Elote) (Using The Little Maker’s Visual Guide)
Materials Needed:
- Yellow Paper: To serve as the sturdy, oval-shaped base for your corn cob.
- Yellow and White Paper Squares: Small bits of paper to act as individual corn kernels.
- Green Paper: For cutting out the large, protective husks for the bottom of the corn.
- Glue & Scissors: Essential tools for cutting out your shapes and securing the kernels and husks in place
To get the best results, we recommend printing out our The Little Maker’s Visual Guide to keep on the table during the craft.
- Cut Out Oval: Use your scissors to cut a large oval shape out of the yellow paper to form the main body of the corn.
- Glue Kernels: Use your glue stick to attach the small yellow and white paper squares all over the oval until it is covered in “kernels”.
- Add Husks: Cut two leaf-shaped husks out of green paper and glue them to the bottom of your corn cob.
- Finished Elote!: Once the glue is dry, your vibrant paper corn is ready to be displayed as a festive decoration!
Tissue Paper Papel Picado
This traditional Mexican banner adds a beautiful, airy feel to any room while teaching kids about the symbolic importance of the wind in Mexican culture. Papel Picado is an intricate and vibrant craft that uses simple geometric cutouts to create stunning lace-like designs for your next fiesta.
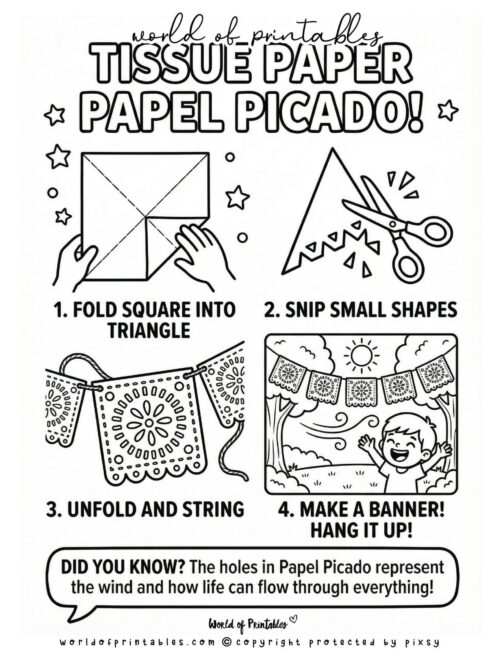
How to Make a Tissue Paper Papel Picado (Using The Little Maker’s Visual Guide)
Materials Needed:
- Tissue Paper Squares: Thin, bright paper that is easy to fold and cut into delicate shapes.
- Scissors: For snipping out various patterns and designs from the edges of the paper.
- Yarn or String: To hold all your finished panels together as a decorative banner.
To get the best results, we recommend printing out our The Little Maker’s Visual Guide to keep on the table during the craft.
- Fold Square into Triangle: Take a square of tissue paper and fold it until it forms a small triangle.
- Snip Small Shapes: Use your scissors to carefully cut small shapes out of the folded edges of the triangle.
- Unfold and String: Gently unfold the paper to reveal your pattern, then thread your yarn or string through the top edges.
- Make a Banner: Continue creating squares and stringing them together until you have a festive banner to hang up!
Bean Mosaic Art
Create a textured, earthy masterpiece inspired by traditional Mexican folk art! This bean mosaic is a wonderful way for kids to explore different shapes, sizes, and colors while celebrating one of Mexico’s most important staple foods.
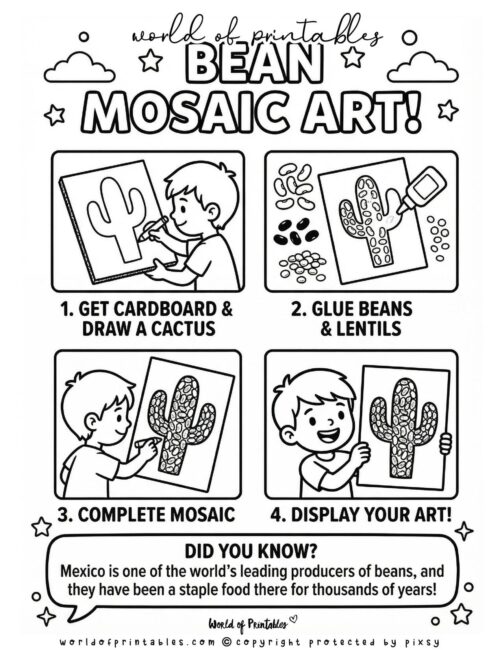
How to Make Bean Mosaic Art(Using The Little Maker’s Visual Guide)
Materials Needed:
- Cardboard: A sturdy base to support the weight of your bean masterpiece.
- Markers: To draw your initial cactus shape or any other festive design.
- Glue: To securely bond your beans and lentils to the cardboard base.
- Dried Beans & Lentils: A variety of different colored beans to create a textured, colorful mosaic.
To get the best results, we recommend printing out our The Little Maker’s Visual Guide to keep on the table during the craft.
- Get Cardboard & Draw a Shape: Start by finding a sturdy piece of cardboard and using a marker to draw a large, simple shape – Cactus, guitar, flower, sun, etc.
- Glue Beans & Lentils: Apply glue to small sections of your drawing and carefully press various dried beans and lentils into the glue.
- Complete Mosaic: Continue gluing and placing your beans until the entire shape is filled with a beautiful, textured pattern.
- Display Your Art: Once the glue is completely dry, your earthy and vibrant mosaic is ready to be shown off as part of your fiesta decor!
Paper Plate Guacamole & Chips
Get ready for some delicious pretend play with this fun and interactive paper plate craft! Kids can “whip up” a batch of chunky guacamole and crunchy tortilla chips, perfect for a festive Cinco de Mayo role-play session.

How to Make Paper Plate Guacamole & Chips (Using The Little Maker’s Visual Guide)
Materials Needed:
- Paper Plates: You’ll need two plates—one for the guacamole bowl and one to cut into chips.
- Green Paint: To give your guacamole that classic, creamy avocado color.
- Tissue Paper Scraps: For adding “chunky” textures like onions and tomatoes to your dip.
- Scissors & Glue: To cut out your chips and secure your guacamole toppings in place.
To get the best results, we recommend printing out our The Little Maker’s Visual Guide to keep on the table during the craft.
- Paint the Plate: Paint the center of one paper plate a vibrant green to serve as your bowl of guacamole.
- Add Chunks: Glue small, scrunched-up pieces of tissue paper onto the green paint to give your dip a chunky, realistic texture.
- Make Chips: Take a second paper plate and cut it into several small triangles to create your “crunchy” tortilla chips.
- Dip & Pretend to Eat: Use your new paper chips to scoop up the pretend guacamole and enjoy a festive “snack”!
That’s a Wrap on Our Fiesta!
It’s pretty incredible how a simple stack of kitchen supplies can turn into a whole celebration of flags, fun, and tacos. We hope these step-by-step guides make your next rainy afternoon or Cinco de Mayo project a little easier (and a lot more fun). There really is no right or wrong way to do it – just grab the glue, pick a project, and see where the afternoon takes you!
More Fun Crafts & Printables
Check out these other free resources:
- Printable Cinco De Mayo Word Searches
- Cinco de Mayo Coloring Pages
- 10 Creative & Easy Paper Plate Crafts for Kids
- Pipe Cleaner Crafts: 10 Easy & Colorful DIY Ideas
- Popsicle Stick Crafts: 10 Fun & Easy DIY Ideas
- Mother’s Day Crafts for Kids: Easy DIY Gift Ideas
- Easter Crafts for Kids: Fun DIY Activities for Little Makers
- Spring Crafts for Kids: Fun, Floral, and Eco-Friendly!
- Earth Day Crafts for Kids: Turn Trash into Treasure!
Follow World of Printables on Pinterest
COPYRIGHT
The printables that you find here are the copyright of World of Printables – you cannot redistribute or sell any of these printables or templates, although you can link back to our website.
AI TRANSPARENCY: Whilst the majority of our creations have been created completely traditionally, occasionally we utilize AI tools in our design process. We acknowledge the advancements in AI technology and leverage them responsibly to optimize our creative output. However, it is important to note that our utilization of AI does not compromise the human element of our work. Our commitment to delivering high-quality designs through a balanced integration of traditional expertise and AI enhancements remains paramount.