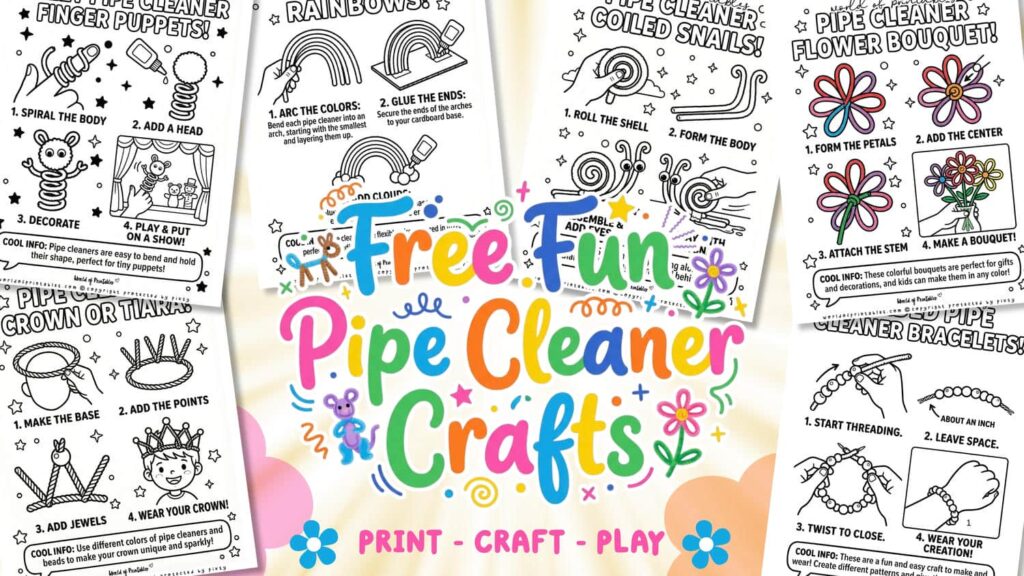
Pipe cleaners are a staple in any craft bin for a reason. You can twist, bend, and curl them into almost anything without needing hours to dry or a messy cleanup. These projects are perfect for a quick creative session or a rainy afternoon. They’re colorful, inexpensive, and a great way for hands to stay busy.
Check out these 10 ideas to transform those fuzzy wires into something fun!
Scroll down to find your favorite project, click any Visual Guide image to open the printable PDF, and let’s start creating something fun!
💡 Teacher/Parent Tip: Print out The Little Maker’s Visual Guide and set it on the table. It’s designed so kids can follow the pictures and lead the craft themselves – giving them a huge boost of “I did it!” confidence!
Beaded Pipe Cleaner Bracelets
Pipe cleaners make the perfect “needle” for threading beads, making this a fantastic project for younger kids who might struggle with thin string. They are a fun and easy way to create custom jewelry that kids can wear or gift to friends.
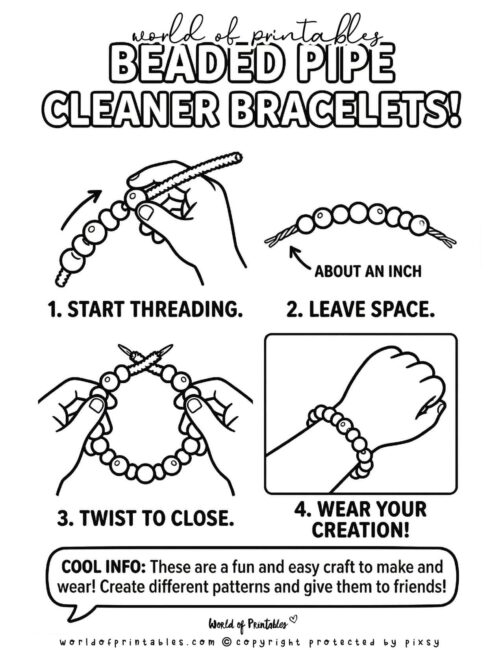
How to Make a Beaded Pipe Cleaner Bracelets (Using The Little Maker’s Visual Guide)
Materials Needed:
- Pipe Cleaners: To act as the flexible base for your colorful jewelry.
- Pony Beads: For creating different patterns and adding a splash of color.
To get the best results, we recommend printing out our The Little Maker’s Visual Guide to keep on the table during the craft.
- Start Threading: Slide your favorite beads onto the pipe cleaner in whatever pattern you like.
- Leave Space: Make sure to leave about an inch of bare wire at both ends of the stick.
- Twist to Close: Wrap the two ends together firmly to fit your wrist.
- Wear Your Creation: Your custom bracelet is ready to show off or share!
Pipe Cleaner Bubble Wands
Custom bubble wands are a fantastic way to upgrade outdoor playtime. Because pipe cleaners are so flexible, kids can experiment with making bubbles in all sorts of fun, unique shapes.

How to Make Pipe Cleaner Bubble Wands (Using The Little Maker’s Visual Guide)
Materials Needed:
- Pipe Cleaners: To bend into creative shapes that hold plenty of bubble solution.
- Pony Beads: For decorating the handle and making it easier for small hands to grip.
To get the best results, we recommend printing out our The Little Maker’s Visual Guide to keep on the table during the craft.
- Form the Loop: Twist the top of your pipe cleaner into a fun shape like a circle, a heart, or a star.
- Straighten the Handle: Keep the bottom half of the pipe cleaner straight to act as your wand’s handle.
- Decorate: Slide a few colorful beads onto the handle for a custom look.
- Make Bubbles: Dip your wand into a bubble solution and head outside to play!
Pipe Cleaner Christmas Trees
These mini evergreens are a great lesson in layering and sizing. They look wonderful as desk decorations or can be turned into ornaments by adding a small loop at the top.
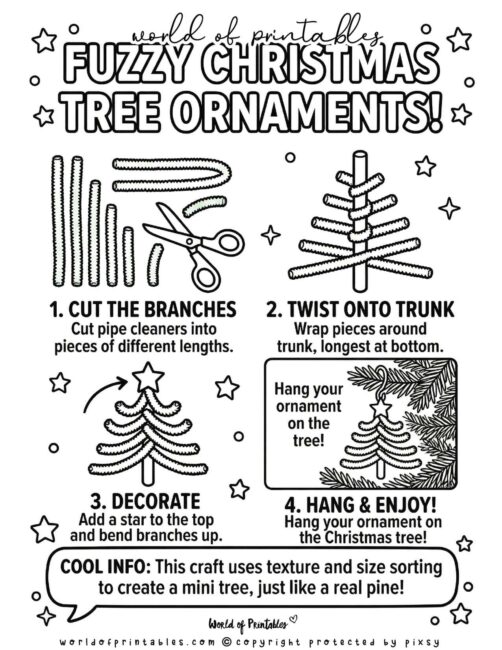
How to Make Pipe Cleaner Christmas Trees (Using The Little Maker’s Visual Guide)
Materials Needed:
- Green Pipe Cleaners: To create the lush, needle-like branches of the tree.
- Wooden Bead or Craft Stick: To act as the solid “trunk” or central support for the tree.
- Scissors: To cut the pipe cleaners into different lengths for the tiered branches.
- Small Star or Bead: To place at the very top as a festive tree topper.
To get the best results, we recommend printing out our The Little Maker’s Visual Guide to keep on the table during the craft.
- Cut the Branches: Use your scissors to cut green pipe cleaners into pieces of varying lengths, making sure you have a mix of long, medium, and short segments.
- Twist onto Trunk: Wrap the pipe cleaner pieces around your bead or stick, starting with the longest pieces at the bottom.
- Layer Up: Continue wrapping the shorter pieces as you move up the trunk to create the classic triangle tree shape.
- Final Flourish: Add your star or bead to the top and bend the branches slightly to give the tree some dimension.
Pipe Cleaner Dancing Fairies
These bendable figures are perfect for imaginative play, allowing kids to create their own magical fairy ballet. Because their arms and legs are so flexible, they can be posed in any dance move you can imagine.
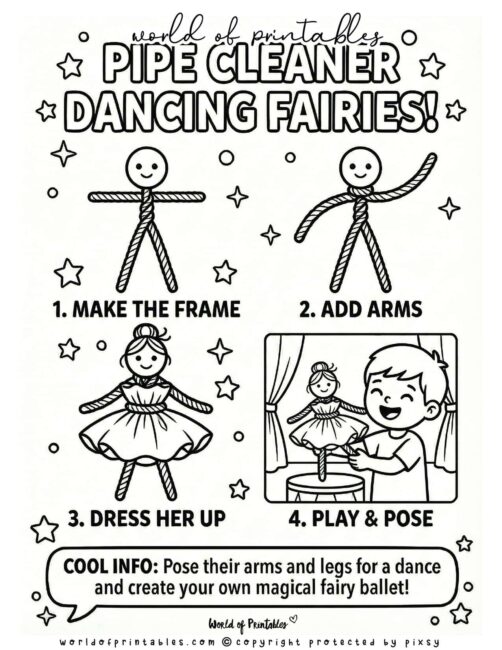
How to Make Pipe Cleaner Dancing Fairies (Using The Little Maker’s Visual Guide)
Materials Needed:
- Pipe Cleaners: To build the poseable frame for the fairy’s body, arms, and legs.
- Large Wooden Bead: To serve as a smooth, round head for the fairy.
- Fabric or Paper Scrap: To wrap around the waist as a fluttering, decorative dress.
To get the best results, we recommend printing out our The Little Maker’s Visual Guide to keep on the table during the craft.
- Make the Frame: Loop a pipe cleaner through the wooden bead to secure the head, then twist the bottom to form the body and two legs.
- Add Arms: Wrap another pipe cleaner around the “neck” area just below the bead to create two poseable arms.
- Dress Her Up: Wrap a scrap of fabric or paper around the middle to make a skirt and secure it with a small twist.
- Play & Pose: Move the arms and legs into different positions to make your fairy dance or fly!
Fuzzy Pipe Cleaner Finger Puppets
Pipe cleaners are easy to bend and hold their shape, which makes them the perfect material for crafting tiny puppets. These are great for quick classroom activities or at-home theater games because they are so simple for kids to assemble.
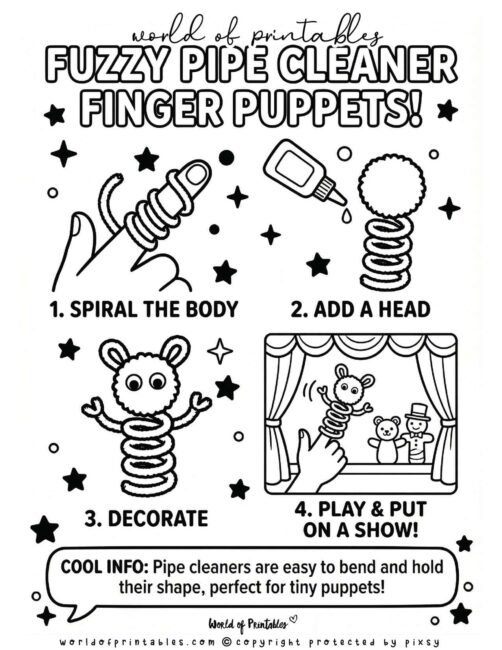
Fuzzy Pipe Cleaner Finger Puppets (Using The Little Maker’s Visual Guide)
Materials Needed:
- Pipe Cleaners: To create the flexible, coiled body that sits comfortably on a finger.
- Craft Glue: To securely attach the head and any decorative elements.
- Pom-Poms: To act as the fuzzy head of your puppet character.
- Googly Eyes: To give your puppets a lively expression and personality.
To get the best results, we recommend printing out our The Little Maker’s Visual Guide to keep on the table during the craft.
- Spiral the Body: Carefully wrap a pipe cleaner around your finger to create a sturdy, spring-like coil.
- Add a Head: Apply a drop of glue to the top of the coil and press a pom-pom onto it to form the head.
- Decorate: Stick on googly eyes and use small pipe cleaner scraps to add ears, arms, or even a tail.
- Play & Put on a Show: Once the glue is dry, slide the puppet back on your finger and start your performance!
Pipe Cleaner Flower Bouquet
These colorful bouquets are perfect for gifts and decorations, and kids can make them in any color they imagine. They are a wonderful way to bring a permanent pop of “bloom” to a room without any of the maintenance of real flowers.

How to Make a Pipe Cleaner Flower Bouquet (Using The Little Maker’s Visual Guide)
Materials Needed:
- Colorful Pipe Cleaners: To form the vibrant petals and the bright center of each flower.
- Green Pipe Cleaners: To serve as the sturdy stems that hold your bouquet upright.
- Small Vase or Jar: To display your finished collection of flowers.
To get the best results, we recommend printing out our The Little Maker’s Visual Guide to keep on the table during the craft.
- Form the Petals: Bend a colorful pipe cleaner into several loops and twist them together at the base to create the flower shape.
- Add the Center: Coil a small piece of a different colored pipe cleaner into a tight spiral and press it into the middle of the petals.
- Attach the Stem: Twist a green pipe cleaner around the bottom of the flower head and add a small loop for a leaf.
- Make a Bouquet: Create several flowers in different colors and arrange them in your vase for a beautiful display!
Pipe Cleaner Superhero Masks
These masks are a fantastic way to spark imaginative play and help kids create their own unique superhero identities. Because they are made of soft pipe cleaners, they are lightweight and comfortable for all-day heroics.
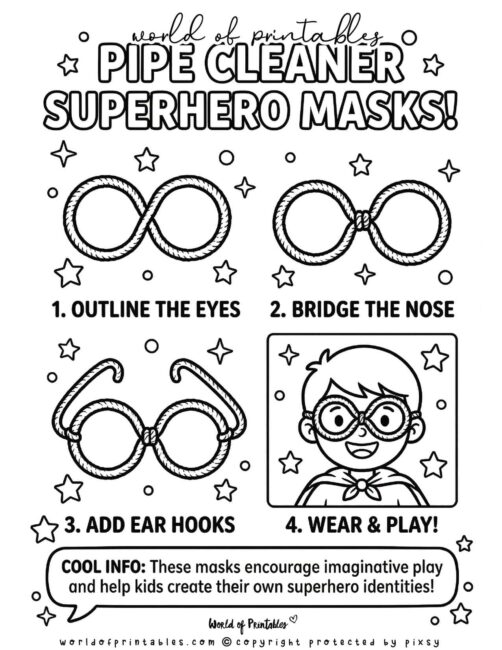
How to Make Pipe Cleaner Superhero Masks (Using The Little Maker’s Visual Guide)
Materials Needed:
- Pipe Cleaners: To build the sturdy frame for the eyes and the ear hooks.
- Scraps of Pipe Cleaner: To bridge the nose and secure the different sections together.
To get the best results, we recommend printing out our The Little Maker’s Visual Guide to keep on the table during the craft.
- Outline the Eyes: Twist a long pipe cleaner into a “figure eight” shape to create the two eye openings.
- Bridge the Nose: Use a smaller piece of pipe cleaner to wrap around the center of the “eight,” reinforcing the bridge for the nose.
- Add Ear Hooks: Attach two more pipe cleaners to the outer edges of the eyes and bend them into hooks that fit comfortably over the ears.
- Wear & Play: Put on your new mask and let the superhero adventures begin!
Pipe Cleaner Rainbows
Creating a 3D rainbow is a wonderful way to brighten up a room while practicing color sorting and layering. These fuzzy arches stay perfectly in place once glued, making them a great desk accessory.
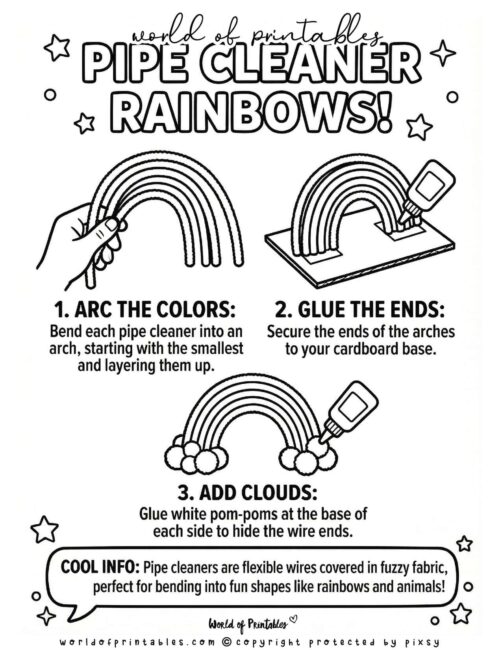
How to Make a Pipe Cleaner Rainbow (Using The Little Maker’s Visual Guide)
Materials Needed:
- Colorful Pipe Cleaners: To create the vibrant, fuzzy arches of the rainbow.
- Cardboard Base: To provide a sturdy foundation for your rainbow to stand on.
- Craft Glue: To secure the wire ends and the fluffy clouds in place.
- White Pom-Poms: To act as soft, fluffy clouds at the base of your rainbow.
To get the best results, we recommend printing out our The Little Maker’s Visual Guide to keep on the table during the craft.
- Arc the Colors: Bend each pipe cleaner into an arch, starting with the smallest color and layering the others over the top.
- Glue the Ends: Apply glue to your cardboard base and secure the ends of the arches so they stand upright.
- Add Clouds: Glue white pom-poms around the base of the arches on both sides to hide the wire ends and complete the look.
Pipe Cleaner Coiled Snails
These little snails are a fun way to use spirals to create texture and shape. Snails move by gliding along on a muscular “foot,” and while these pipe cleaner versions won’t leave a slimy trail, they make for adorable desk companions.
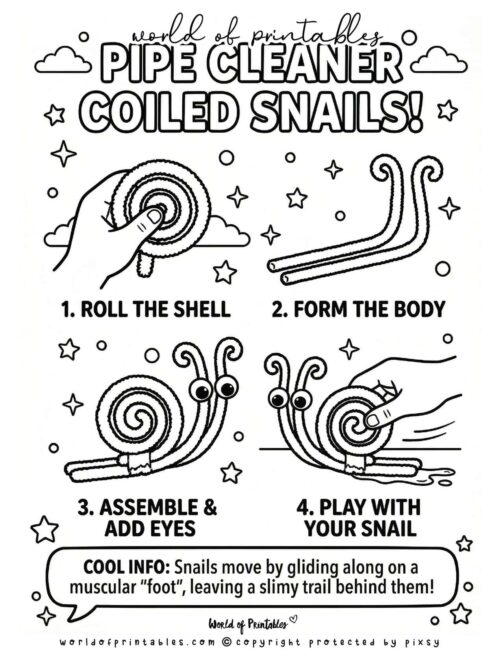
How to Make a Coiled Snail (Using The Little Maker’s Visual Guide)
Materials Needed:
- Pipe Cleaners: One for the colorful, spiraled shell and another for the snail’s body.
- Googly Eyes: To give your snail a curious and friendly face.
- Craft Glue: To secure the eyes to the antennae and hold the shell in place.
To get the best results, we recommend printing out our The Little Maker’s Visual Guide to keep on the table during the craft.
- Roll the Shell: Start at one end of a pipe cleaner and roll it into a tight, flat spiral to form the shell.
- Form the Body: Bend a second pipe cleaner into a long “U” shape, curling the ends outward to create the antennae.
- Assemble & Add Eyes: Glue the shell onto the flat “foot” of the body and attach googly eyes to the antennae.
- Play With Your Snail: Your new garden friend is ready to glide around your play area!
Pipe Cleaner Crowns
Every little royal needs a crown, and these are much more comfortable than plastic versions because they can be custom-shaped to fit any head size. They are soft, lightweight, and perfect for adding a bit of royal flair to a birthday party or dress-up day.
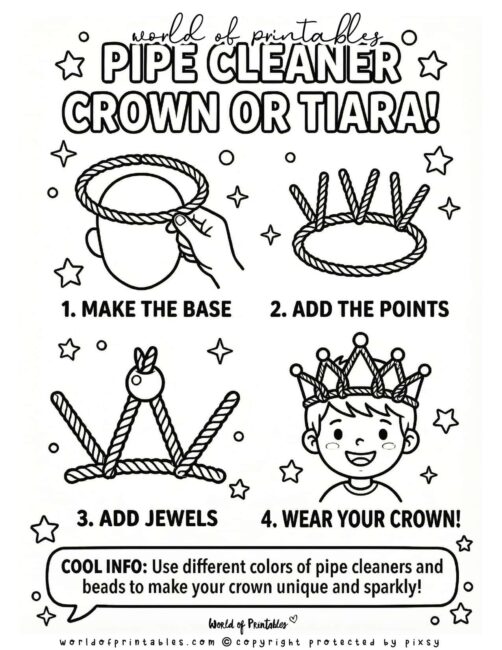
How to Make Pipe Cleaner Crowns (Using The Little Maker’s Visual Guide)
Materials Needed:
- Metallic Pipe Cleaners: To give the crown a classic gold or silver royal shimmer.
- Colorful Beads: To act as the “jewels” that sparkle along the points of the crown.
- Pipe Cleaner Scraps: For twisting on extra reinforcements or tiny decorative details.
To get the best results, we recommend printing out our The Little Maker’s Visual Guide to keep on the table during the craft.
- Create the Base: Twist two long pipe cleaners together to form a sturdy circle that fits comfortably around your head.
- Add the Points: Bend several pipe cleaners into “V” shapes and twist the ends onto the front of the base to create the crown’s peaks.
- Add the Jewels: Before twisting the points shut, slide your favorite colorful beads onto them to act as sparkling gems.
- Final Flourish: Curve the tips of the points for an elegant look and add extra beads along the base to make it extra fancy.
Keep the Creativity Twisting!
By turning simple fuzzy wires into handmade treasures, you’re showing that a little imagination can turn the everyday into something extraordinary. We hope these Visual Guides inspire your family to grab a pack of pipe cleaners and start twisting something wonderful together!
If you’re looking for more ways to stay creative, don’t miss our Ultimate Collection of Crafts for Kids!
More Fun Crafts & Printables
Check out these other free resources:
- Popsicle Stick Crafts: 10 Fun & Easy DIY Ideas
- Mother’s Day Crafts for Kids: Easy DIY Gift Ideas
- Easter Crafts for Kids: Fun DIY Activities for Little Makers
- Spring Crafts for Kids: Fun, Floral, and Eco-Friendly!
- Earth Day Crafts for Kids: Turn Trash into Treasure!
Follow World of Printables on Pinterest
COPYRIGHT
The printables that you find here are the copyright of World of Printables – you cannot redistribute or sell any of these printables or templates, although you can link back to our website.
AI TRANSPARENCY: Whilst the majority of our creations have been created completely traditionally, occasionally we utilize AI tools in our design process. We acknowledge the advancements in AI technology and leverage them responsibly to optimize our creative output. However, it is important to note that our utilization of AI does not compromise the human element of our work. Our commitment to delivering high-quality designs through a balanced integration of traditional expertise and AI enhancements remains paramount.