
Looking for a craft that uses supplies you already have in the kitchen? Paper plates are the ultimate DIY secret weapon! They are sturdy, inexpensive, and perfectly shaped for everything from wild animals to bright sunshine.
Whether you’re looking for a quick rainy-day activity or a fun way to practice fine motor skills, these paper plate projects are simple enough for toddlers but leave plenty of room for older kids to get creative. Grab your paint and glue – it’s time to transform those plates!
Scroll down to find your favorite project, click any Visual Guide image to open the printable PDF, and let’s start creating something fun!
💡 Teacher/Parent Tip: Print out The Little Maker’s Visual Guide and set it on the table. It’s designed so kids can follow the pictures and lead the craft themselves – giving them a huge boost of “I did it!” confidence!
Rainbow Cloud Hanger
Transform a simple kitchen staple into a vibrant piece of room decor! This craft is perfect for practicing cutting and stapling while exploring all the colors of the rainbow.
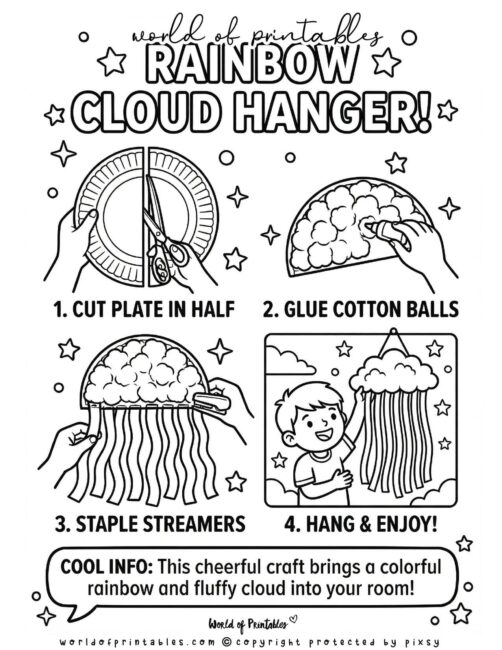
How to Make a Rainbow Cloud Hanger (Using The Little Maker’s Visual Guide)
Materials Needed:
- Paper Plate: To serve as the sturdy base for your fluffy cloud once it’s cut in half.
- Cotton Balls: For gluing onto the plate to create a soft, 3D cloud texture.
- Crepe Paper Streamers: In various colors to create long, flowing rainbow tails.
- Stapler & Glue: To securely attach your rainbow strips and cotton cloud.
To get the best results, we recommend printing out our The Little Maker’s Visual Guide to keep on the table during the craft.
- Cut Plate in Half: Carefully cut your paper plate directly down the middle to create two semi-circle cloud shapes.
- Glue Cotton Balls: Apply glue across the plate and press cotton balls down until the surface is completely covered and fluffy.
- Staple Streamers: Cut long strips of colorful streamers and staple them along the straight bottom edge of the plate.
- Hang & Enjoy: Attach a string to the top of your plate and find a breezy spot to display your colorful creation!
Paper Plate Tambourine
Transform two simple paper plates into a loud and lively musical instrument! This craft is a fantastic way to explore rhythm and sound while making a DIY toy for your own mini-marching band.
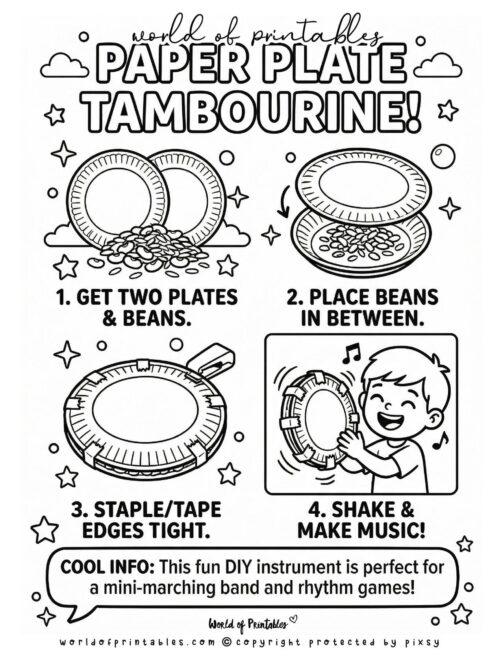
How to Make a Paper Plate Tambourine (Using The Little Maker’s Visual Guide)
Materials Needed:
- Paper Plates: To form the sturdy body of your tambourine by sandwiching them together.
- Dried Beans or Rice: For placing inside the plates to create a satisfying rattling sound when shaken.
- Stapler or Strong Tape: To seal the edges tightly so your “musical” filling stays safely inside.
- Markers or Stickers: For decorating the outside of your plates to make your instrument look as good as it sounds.
To get the best results, we recommend printing out our The Little Maker’s Visual Guide to keep on the table during the craft.
- Get Two Plates & Beans: Start with two clean paper plates and a small handful of dried beans or rice.
- Place Beans in Between: Carefully pour your beans onto the center of one plate and cover it with the second plate facing down.
- Staple/Tape Edges Tight: Use a stapler or strong tape to seal the rims of the plates together all the way around the edge.
- Shake & Make Music: Once secured, your tambourine is ready! Give it a shake to start your own rhythm game.
Paper Plate Rocking Crab
Get ready to make a crustacean that actually moves! This rocking crab craft uses the natural curve of a paper plate to mimic the swaying motion of the ocean waves.
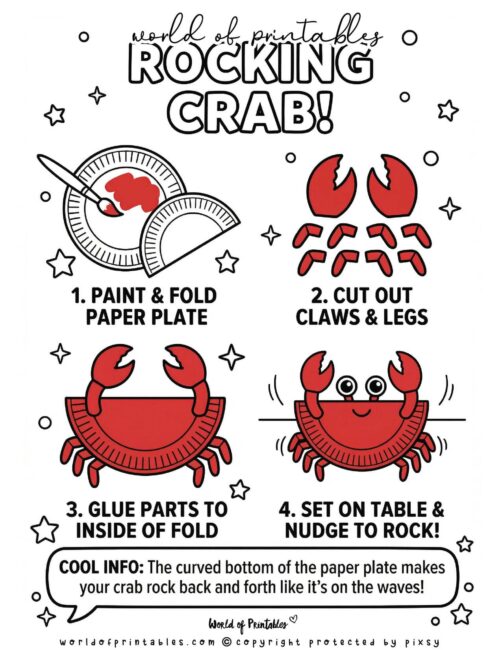
How to Make a Rocking Crab (Using The Little Maker’s Visual Guide)
Materials Needed:
- Paper Plate: To serve as the crab’s colorful body that rocks back and forth.
- Red Paint & Brush: For giving your crab its classic, bright ocean color.
- Red Cardstock: To cut out two strong claws and six little legs.
- Glue & Googly Eyes: To securely attach the limbs and give your crab a friendly face.
To get the best results, we recommend printing out our The Little Maker’s Visual Guide to keep on the table during the craft.
- Paint & Fold Paper Plate: Paint the entire back of your plate red and, once dry, fold it exactly in half.
- Cut Out Claws & Legs: Use your red cardstock to cut out two large pincer claws and six small, bent legs.
- Glue Parts to Inside of Fold: Carefully glue the legs and claws to the inside rim of the folded plate so they stick out.
- Set on Table & Nudge to Rock: Add a face, set your crab on a flat surface, and give it a little push to watch it rock!
Paper Plate Jellyfish
Dive into a deep-sea adventure right at your crafting table! This wiggly jellyfish is a fun way to explore colors and textures while creating a beautiful ocean friend that actually “swims” through the air.
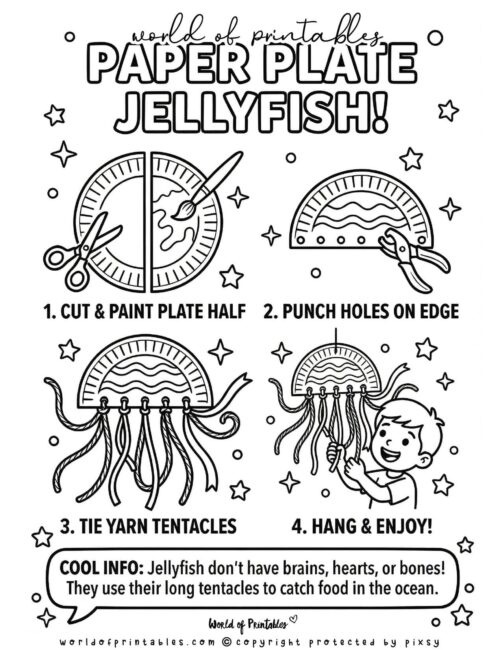
How to Make a Paper Plate Jellyfish (Using The Little Maker’s Visual Guide)
Materials Needed:
- Paper Plate: To serve as the jellyfish’s bell-shaped body once it is cut and painted.
- Paint & Brush: For giving your sea creature a vibrant underwater glow in any color you choose.
- Hole Puncher: To create neat, even holes along the bottom edge for the tentacles.
- Yarn or Ribbon: For tying long, colorful tentacles that wiggle and sway when you move the plate.
To get the best results, we recommend printing out our The Little Maker’s Visual Guide to keep on the table during the craft.
- Cut & Paint Plate Half: Carefully cut your paper plate in half and paint the semi-circle to create the jellyfish’s body.
- Punch Holes on Edge: Use a hole puncher to make several evenly spaced holes along the straight bottom edge of the plate.
- Tie Yarn Tentacles: Thread long pieces of yarn or ribbon through each hole and tie them securely to create wiggly tentacles.
- Hang & Enjoy: Attach a string to the top of the plate so you can hang your jellyfish up and watch it “swim” in the breeze!
Sunshine Wreath
Brighten up any room with this cheerful Sunshine Wreath! It is a simple, sunny project that is perfect for a rainy day and makes a wonderful decoration for any bedroom door.
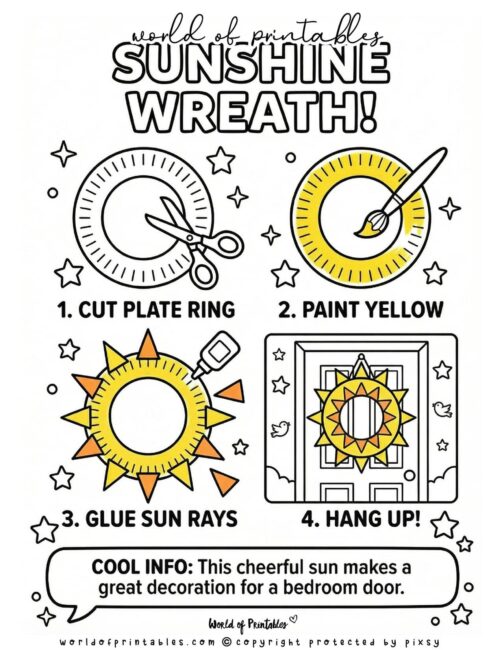
How to Make a Sunshine-Wreath (Using The Little Maker’s Visual Guide)
Materials Needed:
- Paper Plate: To serve as the sturdy base for your sun wreath once the center is removed.
- Yellow Paint & Brush: For giving your wreath its bright, glowing sunshine color.
- Construction Paper: To cut out orange and yellow triangles that will become your vibrant sun rays.
- Glue & Scissors: To carefully cut your plate into a ring and securely attach your paper sunbeams.
To get the best results, we recommend printing out our The Little Maker’s Visual Guide to keep on the table during the craft.
- Cut Plate Ring: Carefully cut the center circle out of your paper plate to leave just the outer ring.
- Paint Yellow: Use your brush to paint the entire ring bright yellow and set it aside to dry completely.
- Glue Sun Rays: Cut out several small triangles from your construction paper and glue them all around the outer edge of the ring.
- Hang Up: Once the glue is dry, find a sunny spot or a bedroom door to display your cheerful new creation!
Paper Plate Dinosaur
Bring the Jurassic era to your living room! This simple 3D dinosaur craft is perfect for little paleontologists to build their very own prehistoric friend.

How to Make a Paper Plate Dinosaur (Using The Little Maker’s Visual Guide)
Materials Needed:
- Paper Plate: To serve as the sturdy, curved body of your dinosaur once it is cut in half.
- Scissors: For carefully cutting the plate into a body and crafting the neck, tail, and legs.
- Stapler: To securely attach all the prehistoric limbs and parts to the main body.
- Green Paint & Brush: For giving your dinosaur its classic, vibrant prehistoric look.
To get the best results, we recommend printing out our The Little Maker’s Visual Guide to keep on the table during the craft.
- Cut Plate in Half: Start by carefully cutting your paper plate exactly in half to create the main body semi-circle.
- Cut Out Parts: Use the remaining plate pieces to cut out a long neck, a tail, and sturdy legs for your creature.
- Staple & Paint: Staple the neck, tail, and legs onto the body semi-circle, then paint the entire dinosaur green.
- Play with Your Pet: Once the paint is dry, your unique 3D dinosaur is ready for a prehistoric adventure!
Paper Plate Lion
Get ready to hear a mighty roar! This cheerful lion craft is a fun way for kids to play with colors and textures while creating the king of the jungle right at home.
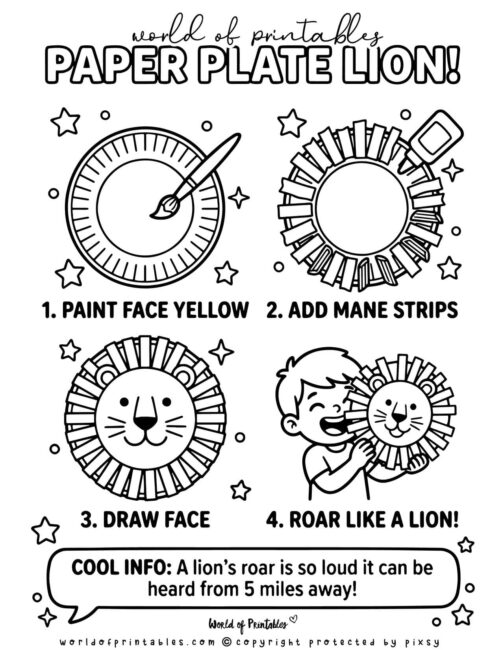
How to Make a Paper Plate Lion (Using The Little Maker’s Visual Guide)
Materials Needed:
- Paper Plate: To serve as the sturdy, round base for your lion’s friendly face.
- Yellow Paint: For giving your lion its classic, golden jungle glow.
- Construction Paper Strips: To create a thick, bushy mane all around the edge of the plate.
- Markers & Glue: To draw on the whiskers and securely attach the mane pieces.
To get the best results, we recommend printing out our The Little Maker’s Visual Guide to keep on the table during the craft.
- Paint Face Yellow: Use a brush to cover the entire center of your paper plate with bright yellow paint and let it dry.
- Add Mane Strips: Glue or staple strips of orange and yellow paper all the way around the outer rim to build a wild mane.
- Draw Face: Use a black marker to draw on a nose, a big smile, and some whiskers, then add your googly eyes.
- Roar Like a Lion: Hold up your finished masterpiece and practice your best jungle roar
Creative Paper Plate Mask
Step into a new character with this easy DIY mask! Whether it’s for a costume party or just an afternoon of imaginative play, these masks are simple to make and completely customizable.
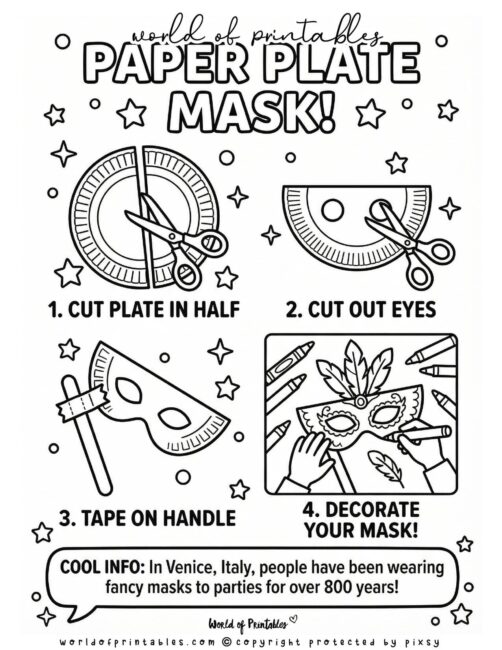
How to Make a Paper Plate Mask (Using The Little Maker’s Visual Guide)
Materials Needed:
- Paper Plate: To serve as the sturdy base for your mask that covers your face perfectly.
- Scissors: For cutting the plate in half and carefully snipping out holes for the eyes.
- Popsicle Stick: To act as a convenient handle so you can hold your mask up while you play.
- Tape & Decorations: To securely attach the handle and add markers, feathers, or glitter for a unique look.
To get the best results, we recommend printing out our The Little Maker’s Visual Guide to keep on the table during the craft.
- Cut Plate in Half: Start by carefully cutting your paper plate exactly in half to create the base for your mask.
- Cut Out Eyes: Use your scissors to cut out two small circles so you can see through your mask once it’s finished.
- Tape on Handle: Tape a large popsicle stick or wooden dowel to the bottom corner of the mask to act as a handle.
- Decorate Your Mask: Use markers, crayons, or feathers to decorate your mask and make it truly one-of-a-kind!
Paper Plate Snail
Slow and steady wins the race with this colorful snail craft! It’s a great way for kids to practice drawing spirals and working with different shapes.
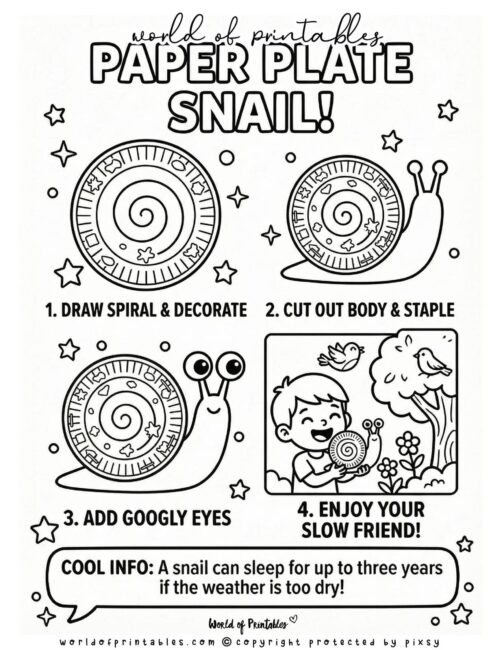
How to Make a Paper Plate Snail (Using The Little Maker’s Visual Guide)
Materials Needed:
- Paper Plate: To serve as the snail’s large, round shell—perfect for decorating with bright patterns.
- Cardstock or Construction Paper: To cut out a sturdy, long body for your snail to “crawl” on.
- Googly Eyes: To give your snail a friendly face and bring its personality to life.
- Markers or Paint: For drawing a big, beautiful spiral on the back of the shell.
To get the best results, we recommend printing out our The Little Maker’s Visual Guide to keep on the table during the craft.
- Draw Spiral & Decorate: Use your markers or paint to draw a large spiral on the back of the paper plate and add fun decorations all over the shell.
- Cut Out Body & Staple: Carefully cut a long, curved shape out of cardstock for the snail’s body and staple the decorated shell onto it.
- Add Googly Eyes: Place two large googly eyes at the top of the snail’s head to give your new friend a happy, curious face.
- Enjoy Your Slow Friend: Your colorful snail is now finished and ready to display or join in on some slow-speed playtime!
Paper Plate Ladybug
This bright and cheerful ladybug is one of the easiest crafts for little hands. It’s a classic project that helps kids practice painting shapes and counting out spots!
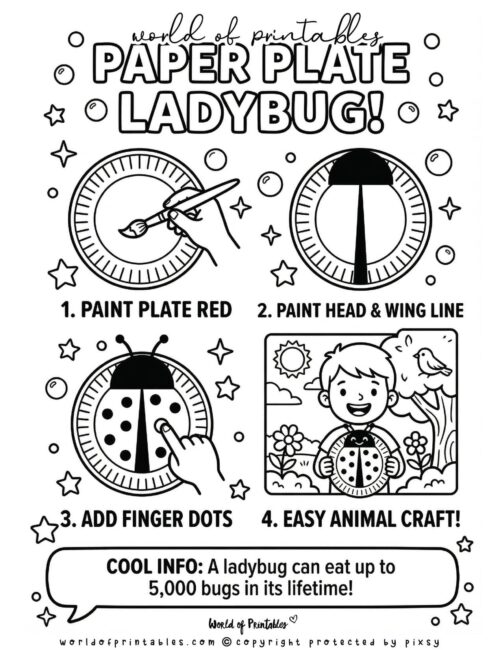
How to Make Paper Plate Ladybug (Using The Little Maker’s Visual Guide)
Materials Needed:
- Paper Plate: To form the large, round body and wings of your ladybug.
- Red and Black Paint: For creating the vibrant wing colors and adding the classic black spots.
- Paintbrush: For spreading the red paint evenly across the base of your plate.
- Your Fingers!: To dip into the black paint and press perfectly sized dots onto the wings.
To get the best results, we recommend printing out our The Little Maker’s Visual Guide to keep on the table during the craft.
- Paint Plate Red: Use your brush to cover the entire back of the paper plate with bright red paint and let it dry completely.
- Paint Head & Wing Line: Paint a black semi-circle at the top for the head and a thick black line down the center to separate the wings.
- Add Finger Dots: Dip your finger into black paint and press it onto the red wings to add plenty of ladybug spots.
- Easy Animal Craft: Your cheerful ladybug is now finished and ready to bring some color to your garden or playroom!
That’s a Wrap on Paper Plates!
It’s pretty incredible how a simple stack of kitchen supplies can turn into a whole zoo of lions, snails, and dinosaurs. We hope these step-by-step guides make your next rainy afternoon or weekend project a little easier (and a lot more fun). There really is no right or wrong way to do it – just grab the glue, pick a plate, and see where the afternoon takes you!
If you’re looking for more ways to stay creative, don’t miss our Ultimate Collection of Crafts for Kids!
More Fun Crafts & Printables
Check out these other free resources:
- Pipe Cleaner Crafts: 10 Easy & Colorful DIY Ideas
- Popsicle Stick Crafts: 10 Fun & Easy DIY Ideas
- Mother’s Day Crafts for Kids: Easy DIY Gift Ideas
- Easter Crafts for Kids: Fun DIY Activities for Little Makers
- Spring Crafts for Kids: Fun, Floral, and Eco-Friendly!
- Earth Day Crafts for Kids: Turn Trash into Treasure!
Follow World of Printables on Pinterest
COPYRIGHT
The printables that you find here are the copyright of World of Printables – you cannot redistribute or sell any of these printables or templates, although you can link back to our website.
AI TRANSPARENCY: Whilst the majority of our creations have been created completely traditionally, occasionally we utilize AI tools in our design process. We acknowledge the advancements in AI technology and leverage them responsibly to optimize our creative output. However, it is important to note that our utilization of AI does not compromise the human element of our work. Our commitment to delivering high-quality designs through a balanced integration of traditional expertise and AI enhancements remains paramount.